Advanced Connector Policies in Copilot Studio

Writer

As we architect complex Copilot integrations and agentic workflows, securing the underlying data access is always the foundational step. For enterprises operating across diverse regulatory landscapes the traditional approach to Power Platform governance has often required complex workarounds.
The introduction of Advanced Connector Policies (ACP) marks a significant evolution in how we manage AI governance. It moves us away from loose categorizations and introduces a modern, flexible, and strict Zero Trust approach to managing certified connectors across Copilot Studio, Power Apps, and Power Automate.
This article is a practical, end-to-end breakdown: what changes conceptually, the prerequisites you need before you touch a single setting, a click-by-click admin walkthrough, a safe phased rollout playbook, and troubleshooting/rollback steps for when something inevitably breaks.
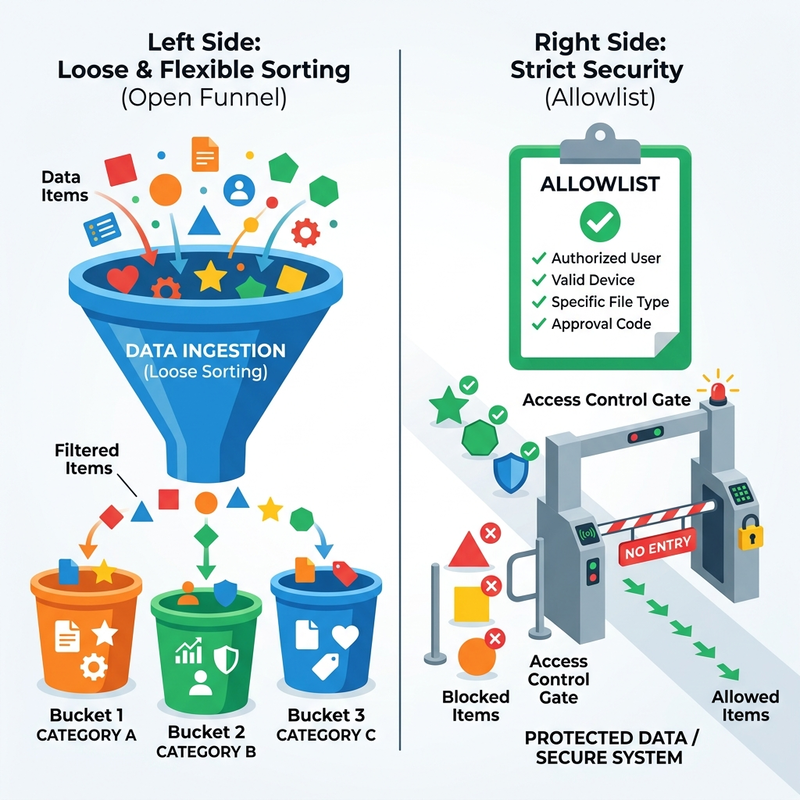
The Paradigm Shift: From Classic DLP to Default-Deny ACP
Historically, securing data within the Power Platform relied on Data Loss Prevention (DLP) policies. This classic method involved bucketing connectors into Business, Non-Business, and Blocked categories to prevent data exfiltration—for example, ensuring a corporate SharePoint document library couldn’t accidentally route data to a public X (Twitter) or Facebook connector.
While foundational, classic DLP has a critical flaw for strict enterprise environments: new connectors are usable by default. When Microsoft ships a connector, it lands in the Non-Business group and makers can start using it immediately—you have to notice it and block it after the fact.
Advanced Connector Policies flip the default posture to Deny. ACP uses a strict allowlist: every connector is blocked until you explicitly allow it. If Microsoft introduces a new connector tomorrow, it is automatically blocked in your environment until you evaluate and add it. The Business/Non-Business categorization is gone entirely—there is one allowlist, and everything else is denied.
Classic DLP vs. ACP at a glance
| Dimension | Classic DLP | Advanced Connector Policies |
|---|---|---|
| Default posture | Allow — new connectors are usable | Deny — everything blocked until allowed |
| Classification model | Business / Non-Business / Blocked buckets | Single strict allowlist (no buckets) |
| Granularity | Connector-level (+ limited endpoint filtering) | Connector and action level |
| New connectors | Available automatically | Blocked automatically |
| Deprecated/trigger visibility | None | Triggers, internal actions, and deprecated actions are tagged |
| Enforcement | Runtime (design-time in some surfaces) | Design-time and runtime (design-time rolling out per workload) |
| Scope | Environment / tenant | Environment / environment group |
| Connector coverage | All types (incl. custom, HTTP, virtual) | Certified + MCP servers only (custom/HTTP planned; virtual never) |
Preview status: ACP is in preview and applies to certified connectors (first-party and certified third-party) plus MCP servers (server-level block only). Custom connectors and HTTP are not yet supported—keep using classic DLP for those today. Virtual connectors are not supported and never will be; Copilot Studio virtual connectors continue to be governed by classic data policies for now. Validate in a non-production environment before rolling out broadly.
Prerequisites: What You Need Before You Start
This is the part most write-ups skip, and it’s where rollouts stall. Confirm all of the following first:
- Admin role. You need the Power Platform Administrator or Global Administrator role to configure ACP in the Power Platform admin center.
- Managed Environments for full control. This is the big one. ACP works on both Managed and non-Managed environments (so you can migrate off classic DLP at no extra cost), but on non-Managed environments the “nonblockable” connectors stay nonblockable. To block any connector or action—including the default nonblockable set—the environment must be a Managed Environment. Managed Environments require premium Power Platform licensing.
- An inventory of what you actually use. ACP is default-deny. Before you flip it on, list the connectors your existing apps, flows, and agents depend on—otherwise you will block live workloads. Power Platform admin analytics and the maker portals’ connector lists are good sources.
- A pilot environment. Pick a low-risk sandbox or pilot environment to validate the policy before touching production.
Don’t skip the Managed Environments check. If you build an allowlist on a non-Managed environment and expect to lock down a nonblockable connector, it simply won’t block—and you’ll waste time debugging a policy that’s working as designed.
Core Features and Capabilities
Action-Level Granularity
This is arguably the most powerful feature. You no longer have to block an entire connector because one of its functions is risky. With ACP you can allow a connector but disable specific actions, triggers, or internal actions within it. The interface also tags deprecated actions, so you can prune legacy operations that the connector publisher no longer supports. Note that once you customize the allowed actions on a connector, new actions added later are blocked by default—the strict posture applies at the action level too.
Environment and Environment Group Scoping
ACP can be applied directly to a single environment (ideal for high-risk, pilot, or regulated environments) or to an environment group for bulk deployment across many environments at once—for example, a group encompassing all “Customer-Facing” or “Regional” (country/city-bounded) environments. Each environment supports a maximum of one effective ACP, either configured directly on it or inherited from its group. If you remove an environment from a group, it keeps the last policy it inherited, which you can then adjust individually.
MCP Server Governance (Relevant for Agents)
Because ACP is built for the agentic era, it surfaces Model Context Protocol (MCP) servers alongside connectors. You can block an entire MCP server from the same allowlist. Granular control over individual MCP tools within a server isn’t available yet—today it’s all-or-nothing per server.
Design-Time Enforcement
Governance is caught while makers are authoring—not just at runtime. A maker who tries to use a blocked connector gets a clear violation error before they can publish.
Rollout order matters. Design-time enforcement is shipping per maker portal in this order: Power Automate first, then Copilot Studio, then Power Apps. Until a portal gets design-time support, ACP runs as runtime-only for that workload (the connector call fails when the app/flow/agent executes). Each portal’s design-time release is also the general availability marker for ACP on that workload.
Configuration Walkthrough: Implementing ACP in the Admin Center
Option A — Single Environment (targeted governance)
- Sign in to the Power Platform admin center (
admin.powerplatform.microsoft.com). - In the navigation pane, select Security.
- Select Data and privacy.
- Select Advanced connector policies.
- Define the policy using the connector allow/block controls (covered below) and select Save.
Option B — Environment Group (bulk deployment)
- Sign in to the admin center.
- In the navigation pane, select Manage > Environment groups.
- Open the environment group you want to govern.
- Select the Rules tab, then Advanced connector policies.
- Define the policy and select Save.
- Back on the group page, select Publish rules in the command bar. Publishing runs a lifecycle operation on every environment in the group (it appears in environment history as Update Managed Environment Settings) and cascades the policy to both design-time and runtime infrastructure.
Choosing your enforcement mode: Mixed vs. ACP-Only
You don’t have to abandon classic DLP on day one. ACP runs in two modes:
- Mixed mode (default). ACP and classic DLP both apply. At runtime, the platform merges the most restrictive settings from both systems. This is the recommended state during migration—classic DLP acts as a safety net while you build out and validate your ACP allowlist.
- ACP-only mode. Classic data policy evaluation is skipped entirely; only ACP rules are enforced. Your DLP configs aren’t deleted—they’re just ignored while ACP-only is active. Enable this once you’ve fully migrated, to eliminate the confusion of two policy engines.
To enable ACP-only mode:
- Single environment: under Security > Data and privacy, enable Advanced connector policies only.
- Environment group: under the group’s Rules tab, enable the Advanced connector policies only rule.
Tip: Changes can take up to 24 hours to propagate per the UI, but in practice typically resolve within 1–2 minutes depending on tenant latency. After saving, check the Status property at the top of the policy panel—Applied confirms enforcement is live for that scope.
Managing the Connector Allowlist
When you open the policy, the nonblockable connectors are preloaded as allowed (a small default set—roughly two dozen). Every other certified connector (1,400+ in the catalog) starts blocked. From here:
- Add connectors → choose from the full certified catalog to allow them.
- Select a connector and Remove connector → blocks it (on Managed Environments you can remove even the default nonblockable ones).
Configuring Action-Level Controls (Least-Privilege Example)
Here’s a concrete least-privilege example using Adobe Acrobat Sign:
- Search for “Adobe” and add Adobe Acrobat Sign to your allowlist.
- Select the connector and choose Edit action.
- Toggle off everything except the actions you genuinely need—e.g.,
Get a PDF of a signed agreementandGet PDF of agreements audit trail. - Select Save. The connector is now allowed but tightly scoped.
Other common action-level scenarios:
- Notifications connector: allow
send me a mobile notificationwhile leaving the deprecatedsend me an email notificationblocked. - Microsoft To Do: block specific deprecated actions, or disable all actions if the service isn’t approved for your tenant.
Real-World Scenario: Copilot Studio Design-Time Blocking
Walk through what an agent maker actually experiences when the Notifications connector is blocked by ACP:
- The maker adds a tool/node in their Copilot Studio agent (e.g., “Send me a mobile notification”).
- On Publish, Copilot Studio throws an immediate error: “One error is preventing your agent from being published.”
- The maker downloads the error log (an Excel file).
- The log details the violation: Component type is connector blocked by ACP, naming the specific topic and the offending connector. Crucially, it highlights the ACP violation distinctly from any standard DLP violation—so you know which policy engine to fix.
- The administrator opens the ACP policy, adds the Notifications connector, enables only
Send me a mobile notification(keeping the deprecatedSend me an email notificationblocked), and saves. - The maker refreshes their Copilot Studio session and publishes successfully.
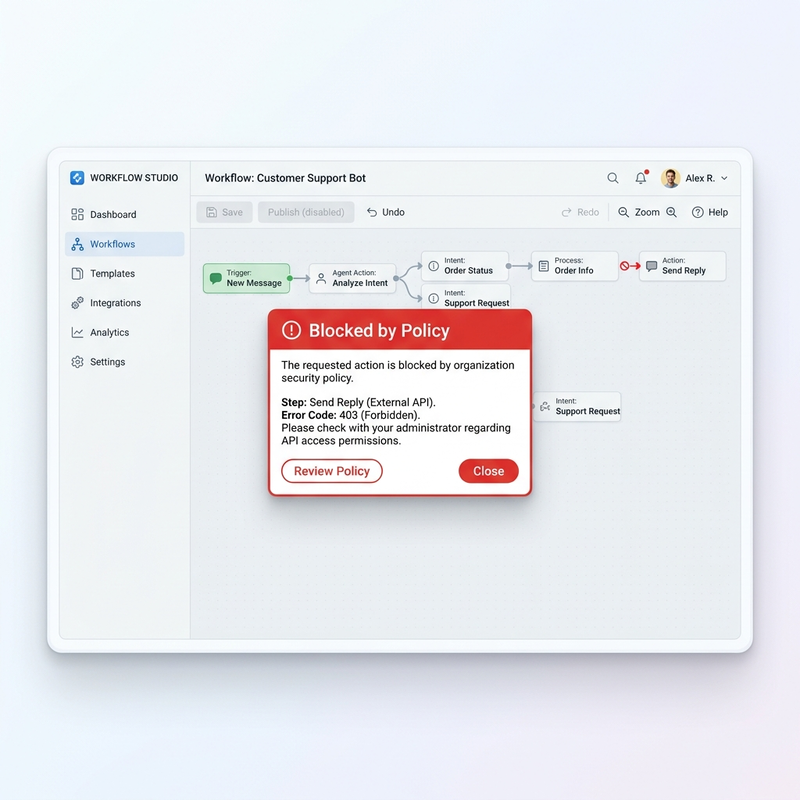
How to read the error file: filter for rows where the component type contains “connector blocked by ACP.” The row tells you the topic/component name and the connector—that’s your exact remediation target. If you instead see a DLP violation, the fix is in classic data policies, not ACP.
A Phased Rollout Playbook
Don’t enable ACP-only mode across production on day one. Roll it out in stages:
- Pilot. Choose a low-risk Managed Environment. Keep mixed mode so classic DLP still backstops you.
- Build the allowlist from reality. Add only the connectors your inventory shows are in use, then scope actions down to least-privilege.
- Test the block. In Power Automate (which gets design-time enforcement first), build a flow that uses a blocked connector and confirm you’re stopped at authoring time. Repeat in Copilot Studio for an agent.
- Verify state. Confirm the policy
Status = Applied. - Expand via environment groups. Move from the pilot to a group of similar environments and Publish rules.
- Go ACP-only. Once stable and your team trusts the allowlist, enable ACP-only mode to retire the dual-engine complexity.
- Keep a rollback ready (see below) before you flip production.
Troubleshooting & Rollback
- Disable ACP cleanly. Each policy panel (single environment and group) has a Remove rule button. Selecting it disables ACP entirely for that scope. (Previously the only ways to “turn it off” were via the API or by allowing every connector—the button is the clean path now.)
- A live workload broke after enabling ACP. You blocked something in use. Read the maker’s downloaded error file, identify the connector/action, and either add it to the allowlist or—if it’s urgent—use Remove rule to revert while you investigate. Mixed mode during rollout prevents most of these surprises.
- My block isn’t taking effect. Confirm the environment is a Managed Environment (nonblockable connectors can’t be blocked on non-Managed). Then confirm
Status = Appliedand allow propagation time. - Copilot Studio still lets the maker build the blocked node. Until design-time enforcement reaches Copilot Studio for your tenant, ACP is runtime-only for that workload—the call fails on execution rather than at publish. Verify rollout status for your tenant.
Automating at Scale with the Power Platform API
For large tenants, click-ops doesn’t scale. The Power Platform API exposes publicly documented endpoints to create and update ACP policies and move environments into groups programmatically. Bake policy creation into your environment provisioning pipeline so every new environment is born default-deny—no manual step, no window where a fresh environment is wide open.
Architectural Best Practices for Agent Governance
- Trim the defaults (Managed Environments only). Review the preloaded nonblockable connectors. If your architecture doesn’t use services like Viva Engage or OneNote, remove them to maintain least privilege. Remember: removing nonblockable connectors only takes effect on Managed Environments.
- Secure identity and AI inference workflows. When orchestrating agent identities, explicitly allow your critical enterprise connectors—for example Microsoft Entra ID (formerly Azure AD) and your Azure AI Foundry/agent inference connectors—and immediately lock their actions down with granular controls.
- Govern MCP servers deliberately. Treat each MCP server as an allow/block decision; there’s no per-tool granularity yet, so only allow servers you fully trust.
- Audit deprecated actions on a cadence. Regularly revisit allowed connectors in the ACP interface and disable any actions newly tagged as deprecated, so your agents always run on supported operations.
- Provision default-deny via API. Make new environments inherit a baseline ACP from creation rather than retrofitting governance later.
Read next