Mastering the GitHub Copilot CLI: A Comprehensive Technical Guide

Writer
Quiz available
Take a quick quiz for this article.

The GitHub Copilot CLI is rapidly evolving from a simple terminal assistant into a highly autonomous, agentic workflow engine. When paired correctly with Visual Studio Code, it can act as a fully-fledged “daily driver” that handles planning, coding, self-correction, and background process management.
In this deep dive, we explore the workflows, tips, and architectural tricks for mastering the Copilot CLI. We will cover everything from basic integration and keyboard shortcuts to building custom agents, executing autonomous coding loops, and leveraging complex orchestration like “Autopilot + Fleets”. We’ll also touch upon advanced input techniques such as voice-to-text dictation and design inspiration methods. Let’s dive in.

Part 1: The Ultimate Setup & VS Code Integration
To get the absolute most out of the Copilot CLI, you should not be running it in your standard floating terminal. You need it fully integrated into your IDE.
Installation & Workspace Setup
Install the CLI (e.g., using Homebrew on macOS). Instead of operating in an isolated shell, open your working project folder in VS Code (code-insiders . -r).
The secret to a great workflow is bringing the terminal into the editor space rather than leaving it in the bottom panel. You can achieve this by simply dragging the terminal tab into the main editor window or binding a custom keyboard shortcut to the “Create New Terminal in Editor” command.
Bypassing Approvals with “YOLO Mode”
By default, the Copilot CLI will repeatedly ask for permission before creating or modifying files. For a fluid, agent-driven workflow, you want to enable “YOLO mode” (allow all).
- You can do this mid-session by typing
allow all. - You can start the CLI in this mode using
copilot --yolo.
Pro Tip: Use the VS Code integrated AI (Ctrl+I or Cmd+I) to quickly
generate an alias in your .zshrc or .bashrc so that typing yolo
instantly launches the CLI with auto-approvals.
Session & Terminal Process Management
Never lose your context. The CLI makes it easy to jump back into previous workspaces:
copilot --res: Brings up a visual list of your recent sessions to resume.copilot --continue: Instantly resumes your most recent abandoned session. (Highly recommended: alias this command tocprfor lightning-fast resumptions).
Furthermore, knowing basic terminal process management is crucial. If you need to pause your agent mid-thought, you can suspend the CLI via Ctrl+Z and resume it flawlessly with fg (on Linux/Mac).
Fixing the VS Code Terminal Experience
Running the CLI heavily inside VS Code requires two major UI tweaks:
- Dynamic Tab Titles: By default, every terminal tab just says “Node”. Go to your VS Code settings, search for
terminal tabs title, and change the format tosequence. This forces VS Code to display the actual chat session title in the tab to track active sessions. - Preventing Swallowed Shortcuts: When your cursor is in the terminal, it swallows IDE shortcuts like Zoom (
Cmd +) or Toggle Sidebar (Cmd + B). Go to yoursettings.jsonand add these commands toterminal.integrated.commandsToSkipShellso VS Code commands work perfectly within the terminal space.
Part 2: CLI Navigation & Essential Shortcuts
Navigating the CLI effectively requires knowing a few built-in concepts and standard shell shortcuts.
The Interface
/triggers commands. For example, use/modelsto swap between high-reasoning models likeo3-miniorGPT-4oon the fly, tweaking reasoning levels as needed.@allows you to mention specific files in your workspace for deeply contextual prompts.?opens the shortcut helper.
Essential Keyboard Shortcuts
If you are typing out long prompts, these standard navigation commands are lifesavers:
These are standard shell shortcuts that work beautifully within the Copilot CLI prompt.
Ctrl + L: Clears the screen without dropping your session.Ctrl + A: Jump to the beginning of the line.Ctrl + E: Jump to the end of the line.Ctrl + K: Delete all text after the cursor.Ctrl + U: Delete all text before the cursor.
Part 3: Advanced Customization and Agents
The traditional chat loop involves a standard agent interaction: you provide a prompt, it responds, and you iterate. We can go significantly deeper by injecting tailored rules and specialized workflows.
Custom Agents (/agent) & Core Skills
Custom agents are fundamentally markdown prompt files that enforce specific rules and workflows. When you create an agent, it is saved either globally or directly in your project context. Because you are running the CLI inside VS Code, Cmd/Ctrl + clicking the generated agent file path in the terminal opens it instantly in your editor!
Additionally, you can augment the CLI by installing Markdown-based Skills. A prime example is the “Front-end Design Skill”, which provides the agent with deep, structural knowledge on styling paradigms, ensuring consistent UI across your application.
The “Anvil” Workflow & Adversarial Reviews
One of the most powerful paradigms introduced is the “Anvil” plugin—a custom agent plugin that utilizes the Context 7 MCP server. LLMs are incredibly eager to please but they sometimes output sloppy code.
Anvil forces an Adversarial Review: one model writes the code (e.g., Opus), but Anvil forces sub-agents powered by other models (like Codex or Gemini) to critically review and attack it. The primary model then has to resolve those critiques before presenting the final build.
The Anvil Advantage: By forcing cross-model verification, you minimize hallucinations and ensure the technical quality of the output before it touches your codebase.
Part 4: Supercharging the Input: Context & Design
Before we look at full automation, we need to master how we feed context to the AI. Let’s imagine a Project Setup: Building a complex URL link-sharing app with React, Vite, and Firebase. Typing out all the nuances of this architecture by hand is tedious.
Voice-to-Text Architectural Prompts
Instead of typing, start using OS-level dictation. By engaging voice-to-text directly into the Copilot CLI, you can verbally dump massive, highly nuanced architectural prompts in seconds. Speaking your thought process creates a richer, more detailed starting point for the agent than typing naturally affords.
Design Inspiration via CSS
Struggling to get the AI to pick good colors for your React project? Go to Adobe Color, copy the raw CSS properties of a beautiful color palette, and paste it directly into your prompt. This acts as raw design inspiration, strictly guiding the AI’s UI color choices from the start.
The Advanced Potential: Vibe Coding
When these high-bandwidth input methods combine with powerful models, they unlock intense capabilities like Vibe Coding. You can rapidly guide the CLI to generate highly complex features, such as building interactive 3D browser elements, simply by describing visual vibes and feeding it raw styling data.
Part 5: Autonomous Coding Loops (Ralph vs. Autopilot)
When building apps with AI, most of us default to a manual chat loop. But what if you could take yourself out of the loop?
The Foundation: The Product Requirements Document (PRD)
Before you can automate an agent, it needs to know what it’s building. Both autonomous methods rely heavily on a PRD.
Instead of vague instructions, a PRD acts as a strict checklist of user stories (e.g., “Port the global CSS,” “Create the My Lists view”). You can generate this easily using the Plan Mode (Shift + Tab) in Copilot CLI. The AI will cross-examine your goals and draft an architectural plan that you can save as a .md file.
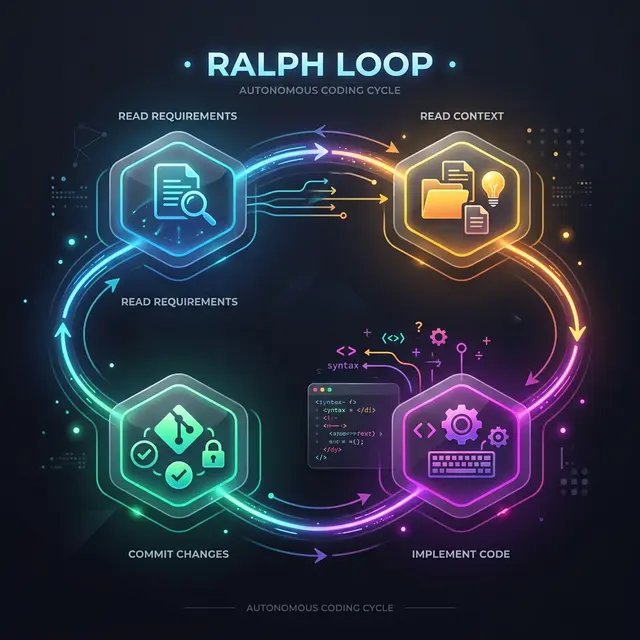
Method 1: The “Ralph Loop” (Deep Dive)
A Ralph Loop is a custom orchestration method built using a standard bash script. It forces the Copilot CLI to run continuously in a non-interactive shell until a PRD is completely checked off.
CLI Commands & Architecture
You set up a basic while loop in bash that repeatedly executes the Copilot CLI with specific flags: copilot -y -p "$(cat prompt.md)"
-y(YOLO mode): Approves all tool calls automatically.-p(Prompt): Passes your instruction text directly.
The Workflow
- Read PRD: Check for the first uncompleted user story.
- Read
progress.txt: Review the ledger of past learnings and historical memory. - Implement ONE story: Focus purely on one task to maintain precision.
- Test: Use the Agent Browser Skill to verify the UI.
- Commit & Update: Commit the code, check off the PRD item, and append new learnings explicitly to
progress.txt.
The Core Principle: Fresh Context. By wiping the context window every iteration, Ralph avoids 'hallucination accumulation'. Historical memory is strictly managed through the progress.txt file.
Method 2: Autopilot + Fleets (Deep Dive)
If you’d rather not manage bash scripts, Copilot CLI has an extremely powerful built-in orchestration alternative: Autopilot.

Architecture: The SQLite Backend
While Ralph relies on text files, Autopilot uses a local SQLite database to track to-dos and orchestrate tasks. It analyzes which tasks can be done simultaneously without conflicts and spins up a “Fleet” of sub-agents to execute them in parallel.
Usage
- Enter Autopilot mode (using
Shift + Tabuntil the indicator turns green). - Fleets: Trigger parallel sub-agents by adding
@fleetto your prompt. - Monitoring: Type
/tasksin the CLI while it runs to visually watch parallel jobs (scaffolding, porting CSS, asset downloads) executing in real-time.
🏆 The Showdown: Porting Blazer to React
To test these two methods, we tasked them with porting a complex ASP.NET Blazer web app to a JavaScript/React/Vite stack.
| Category | Ralph Loop | Autopilot + Fleets |
|---|---|---|
| Visual Accuracy | Struggled with layouts; small icons; missing sub-pages. | Pixel-perfect matching; nailed colors/layouts. |
| Logic/UX | Smartly handled protocol-less URLs. | Successful server-side OG data fetching. |
| Time to Complete | Almost a full day (~8-10 hours). | Approx. 45 minutes (thanks to parallel Fleets). |
| API Cost | 300 premium requests (3 per loop for 100 loops). | 3 premium requests total (single orchestration). |
The Verdict: To Ralph or Not to Ralph?
The winner is Autopilot + Fleets. It is faster, cheaper, and produces higher-quality code with zero boilerplate scripting.
However, Ralph Loops have their place for massive codebases. If the codebase is so large that even deep context breaks down, forcing a fresh context injection via progress.txt is more reliable. Plus, running Copilot CLI in a continuous bash loop is entirely allowed under their TOS.
📦 The Evidence Bundle
When the Autopilot finishes, a well-designed agent (like Anvil) will natively provide an “Evidence-Based Bundle”.
Instead of just hoping the code works, the agent presents a detailed summary of changes:
- The initial state before changes.
- The verifications it passed (Vite build, Firebase rules).
- The adversarial reviews it cleared.
- A single rollback command to instantly revert all changes if you aren’t thoroughly satisfied.
Always review the Evidence Bundle before committing. It provides the ground truth of the agent’s work, removing the guesswork from autonomous development.
By utilizing these tools, cross-model reviews, parallel fleets, and voice dictation, the GitHub Copilot CLI transforms from an autocomplete helper into a deeply integrated, autonomous engineering partner.
Read next