Mastering Copilot Studio's Human Review Node Automations

Writer

As enterprise automation strategies evolve, finding the right balance between deterministic logic and human oversight remains a critical architectural challenge. Microsoft Copilot Studio addresses this directly with the Request for information action — the node most builders refer to as Human Review, because that’s the connector category it lives under in the designer.
This action lets a deterministic, agent-driven workflow pause execution, hand contextual data off to a human, collect a structured response, and resume automatically once a decision is made. Whether you’re building IT ticketing systems, HR onboarding paths, or financial approval matrices, knowing how to orchestrate this component well is the difference between a resilient automation and one that silently stalls.
This is a comprehensive, hands-on breakdown: what it is, how to build it end to end, how to branch on the result, and how to get out of the traps that catch first-time builders.
Naming & availability, up front (so nothing surprises you): In the designer this is the Request for information action, found under the Human review connector/category. The action reached general availability on January 30, 2026 for agent flows and workflows. The related capabilities it’s often confused with — multistage approvals and AI approvals — are still in preview as of this writing. We’ll cover all three and be explicit about which is which.
The New Workflow Paradigm
Before diving into the node itself, it helps to understand the environment it lives in. Copilot Studio’s workflow (and agent flow) designer gives you an agentic, low-code way to build automations that consume your existing Copilot Studio capacity.
At their core, these flows are deterministic: they follow strict, rule-based paths kicked off by a Trigger (the event) and executed through Actions (the tasks). Native AI actions and agent handoffs are built in, but plenty of real-world processes still need a hard, manual failsafe.
Consider a travel-expense policy: an agent can auto-approve anything under $1,000 by checking a few data criteria. Anything over $1,000, though, must be signed off by a finance approver. That gate — where automation stops and a human decides — is exactly what the Human Review node is for.
Prerequisites (Read This Before You Build)
You’ll save yourself a frustrating afternoon by confirming these first:
- Access to Copilot Studio at copilotstudio.microsoft.com, inside a Power Platform environment where you can create flows/workflows.
- An Outlook (Office 365) connection. The native Request for information action delivers its form via Outlook email — so the flow needs a valid connection to send on your behalf. (More on channels below.)
- In-tenant reviewers only. Requests cannot be sent to users outside your tenant. Every assignee must be an internal, licensed user with a valid email address.
- Capacity awareness. These flows run on your Copilot Studio capacity. A paused flow waiting on a human doesn’t burn compute while it idles, but the run itself still counts against your environment’s flow/message entitlements — worth knowing before you scale to hundreds of runs a day.
How Human Review Works
When a workflow reaches a Request for information node, execution pauses. The node packages the information you designated, sends a structured form to the assigned human(s), and waits. When the human submits their response, the workflow resumes automatically and the captured values become available to every downstream step.
Channel Support and Delivery (Important Correction)
Here’s a detail that trips people up, so let’s be precise:
- Native Request for information → Outlook email only (today). Microsoft’s current documentation is explicit: all requests are currently sent via Outlook. More platforms may be added later, but as of now there is no native Teams delivery for this specific action.
- Want a Teams adaptive card instead? Use the Teams connector’s “Post adaptive card and wait for a response” action. It follows the same pause-and-resume pattern but delivers an interactive card into a Teams chat or channel — ideal when your reviewers live in Teams, not their inbox.
Don’t promise stakeholders a Teams approval card and then wire up the Outlook-only node. Decide your channel first: Request for information for email, Post adaptive card and wait for a response for Teams. They’re two different connectors with the same superpower.
Configuring the Review Parameters
Selecting the node opens a configuration pane with a handful of required fields:
- Connection: Establish (or pick) the Outlook connection the action will send through. Workflows require this explicitly.
- Title: The subject line of the email. Make it scannable — e.g.,
Expense approval needed: {employee_name} — {expense_amount}. - Message: The body/context. Use dynamic content from earlier steps so the approver has everything they need without leaving the email. For example, inject
{expense_submitted}and{receipt_link}directly into the message. - Assigned to: One or more reviewer email addresses. With multiple addresses you get a “first to respond wins” model — a pool of approvers (say, Alex and Girish) can share the queue. Only the first response is processed; later responses are silently ignored. If you genuinely need everyone to sign off, that’s a multistage-approval feature, not this action (see below).
Step-by-Step: Build the Expense Approval End to End
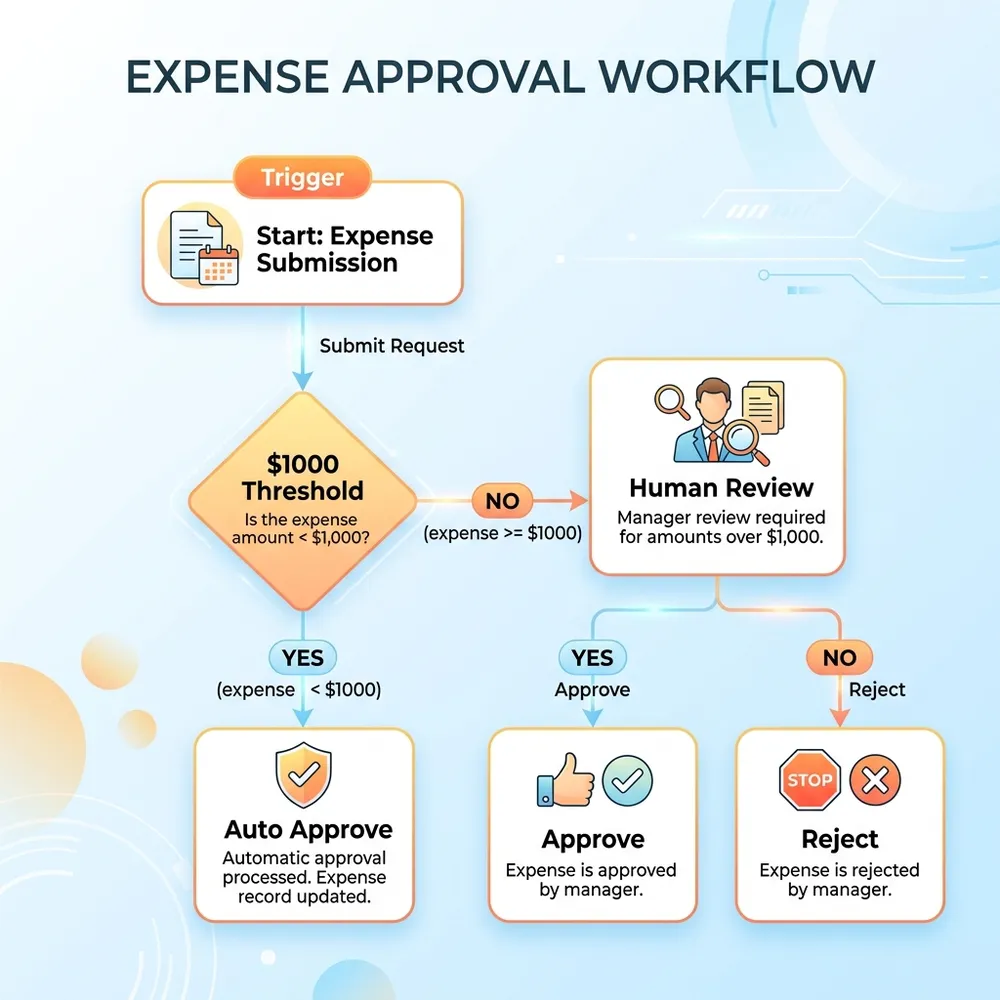
Let’s actually build the $1,000 expense gate. This is the part most write-ups skip.
- Create the workflow and trigger. In Copilot Studio, go to Flows in the left nav → New workflow. Add a trigger — for a quick build, a manual trigger with two inputs works:
expense_amount(Number) andemployee_name(Text). - Branch on the threshold. Add a Condition step:
expense_amountis less than or equal to 1000.- Yes branch: add your auto-approve logic (write to a data source, send a confirmation). Done — no human needed.
- No branch: this is where the human comes in.
- Add the Human Review node (No branch). Click Add a step, search for Human review, and select Request for information. Configure:
- Title: Approval needed:
{employee_name}— ${expense_amount} - Message: explain the policy and paste in the relevant dynamic fields.
- Assigned to: your finance approver(s).
- Title: Approval needed:
- Define the reviewer’s input form. Select Add an input and add the fields you want back (covered in detail in the next section). For this build, add a Yes/No field named
Approved?and an optional Text field namedReviewer comments. - Read the decision and route on it. After the node, add a Compose action to surface the captured values, then a second Condition on
Approved?:- Yes: mark the expense approved, notify the employee, record the disbursement.
- No: send a polite rejection with the reviewer’s comments.
- Save, then test (see the testing section near the end).
That’s the whole pattern: trigger → automated check → human gate → branch on the human’s answer. Everything else is a variation on this skeleton.
Designing the Reviewer Input Form
The node doesn’t settle for a generic “Approve/Reject.” You build a structured form right inside the email (or Teams card). The action currently supports five input types:
- Text (string) — e.g., approval comments
- Yes/No (Boolean) — e.g., approve toggles
- Number (integer) — e.g., an adjusted amount
- Email (email address) — e.g., who to escalate to
- Date — e.g., disbursement date
Each field can be made required or optional, and you can offer single-select or multi-select choice lists for routing-style inputs (e.g., “Send to Finance,” “Send to Admin”).
Design the form around the decision, not the data you wish you had. Every extra mandatory field is one more reason a busy approver bounces the email. Ask for the minimum that lets the next step run, and make everything else optional.
Extracting the Captured Data
Once the human submits, the workflow resumes and the response is captured in the run. To use those values:
- Add a Compose action immediately after the Human Review node.
- In the input box, type
/to open the dynamic-content picker and choose the Human Review category. - You’ll see every field you defined —
Approved?,Reviewer comments, dates, numbers, and so on. - Map those outputs anywhere downstream: into a Condition for branching, into a row you write to Dataverse/SharePoint, or into a follow-up notification. The reviewer’s Boolean choice driving your If/Else is the single most important wire in the whole flow — that’s what turns a form into an approval.
Going Further: Multistage & AI Approvals (Preview)
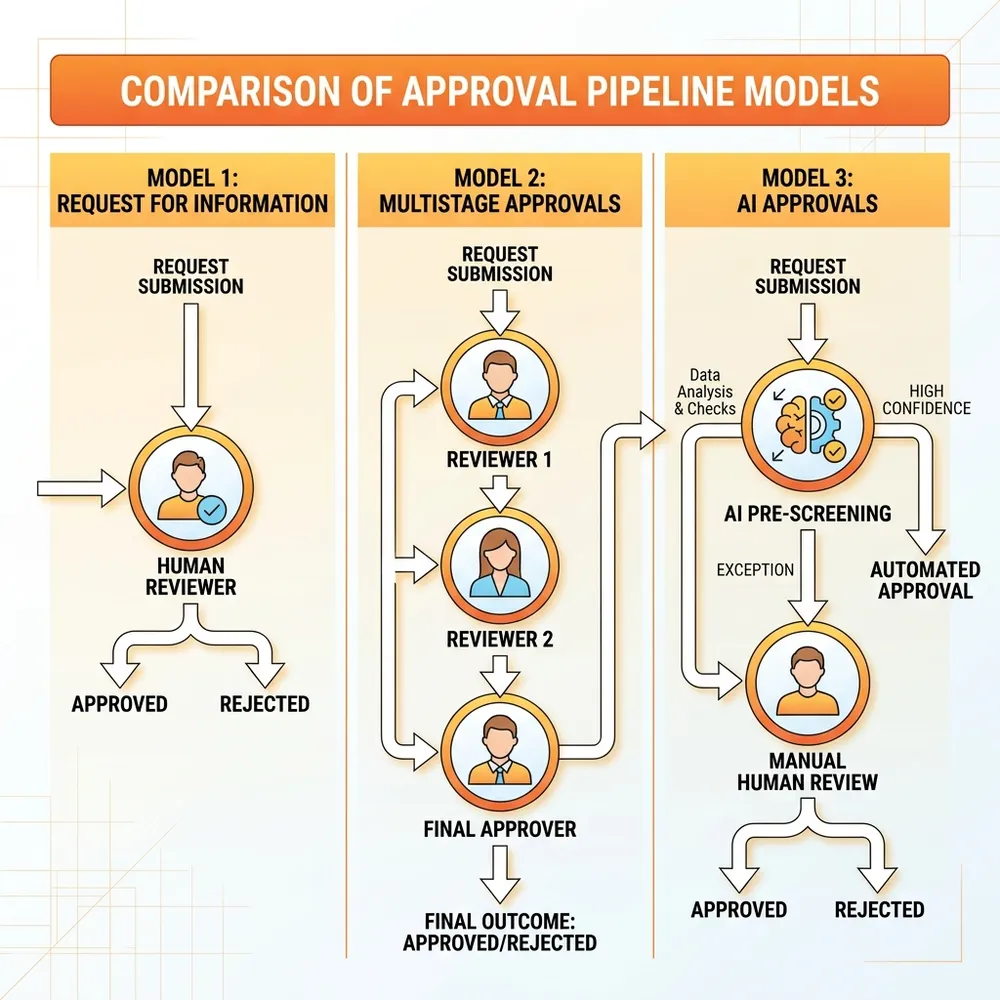
If your real process is more than one gate, you have two adjacent capabilities — both currently in preview, and both found under the same Human review connector in agent flows:
- Multistage approvals. Chain several sign-off stages with conditions between them. Unlike the single Request for information action, manual stages here support both “First to respond” and “Everyone must approve.”
- AI approvals. Insert an AI stage that reads your written criteria (e.g., “reject expenses over $1,000 without manager pre-approval”) plus unstructured inputs like receipts or invoices, and returns an approve/reject decision with a rationale. The common pattern: let AI clear the routine 80%, and route only the exceptions to a human stage. You keep the speed and the human override.
Pick the right tool for the job: one gate, email response → Request for information. Multiple human sign-offs → multistage approvals. High volume where AI can pre-screen and humans handle exceptions → AI approvals feeding a manual stage. Don’t reach for the heavy machinery if a single node will do.
Essential Tips, Tricks & Technical Gotchas
A few traps reliably catch builders — especially on the preview capabilities.
1. The Mandatory Field Logic Trap
Be ruthless about which fields you mark mandatory.
- The scenario: You make “Disbursement Date” mandatory, assuming every approved expense needs a payout date.
- The trap: A reviewer who rejects the expense (invalid receipts) is still forced to enter a Disbursement Date before the form will submit. You’ve created a logical dead-end on the rejection path.
The fix: Never make a field mandatory when it’s only relevant for one
outcome. Keep Disbursement Date optional, and enforce it after the
fact — on the Yes branch of your post-review Condition, validate that a
date was supplied (and loop back or notify if it wasn’t). Conditional
relevance belongs in your flow logic, not in a blunt “required” toggle.
2. Handling Type Mismatch Errors
During development you may hit: “Variable of type integer cannot be initialized/updated with a value of type string.” This commonly happens when a dynamic number coming off a manual trigger lands in an Integer variable and the engine treats the payload as a string.
Troubleshooting, in order: 1. Re-bind it. Remove the dynamic
connection and re-add it — this clears stale binding metadata more often than
it should need to. 2. Recreate the variable. Delete it, create it fresh,
and map it again. 3. Cast explicitly. Don’t rely on implicit coercion.
Wrap the value in an int() expression (e.g.,
int(triggerBody()?['expense_amount'])) before it hits the Integer variable,
so the type is unambiguous. 4. Isolate with a hardcoded value. To prove
your routing (the If/Else) isn’t the culprit, temporarily hardcode a static
integer like 5000 into the variable and run it. If the flow succeeds, you’ve
isolated the problem to the trigger’s data-payload casting — not your logic.
3. The Silent Stall: Plan for “Nobody Answers”
A paused flow waits patiently — possibly forever. There’s no built-in “the approver ignored this for three days” branch on the basic node.
The fix: For anything time-sensitive, design escalation deliberately. Either (a) use multistage approvals, which give you stage-level routing and conditions, or (b) structure your workflow so a parallel timer/reminder path can nudge or reassign. Decide who gets paged when a request goes stale before you ship — not after a $50k approval sits unread over a long weekend.
Testing Before You Ship
Don’t publish on faith. Run the flow from the designer’s Test panel with a value that forces the human path (e.g., expense_amount = 2500). Confirm:
- The email actually lands in the assignee’s Outlook with your dynamic fields populated.
- Submitting the form resumes the run.
- The Yes and No branches each behave correctly — test both by approving once and rejecting once.
- Watch the run history for the type-mismatch and dead-end traps above. Fix in the designer, re-test, then publish.
Conclusion
The Request for information (Human Review) action is small, but it changes the shape of what you can safely automate. By placing it where automation must yield to judgment — and by branching cleanly on the human’s answer, planning for non-responses, and choosing the right channel and approval style — you build automations that lean on the speed of AI while keeping the safety of human governance firmly in the loop.
Start with the single-node expense gate above. Once that pattern is muscle memory, multistage and AI approvals are a short step away.
Read next
Related articles

Mastering Agentic Automation: Calling Copilot Studio Agents Inside the New Workflow Designer

Mastering Copilot Studio: Workflow Designers, Licensing Hacks, and Agent 365 Governance