Architecting Custom UIs for Dataverse with Copilot, MCP Apps, and Declarative Agents

Writer

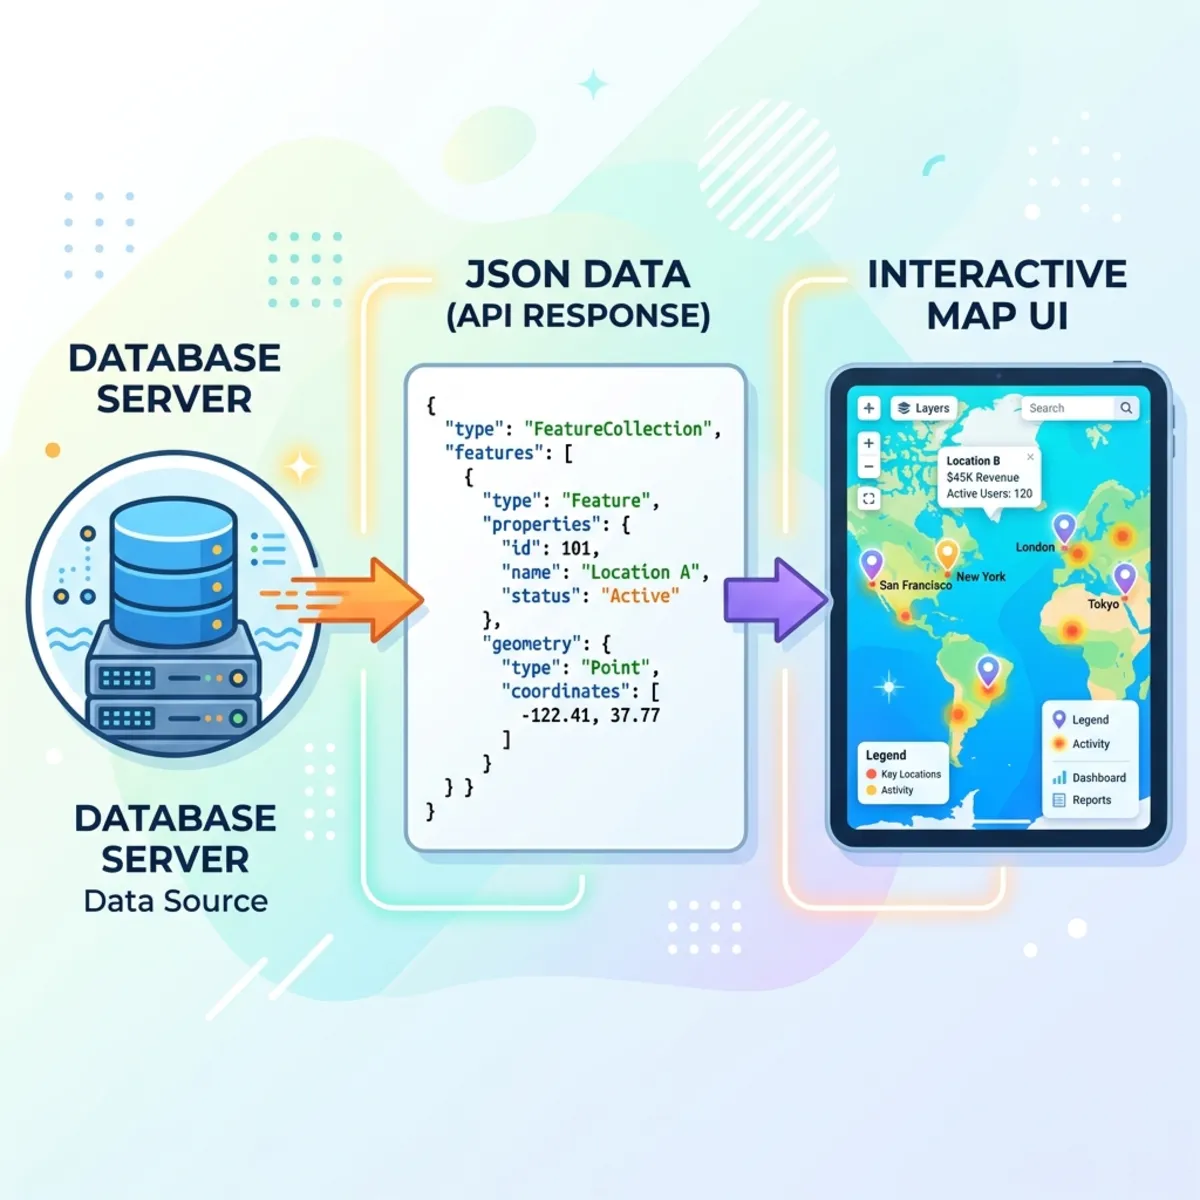
Have you ever looked at your Copilot instance and thought: “If this AI can query, summarize, and understand my entire Dataverse environment, why can’t it just build a UI to show it to me?” Historically, visualizing data meant leaving the chat interface to build a Canvas app or provisioning a Power BI report. Today, that paradigm is shifting. Thanks to the integration of MCP (Model Context Protocol) apps within Declarative Agents, you can now instruct Copilot to generate interactive, custom user interfaces on the fly.
In this walkthrough, we are going to build an end-to-end solution: a Copilot agent that takes a Dataverse table of gas stations, identifies the ones running out of fuel, and visualizes them on an interactive map complete with optimal routing.
Prerequisites and Workspace Setup
To get started, you need to be operating on the bleeding edge of the Microsoft 365 and Power Platform ecosystem.
- You must access your model-driven apps editor via the preview URL. Standard environments will not expose the necessary features.
- You will need Visual Studio Code and the GitHub Copilot CLI installed on your local machine.
Phase 1: Data Extraction and JSON Scaffolding
Before we can draw a map, we need to teach the agent what data it cares about.
- In the preview model-driven apps editor, navigate to the MCP apps section and click Create.
- Give your visualization a clear objective. For our use case: “Show critical gas stations that need to be refilled immediately.”
- Click Add content. This launches an interface very similar to AI Builder.
- Select your primary Dataverse table (e.g.,
Account) and choose the fields you want exposed (e.g.,Owner,Annual Revenue).
Handling Relationships
Data is rarely flat. To pull in related data, you can configure child relationships directly in this UI. For example, select the Primary Contact relationship under your Accounts, and select fields like Address, First Name, and Full Name.
[!TIP] Pro-Tip for Clean Data: During this preview phase, you may need to manually add a
returnstatement in the UI prompt box to force the system to output clean JSON.
Click Test. In a few seconds, the UI will generate a JSON payload representing your Dataverse structure. Copy this JSON. We need it for the next phase.
Phase 2: Generating the UI via Copilot CLI
You might be tempted to use the standard GitHub Copilot Chat inside VS Code to write the UI code. Don’t. For building MCP apps, the Copilot Command Line Interface (CLI) yields significantly better, more context-aware results.
- Open VS Code, create a new folder (e.g.,
MCP-Widget-Maps), and open a new terminal. - Type
copilotto initialize the GitHub Copilot CLI. - Ensure you have the right tools by running
plugin list. You are looking for the Power Platform / MCP apps plugin. (If you don’t see it, a quick web search for “install Power Platform plugin GitHub Copilot CLI” will give you the installation command). - The Generation Prompt: Pass a highly detailed prompt to the CLI specifying exactly what you want (e.g., “Generate an MCP app UI that visualizes accounts on a map based on their address…”).
- Grounding the Prompt: Paste the JSON you copied from Dataverse directly into the bottom of your prompt.
Self-Correcting Architecture
The CLI is remarkably intelligent. If your JSON is missing a data node required to fulfill your prompt (for example, missing a routing coordinate to draw a dispatch path), the CLI will halt, warn you about the exact missing data shape, and ask you to fix it. Simply update your Dataverse test, grab the new JSON, and repaste it.
Once generated, you can iterate on the code. If the UI generates a massive, ugly banner you don’t want, simply prompt the CLI: “Ditch the whole title banner, just show the map.”
Phase 3: The “Read-Only” Reality Check
Before we deploy, it is critical to understand the current limitations of this architecture.
This UI is strictly Read-Only. You can build a beautiful interface with a “Dispatch Driver” button. When clicked, it might show a slick animation of a truck being routed to a gas station. However, it cannot currently write or update data back to Dataverse. You cannot execute a true POST/UPDATE request directly from this widget. To actually update the system, a user would need to copy the dispatch details and ask the Copilot chat to perform the update. Keep this limitation top of mind when designing your user flows.
Phase 4: Deployment and Sideloading
Once you are happy with the generated code in VS Code, it’s time to bring it back to the Power Platform.
- Go back to the MCP apps designer in your browser and click Next.
- Paste all of your generated code into the blank page provided and click Save.
- Crucial Step: Do not simply download the package yet. Look under Custom Tools and click Save and publish. If you skip this, your changes will not be respected at runtime.
- Click Download app package to generate your
.zipfile.
Inspecting the App Package
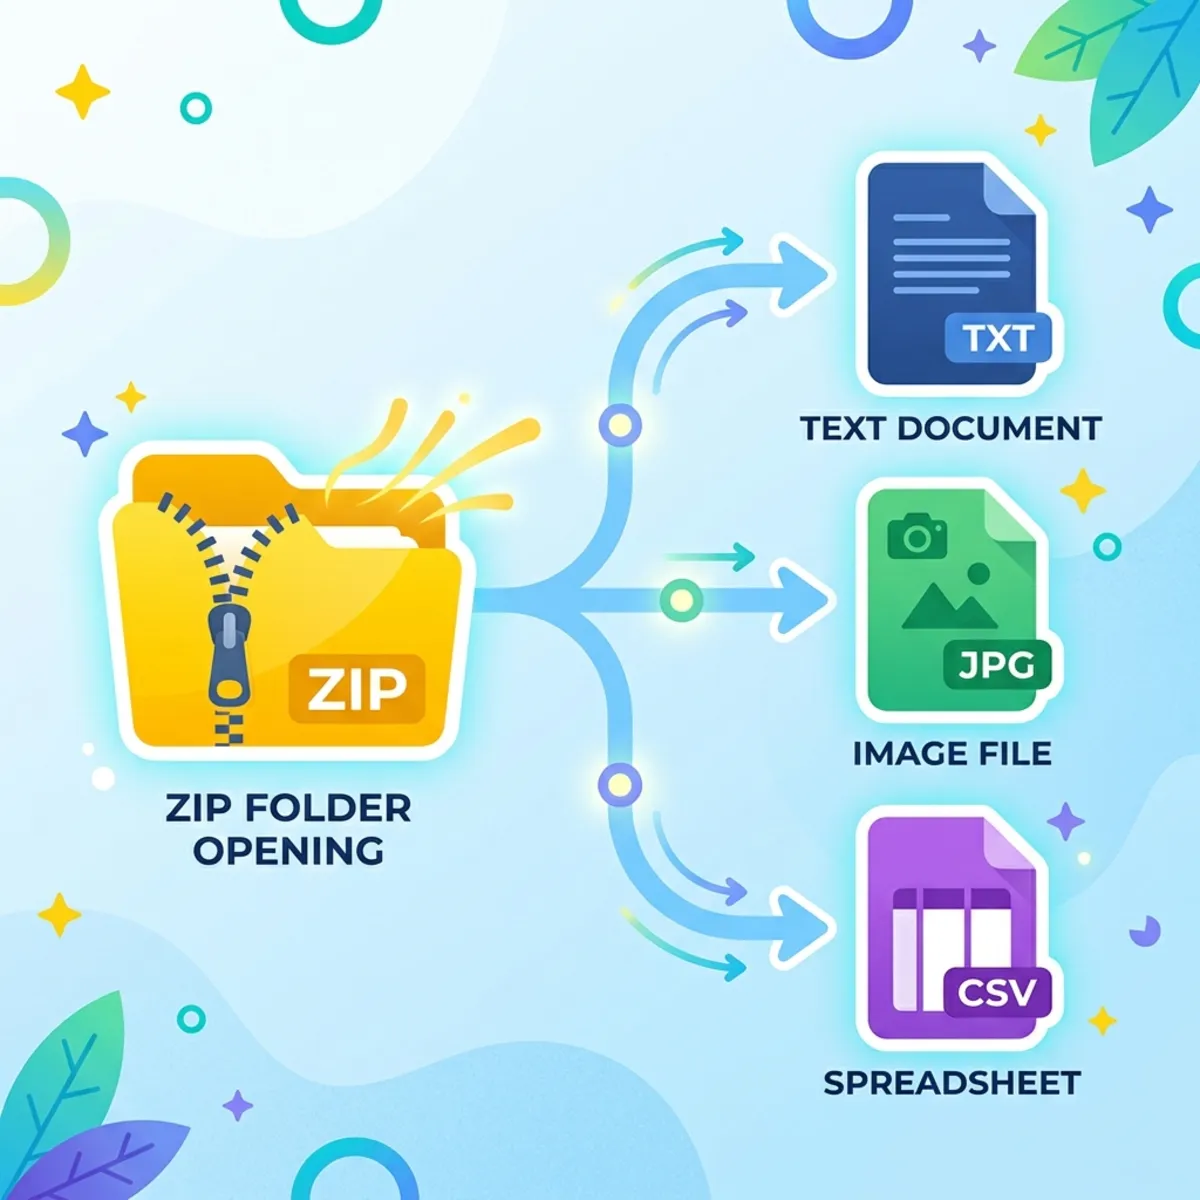
If we crack open that .zip file, we get a great look under the hood of how Declarative Agents function:
app_manifest.json: Standard app metadata.declarative_agent.json: Defines the agent’s capabilities (Graph connections, Teams messaging, Dataverse access). Note: If you inspect this file, you will notice the target Dataverse environment URL is hard-coded. You cannot dynamically swap environments at runtime right now. It also stores the Conversation Starters (“View all accounts”) that pop up when users open the agent.ai_plugin.json: This lists the functions available to the agent. Alongside standard record views, you will see your newly minted custom function (e.g.,use_pumping_stations) sitting at the bottom.
Phase 5: Execution in Teams and Dataverse
To use your new agent in Microsoft Teams:
- Go to Manage Apps -> Upload an app.
- Select your
.zipfile and choose Upload an app to your org’s app catalog.
When you prompt the agent with “Show critical gas stations”, it will pop out an iframe containing your custom UI.
Because the underlying code utilizes libraries like Leaflet JS, it will take a few seconds to parse your Dataverse addresses and geocode them onto the map. Once loaded, you have a fully interactive map built entirely via declarative prompting. You can even access this agent directly through the Copilot side-panel inside Dataverse, where it seamlessly supports both Dark and Light themes based on your system preferences or prompts.
Conclusion
We are in the bleeding-edge days of AI-generated enterprise UIs. While the read-only limitation is a current hurdle, the ability to rapidly convert complex Dataverse schemas into bespoke, interactive visual dashboards using MCP apps is a massive leap forward for agentic workflows.
(A special thanks to the Microsoft engineering teams, particularly Claudio Naya Mendu and Hemant, for pushing the boundaries of what declarative agents can achieve).
Read next