Create Dataverse Tables with GitHub Copilot in VS Code: A Practical Setup Guide

Writer

Describing a business requirement is easier than translating it into tables, columns, choices, and relationships. With Microsoft’s Dataverse tooling connected to GitHub Copilot in Visual Studio Code, an AI agent can help design that model and apply approved changes to a real Dataverse environment.
This guide follows one path: install Microsoft’s Dataverse skills into a local VS Code workspace, connect that workspace to a specific environment, and use Copilot to create and verify a table. Additional tools are explained only where they support that workflow.
Scope: This is a development and data-model authoring setup, not a promise that one MCP connection exposes every Dataverse administration feature. The native MCP server supports table creation and metadata updates. Microsoft’s skills extend the workflow through the Dataverse CLI, Python SDK, and Power Platform CLI when appropriate. Actual capabilities depend on the connected tools, environment, and signed-in user’s permissions. [1][2]
What the Finished Setup Looks Like
You will have:
- A local VS Code workspace with GitHub Copilot enabled.
- Microsoft’s Dataverse skills available to the agent.
- A local MCP configuration pointing to your chosen Dataverse environment.
- Authentication for the tools used by the skills.
- Instructions requiring environment confirmation, schema review, and verification before reporting success.
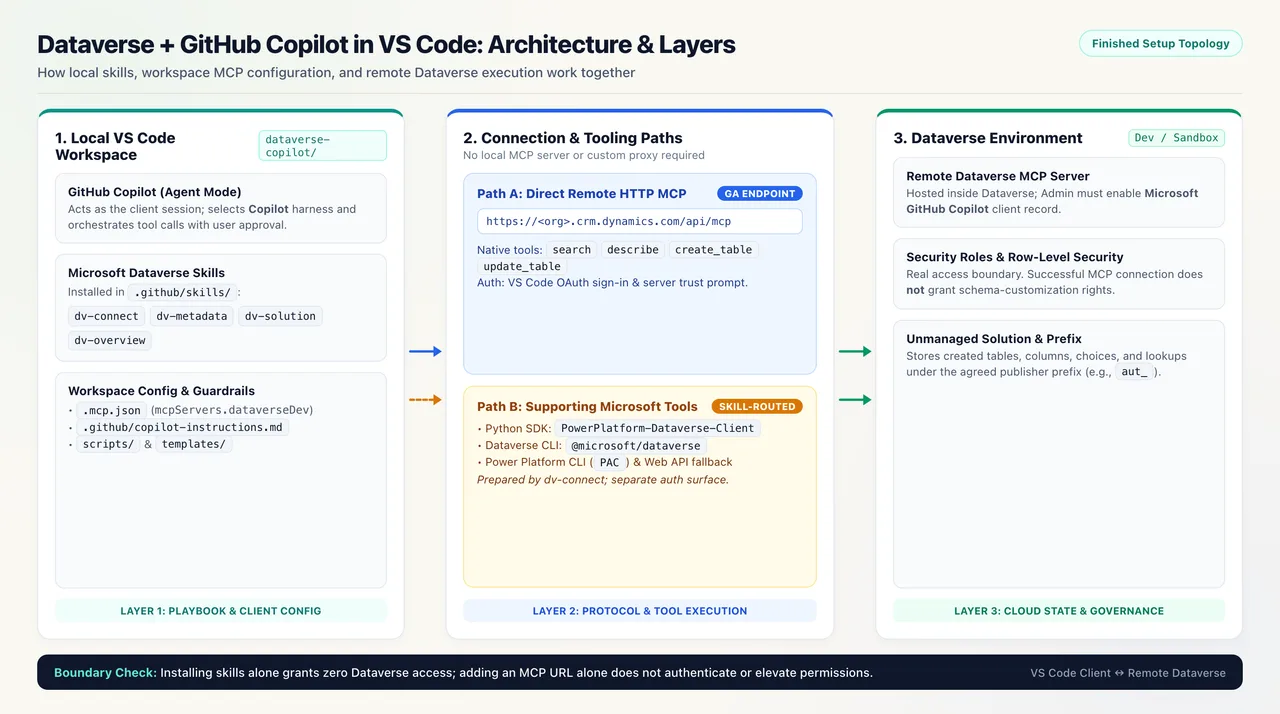
The MCP server runs in Dataverse. VS Code is the client. A local configuration file does not mean you need to build or host a local MCP server. Microsoft’s documented VS Code connection uses the environment’s HTTP endpoint directly. [3]
There are two complementary layers:
| Layer | Responsibility |
|---|---|
| Dataverse skills | Teach Copilot how to connect, design metadata, work with solutions, and select suitable tools. |
| Dataverse MCP and supporting Microsoft tools | Execute operations against the environment. |
Installing skills alone does not grant access to Dataverse. Adding an MCP URL alone does not authenticate the user or grant customization permissions. [2][4]
1. Prepare the Prerequisites
Use an existing development or sandbox environment with a Dataverse database for the first test. Microsoft’s repository also points to the Power Apps Developer Plan as an option for obtaining a development environment. [2]
Before proceeding, have:
- A current installation of Visual Studio Code.
- GitHub Copilot access, with your organization’s policies permitting the required agent and MCP features.
- A Microsoft account with access to the target Dataverse environment and permission to customize its schema.
- A Power Platform administrator who can enable the GitHub Copilot MCP client for that environment.
- The environment’s actual instance URL.
- An existing unmanaged solution and its publisher prefix, or an agreed name and prefix for a new development solution.
Dataverse MCP respects Dataverse security roles and row-level security. A successful connection does not mean the account can create tables. Use an appropriately authorized development account, rather than assuming that enabling MCP grants additional privileges. [5]
Get the Correct Environment URL
- Open Power Apps.
- Select the intended environment.
- Select Settings, the gear icon.
- Select Session details.
- Copy Instance URL. [3]
For the examples below, the instance URL is:
Replace this example with your actual URL. Preserve its regional hostname; do not change it to match the example.
2. Install VS Code and Enable GitHub Copilot
Install or update VS Code using the official Visual Studio Code download page. Choose the installer for your operating system.
Then:
- Open Extensions in VS Code.
- Find and install the GitHub Copilot extension.
- Complete GitHub sign-in.
- Open the Chat view.
- Select Copilot as the session target or harness where that selector is available, and use agent mode for the tasks in this guide. [3][4]
Current configuration matters: Microsoft’s November 2026 VS Code documentation recommends native Copilot MCP configuration for new setups. This guide uses workspace-root .mcp.json with a top-level mcpServers object, not the older .vscode/mcp.json format with servers. These formats should not be mixed. [6]
3. Download Microsoft’s Dataverse Skills
For this walkthrough, install the skills directly from the official Microsoft repository. This keeps the source visible and avoids depending on a separate skills installer or marketplace experience.
Download the Repository
- Open Microsoft Dataverse Skills on GitHub.
- Select Code.
- Select Download ZIP.
- Extract the archive locally.
- Create a separate working folder named
dataverse-copilot. - In VS Code, select File > Open Folder and open
dataverse-copilot.
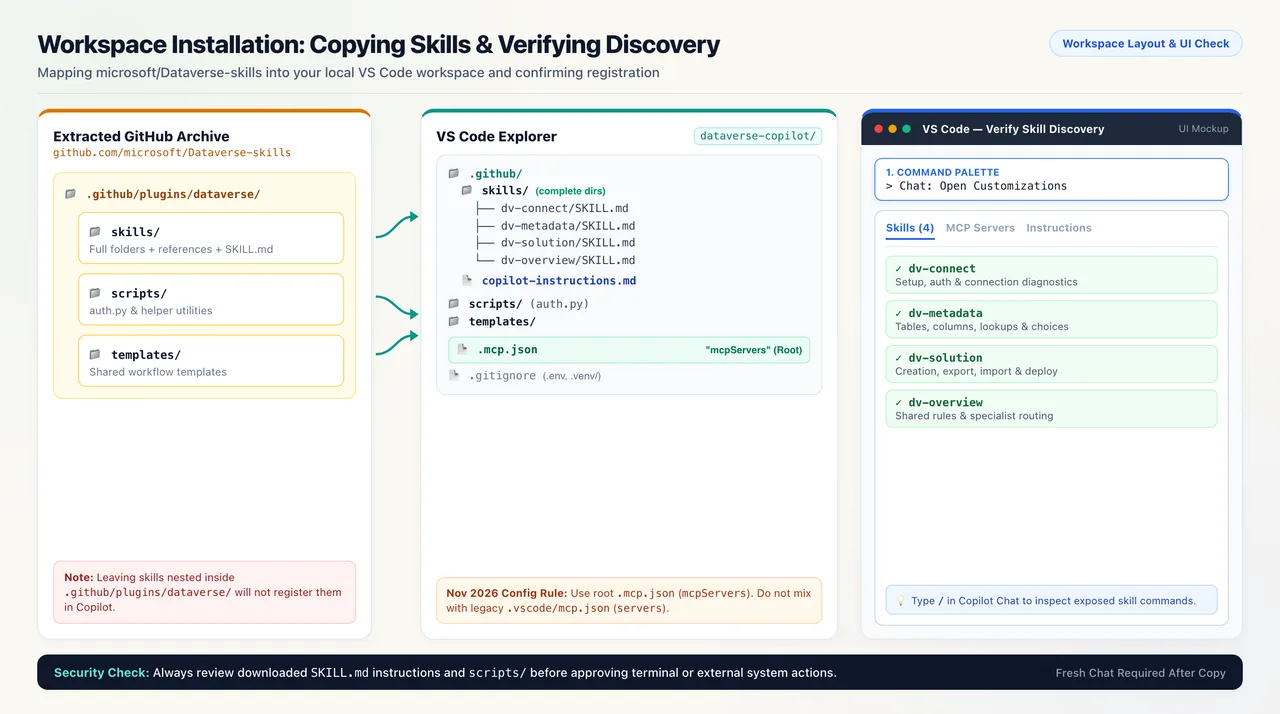
The repository’s canonical plugin directory is .github/plugins/dataverse. It contains skills, scripts, and templates, among other plugin resources. [2][7]
Copy the Skills and Supporting Resources
From the extracted repository, copy:
| Source in the extracted repository | Destination in your workspace |
|---|---|
.github/plugins/dataverse/skills | .github/skills |
.github/plugins/dataverse/scripts | scripts |
.github/plugins/dataverse/templates | templates |
This is a workspace installation adapted from VS Code’s documented support for copying existing skills. Copy the complete skill directories, including their references and supporting files, not just the SKILL.md files. The shared scripts and templates are retained because the Dataverse workflows can reference them. [7][8][9]
The important result is that files such as these exist:
VS Code documents .github/skills/ as a supported project location for the Copilot harness. Simply leaving the skills nested inside the downloaded plugin directory is not the same as installing them into that location. [8]
Verify Skill Discovery
- Start a fresh Copilot chat in the workspace.
- Open the Command Palette.
- Run Chat: Open Customizations.
- Select Skills.
- Confirm that the Dataverse skills appear.
- Type
/in chat to inspect the available skill commands, where exposed. [8]
For this guide, the key skills are:
dv-connect: setup, authentication, connection diagnostics, and MCP registration.dv-metadata: tables, columns, relationships, forms, and views.dv-solution: solution creation, export, import, and deployment.dv-overview: shared rules and routing to the appropriate specialist. [2]
Review the downloaded instructions and scripts before approving their execution. Skills can run commands and interact with external systems. [8]
4. Enable GitHub Copilot Access in the Environment
A Power Platform administrator performs this step:
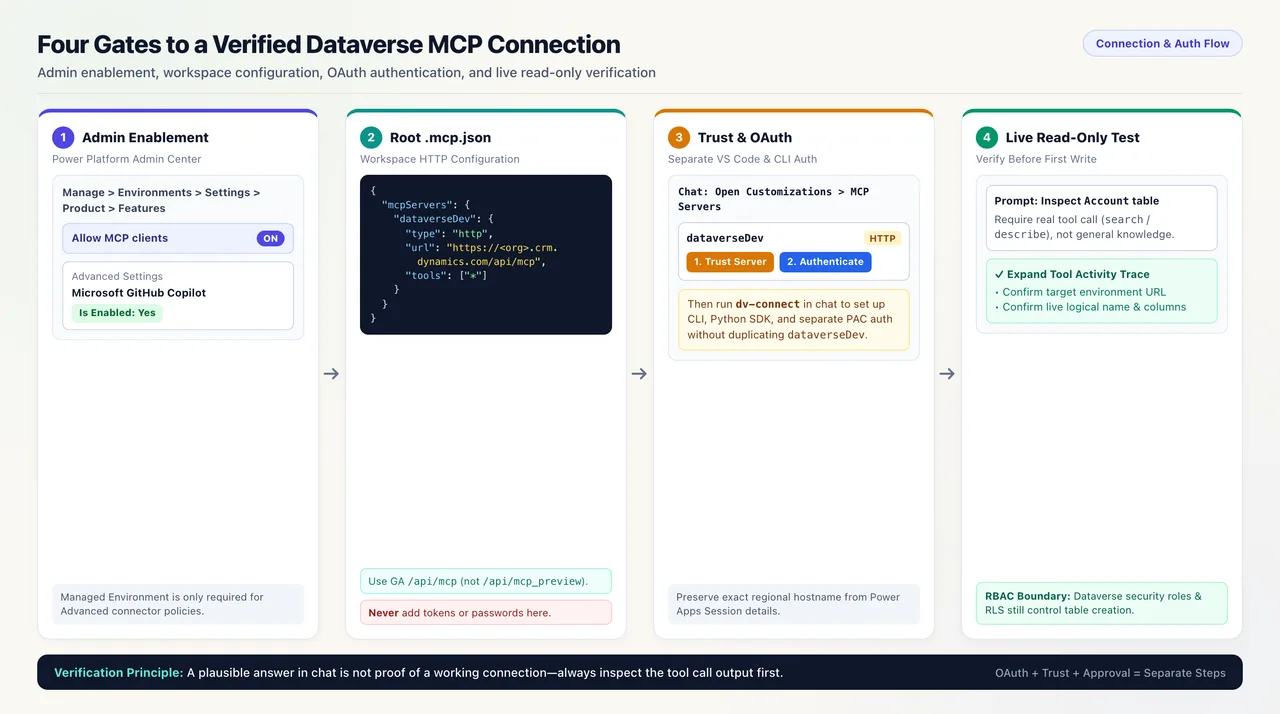
- Open the Power Platform admin center.
- Select Manage > Environments.
- Open the target environment.
- Select Settings > Product > Features.
- Locate Dataverse Model Context Protocol.
- Turn on Allow MCP clients to interact with Dataverse MCP server if necessary.
- Select Advanced Settings.
- Open the Microsoft GitHub Copilot client record.
- Set Is Enabled to Yes.
- Select Save & Close. [10]
Microsoft specifies the Power Platform administrator role for managing these settings. A Managed Environment is required when managing MCP through Advanced connector policies; that is not the same as saying every direct MCP connection requires a Managed Environment. [10]
5. Configure the Local Workspace’s MCP Connection
Create a file named .mcp.json at the root of dataverse-copilot:
Replace the example URL with your instance URL followed by /api/mcp.
This uses the native Copilot workspace format documented by VS Code. The tools setting makes the server’s tools available; it does not bypass individual tool approvals or Dataverse permissions. [6]
Use /api/mcp, the generally available endpoint, for this walkthrough. The separate /api/mcp_preview endpoint exposes preview capabilities that can change or be removed. [5]
Start and Authenticate the Connection
- Save
.mcp.json. - Start a new Copilot session in the same workspace.
- Run Chat: Open Customizations and select MCP Servers.
- Confirm that
dataverseDevappears. - Review any server trust request.
- Complete the sign-in or Authenticate action when prompted, using the account authorized for the target environment. [4][6]
If the connection is not immediately visible, inspect the server configuration and output through the MCP controls. A read-only tool request can help establish whether the connection is actually usable. [4]
Do not add passwords, access tokens, or populated authorization headers to .mcp.json. OAuth sign-in, server trust, and approval of an individual operation are separate steps. [6]
No custom local proxy is required for this direct HTTP route. The local file tells Copilot how to reach Microsoft’s remote Dataverse MCP server. [3]
6. Run the Dataverse Connection Skill
The HTTP connection enables native MCP tools. For the broader skills-based authoring workflow, also initialize the supporting tooling.
In Copilot chat, enter:
Replace the URL before submitting.
The current dv-connect skill checks tooling including Python, Node.js, the Dataverse CLI, and PAC CLI, and initializes authentication and helper resources. Its normal setup is broader than a minimal HTTP MCP connection. Review the commands and installation approvals it requests. [9]
The official Dataverse CLI package used by the skill is:
The Python SDK package used by the skill is:
PAC has a separate authentication surface. Signing into the Dataverse CLI does not automatically establish PAC authentication; the connection skill accounts for both. [9]
If the skill proposes a different MCP configuration, ask it to explain why. Keep one clearly identified connection to the intended environment rather than accumulating duplicate entries.
7. Set the Solution and Working Rules
Before creating metadata, decide which unmanaged solution will contain the components and which publisher prefix will be used.
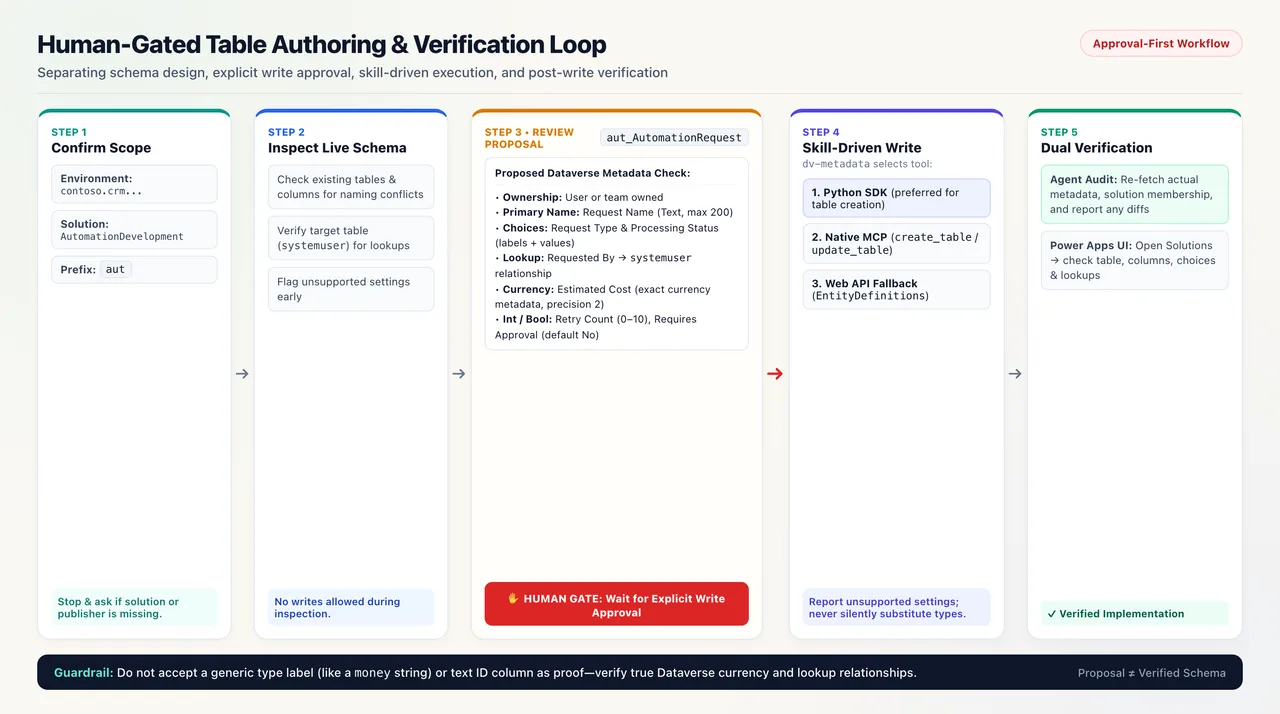
Microsoft’s metadata skill requires confirmation of the target environment, solution, and publisher prefix before the first metadata change. It also recommends making changes in the environment and exporting the resulting solution, rather than hand-authoring solution XML to create new components. [11]
Create .github/copilot-instructions.md with the following project guidance:
VS Code distinguishes project instructions, which provide ongoing guidance, from skills, which provide task-specific workflows. Both have a role in this setup. [8]
These instructions are workflow safeguards, not a security boundary. Dataverse permissions and organizational policies remain the actual access controls.
If setup creates a .env file, exclude it from source control. A minimal .gitignore entry is:
8. Verify the Connection Without Making Changes
Before asking the agent to create a table, submit a read-only test:
Expand the tool activity in chat. Confirm that it used the expected environment and returned live metadata.
A plausible answer is not proof of a working connection. VS Code explicitly recommends verifying the first tool call and inspecting its result. [4]
The documented native MCP metadata tools include search and describe; table writes include create_table and update_table. Check the tools actually exposed in your session before relying on them. [1]
9. Describe and Create a Table
Use a specific request that includes both the business model and the deployment context. The following is an example, not a required naming convention:
Replace the environment, solution, and prefix with your own values.
Review the Proposal
Check:
- The environment and solution are correct.
- Schema names use the intended publisher prefix.
- The primary name column is correct.
- Ownership matches the access model.
- Text lengths, number ranges, defaults, and date/time behavior are explicit.
- Choice labels and underlying values are sensible.
- The lookup targets the intended existing table.
- Requiredness is defined at the intended level.
Do not accept a generic type label as proof of the exact Dataverse type. For example, a currency requirement should be verified as currency metadata, not assumed correct because a helper accepts a money type string. Likewise, a lookup requires the appropriate relationship, not a text column containing an identifier.
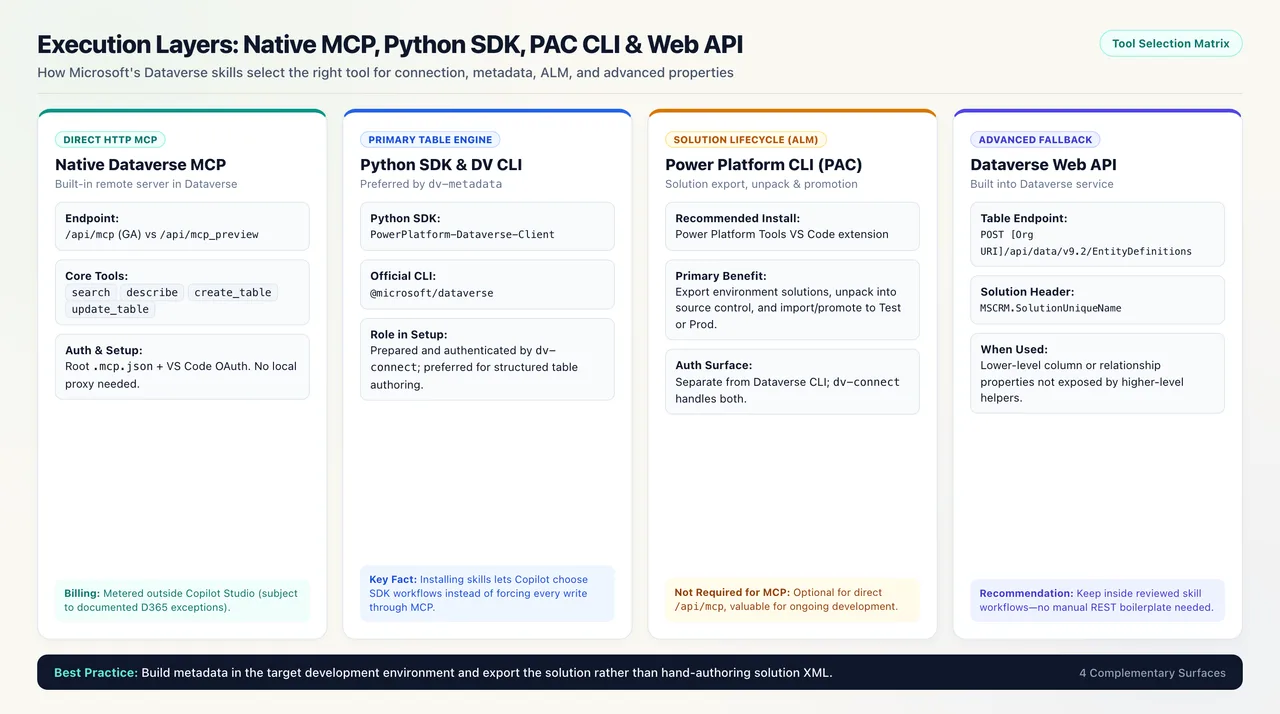
The current metadata skill prefers the Python SDK for table creation and documents Web API fallback for advanced properties the SDK does not expose. Installing the skills does not force every metadata operation through MCP. That tool selection is part of the skill’s workflow. [11]
Approve the Write
After reviewing the proposal, submit:
Review the requested tool and terminal approvals. Keep write approvals explicit for the first deployment.
10. Verify the Result in Dataverse
Do not stop at the agent’s success message.
- Open Power Apps.
- Select the same environment.
- Open Solutions and the agreed solution.
- Confirm the table is included.
- Inspect its columns and relationships.
- Compare the actual settings with the approved proposal.
Ask Copilot for a final verification report covering:
- Table schema and logical names.
- Ownership and primary name column.
- Column types and relevant settings.
- Choice labels and values.
- Lookup target and relationship.
- Solution membership.
- Failed, incomplete, or unverified requirements.
This separates a proposed design from a verified implementation. Keep that distinction when moving beyond a single table to a larger data model.
Do You Need PAC CLI or the Web API?
PAC CLI: Not Required for Direct HTTP MCP, Useful for the Complete Workflow
Microsoft’s direct VS Code MCP setup does not list PAC as a prerequisite. For connecting Copilot to /api/mcp and using the exposed MCP tools, it is not inherently required. [3]
However, Microsoft’s full connection skill prepares PAC for solution and administration workflows. For a workspace intended to support ongoing Dataverse development, keep it available. [9]
Its main additional benefit is solution lifecycle management: exporting the environment-created components, unpacking them into source control, and importing or promoting solutions to another environment. [2][11]
The Power Platform Tools VS Code extension is Microsoft’s recommended way to install Power Platform CLI. [12]
Recommendation: Let the connection skill check and prepare PAC, but do not confuse PAC with the native MCP table-creation tool.
Web API: No Separate Installation, an Advanced Metadata Fallback
The Dataverse Web API is part of the service, not another VS Code extension or local server.
You do not need to hand-write REST requests to start using the native MCP connection. The metadata skill can nevertheless use the Web API when a requested property needs lower-level control. [11]
Microsoft documents table creation through:
For solution-aware metadata creation, the documented optional header is:
The Web API also supports column definitions and relationship metadata. It is the fallback when exact metadata requirements exceed the selected higher-level tool’s capabilities. [13][14]
Recommendation: Keep Web API use inside a reviewed skill-driven workflow. There is no need to make manual REST programming the main tutorial path.
Troubleshooting
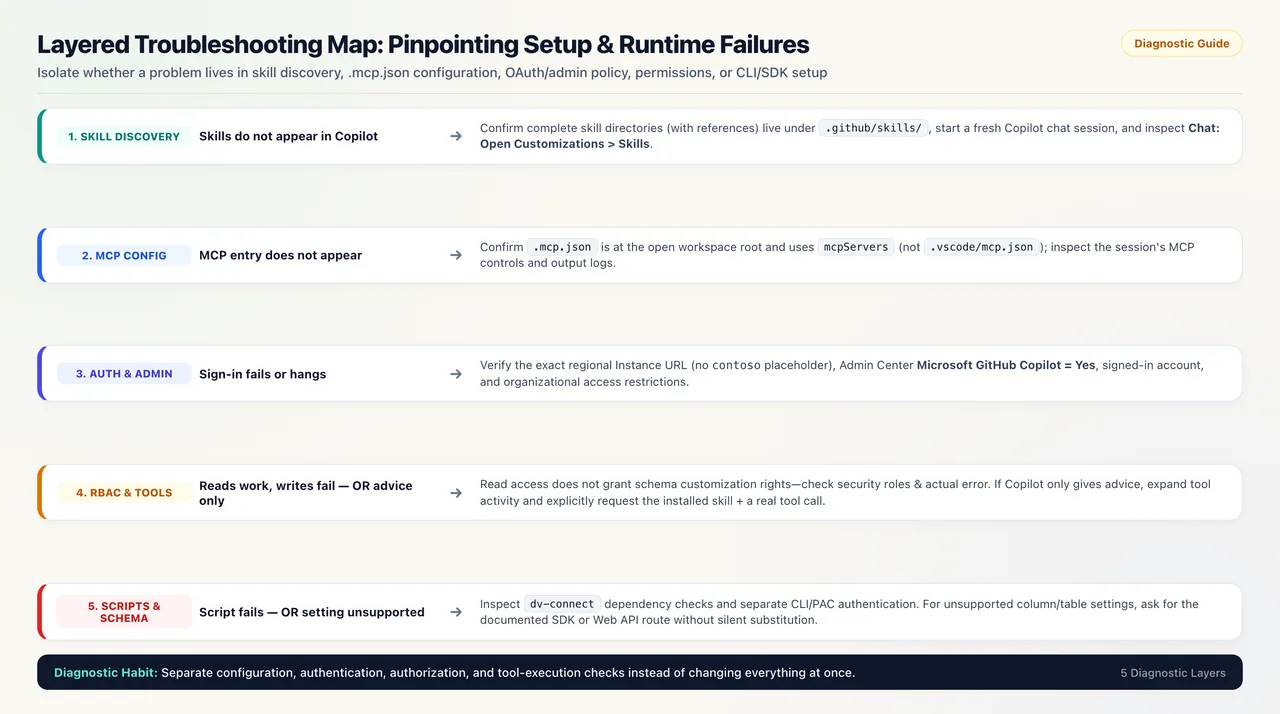
| Symptom | What to check |
|---|---|
| Skills do not appear | Confirm complete skill directories are under .github/skills/, then start a fresh session and inspect Skills in Agent Customizations. |
| MCP entry does not appear | Confirm .mcp.json is at the open workspace root and uses mcpServers; inspect the session’s MCP controls. |
| Sign-in fails | Check the exact instance URL, enabled GitHub Copilot client, account, and organizational access restrictions. |
| Reading works but table creation fails | Check customization permissions and the actual error; successful read access does not grant write privileges. |
| Copilot gives advice but performs no action | Inspect tool activity and explicitly request the installed skill and a real tool call. |
| A supporting script cannot run | Inspect the connection skill’s dependency checks and authentication results; MCP authentication and supporting-tool authentication are separate. |
| The agent cannot implement a requested setting | Ask it to identify the unsupported property and the documented SDK or Web API route, without silently changing the requirement. |
These checks follow Microsoft’s guidance on skill discovery, MCP configuration, authentication, permissions, and supporting-tool setup. [4][5][8][9]
Licensing and Consumption
A GitHub Copilot subscription should not be treated as covering every Dataverse operation.
Microsoft states that Dataverse MCP tools used by agents outside Copilot Studio are charged, subject to documented qualifying-license exceptions for access to Dynamics 365 data. Its current tool documentation also distinguishes search_data consumption from other MCP tools. Confirm the applicable licensing and billing arrangement for the environment before broad use. [1][5]
Final Checklist
Before using the workspace for real development, confirm:
- GitHub Copilot works in the intended VS Code session.
- Microsoft’s Dataverse skills are discovered.
- The environment allows the GitHub Copilot MCP client.
-
.mcp.jsonpoints to the intended environment’s/api/mcpendpoint. - A real read-only tool call succeeds.
- Supporting-tool setup and authentication are complete for the chosen workflows.
- The solution and publisher prefix are confirmed.
- The agent requests approval before writes.
- Created metadata is checked against the approved design.
- Credentials are excluded from source control.
The result is a practical Dataverse authoring workspace: describe the model, review the proposal, approve the changes, and verify the actual environment. Native MCP supplies a direct connection, while Microsoft’s skills and supporting tools provide the broader workflow needed for reliable development.
Official Sources
- Dataverse MCP server and current tools
- Microsoft Dataverse Skills repository
- Connect Dataverse MCP with GitHub Copilot in VS Code
- Add and use MCP servers in VS Code
- Dataverse MCP FAQ
- VS Code MCP configuration reference
- Canonical Dataverse plugin directory
- Use Agent Skills in VS Code
- Microsoft dv-connect skill
- Configure the Dataverse MCP server for an environment
- Microsoft dv-metadata skill
- Install the Power Platform Tools VS Code extension
- Create and update table definitions with the Web API
- Create and update column definitions with the Web API
Read next
Related articles

Dataverse Skills Plugin: Terminal-Driven Solutions
Build Power Apps and Power Automate with Your Coding Agent: A Practical Guide for VS Code Copilot, Copilot CLI, and Claude Code