Build Power Apps and Power Automate with Your Coding Agent: A Practical Guide for VS Code Copilot, Copilot CLI, and Claude Code

Writer
Low-code development does not have to mean making every change through a visual designer. A coding agent can inspect an app, generate screens and formulas, validate its work, and synchronize changes back to Power Apps. It can also build and troubleshoot the automation behind that app.
The important shift is not “replace the designer with Claude Code.” It is give your preferred coding agent a Power Platform toolset, then use the designer to review and test the result.
This guide walks through a training-registration canvas app and its notification flow using three alternative authoring clients: GitHub Copilot in Visual Studio Code, GitHub Copilot CLI, and Claude Code. Choose one. Neither Copilot route requires a Claude Code installation, subscription, or plugin-conversion exercise. Microsoft publishes the Power Platform Skills marketplace, and its canvas-authoring documentation explicitly includes a native VS Code installation path. Sources: Microsoft’s Power Platform Skills repository and canvas-authoring documentation.
The instructions reflect documentation checked on October 26, 2026. Canvas apps coauthoring with agents is generally available according to Microsoft’s announcement. That status should not be generalized to every coding-client customization feature or every plugin in the repository; some client configuration options remain experimental. Sources: canvas agentic coauthoring announcement and VS Code agent-plugin documentation.
1. Understand the architecture before installing anything
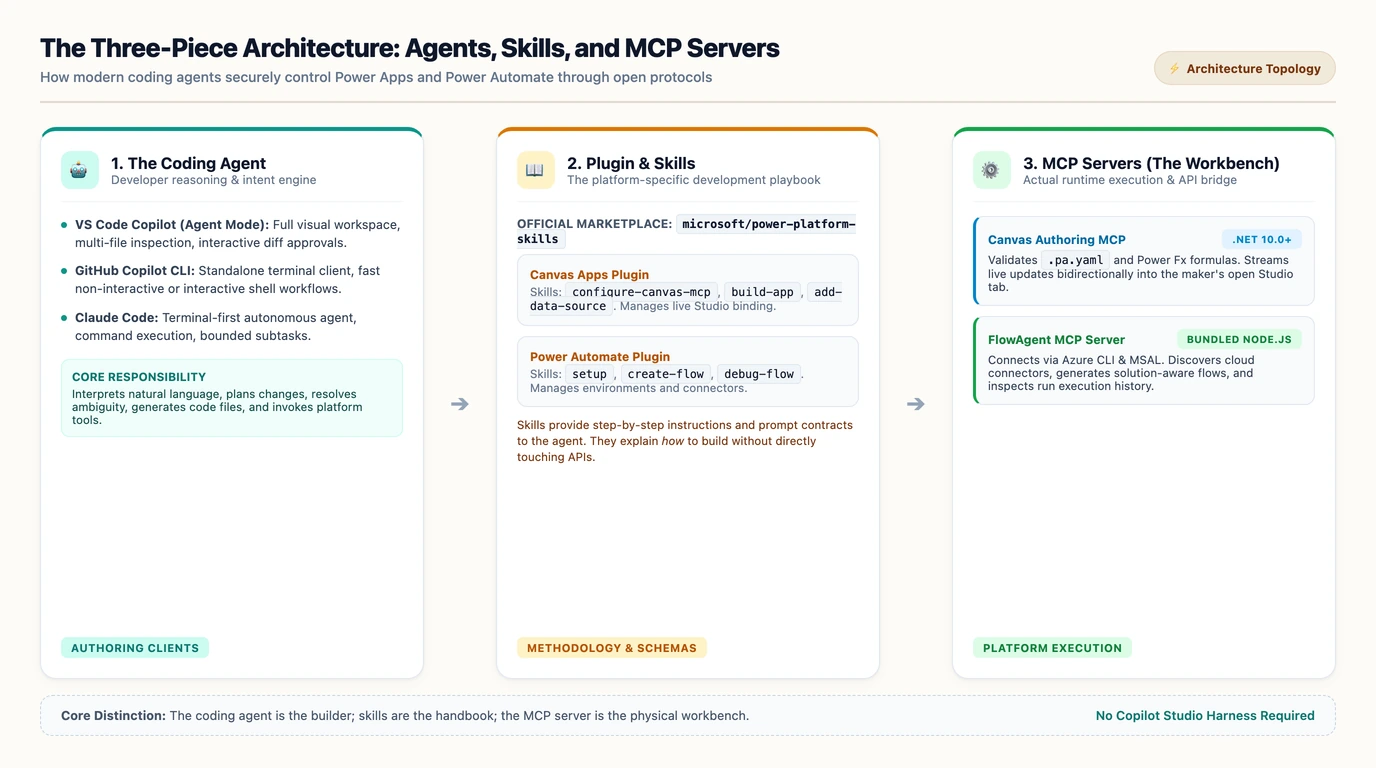
Three pieces work together:
- The coding agent interprets requirements, proposes changes, writes files, and calls tools. This is Copilot in VS Code, Copilot CLI, or Claude Code.
- The plugin and its skills supply Power Platform-specific instructions, references, and workflows.
- The Model Context Protocol (MCP) server exposes operations the agent can actually perform against the platform.
Think of the agent as the developer, the skills as the development playbook, and the MCP server as the workbench. A playbook can explain how to build something, but it does not itself provide access to the tools. Installing skills without a working MCP connection is not equivalent to a connected authoring environment. Sources: Power Platform Skills and VS Code plugin capabilities.
Canvas apps: a live coauthoring connection
For canvas apps, the agent generates .pa.yaml files describing screens, controls, and Power Fx, the formula language used by Power Apps. The Canvas Authoring MCP server validates that source and synchronizes changes through an open Power Apps Studio coauthoring session. Existing app content can also be pulled into local files before editing. Source: canvas authoring workflow.
This is not an arbitrary YAML file upload, and it is not a fully disconnected build pipeline. The live Studio session is part of the workflow. Nor is “a canvas app is just YAML” a complete mental model: the source representation does not eliminate the app’s connections, permissions, runtime behavior, or deployment requirements. Sources: canvas authoring workflow and Microsoft’s coauthoring explanation.
Power Automate: an environment-connected toolset
The Power Automate plugin uses the FlowAgent MCP server. Its documented capabilities include creating and editing cloud flows, discovering connections and connector operations, validating definitions, inspecting run history, and diagnosing failures. It ships a bundled local Node.js server; authentication still connects it to online services. “No npm install required for the server” does not mean Power Automate authoring works without internet access. Source: Power Automate plugin README.
Unlike canvas authoring, this workflow selects a Power Platform environment rather than connecting to a canvas app’s browser session. The two plugins therefore share an authoring client, but not the same connection lifecycle. Sources: canvas setup and FlowAgent setup.
Do not confuse these tools with a Copilot Studio agent harness. This guide builds a canvas app and a cloud flow. It does not require creating a Copilot Studio agent, choosing its runtime model, or configuring its hooks. The canvas authoring server is also distinct from the Power Apps MCP server used for model-driven app agent supervision. Sources: canvas authoring and model-driven app MCP server.
2. Prepare the shared prerequisites
All three routes need the same platform foundation:
- A Power Platform environment where you can create or edit the app and create the flow.
- Access to the SharePoint site and list used by the example.
- An authorized email connection for the notification flow.
- A saved canvas app with coauthoring enabled and its Studio tab kept open.
- The .NET SDK 10.0 or later for canvas authoring.
- Node.js 18 or later and Azure CLI for the Power Automate plugin. If installing Copilot CLI through npm, use Node.js 22 or later, which satisfies both requirements.
The canvas documentation specifies permission to create or edit the app, not a universal requirement to assign every developer the System Customizer role. Have your administrator grant the permissions appropriate to your environment rather than treating a broad role from a demonstration as the minimum for every deployment. Sources: canvas prerequisites, FlowAgent prerequisites, and Copilot CLI installation.
Check the local dependencies in a terminal:
The first command must show an SDK version beginning with 10. or a later major version. Installing only the .NET runtime is insufficient. After installing dependencies, restart the terminal and coding client so they can see the updated executable paths. Source: canvas prerequisites and troubleshooting.
Use a dedicated working folder for this exercise. For example:
This keeps generated files and reviewable changes together. Trust only a workspace and plugins you have inspected: agent plugins can start local processes and execute hooks. Source: VS Code plugin security guidance.
What is optional?
The Power Platform Tools extension and Power Platform CLI are useful for broader development and application lifecycle management, but Microsoft’s canvas-authoring prerequisites do not make the extension mandatory. Likewise, the Claude Code extension is unnecessary for either Copilot route, and VS Code itself is unnecessary when you choose a terminal-only client. Sources: canvas prerequisites and Power Platform Skills installation.
3. Choose one authoring client
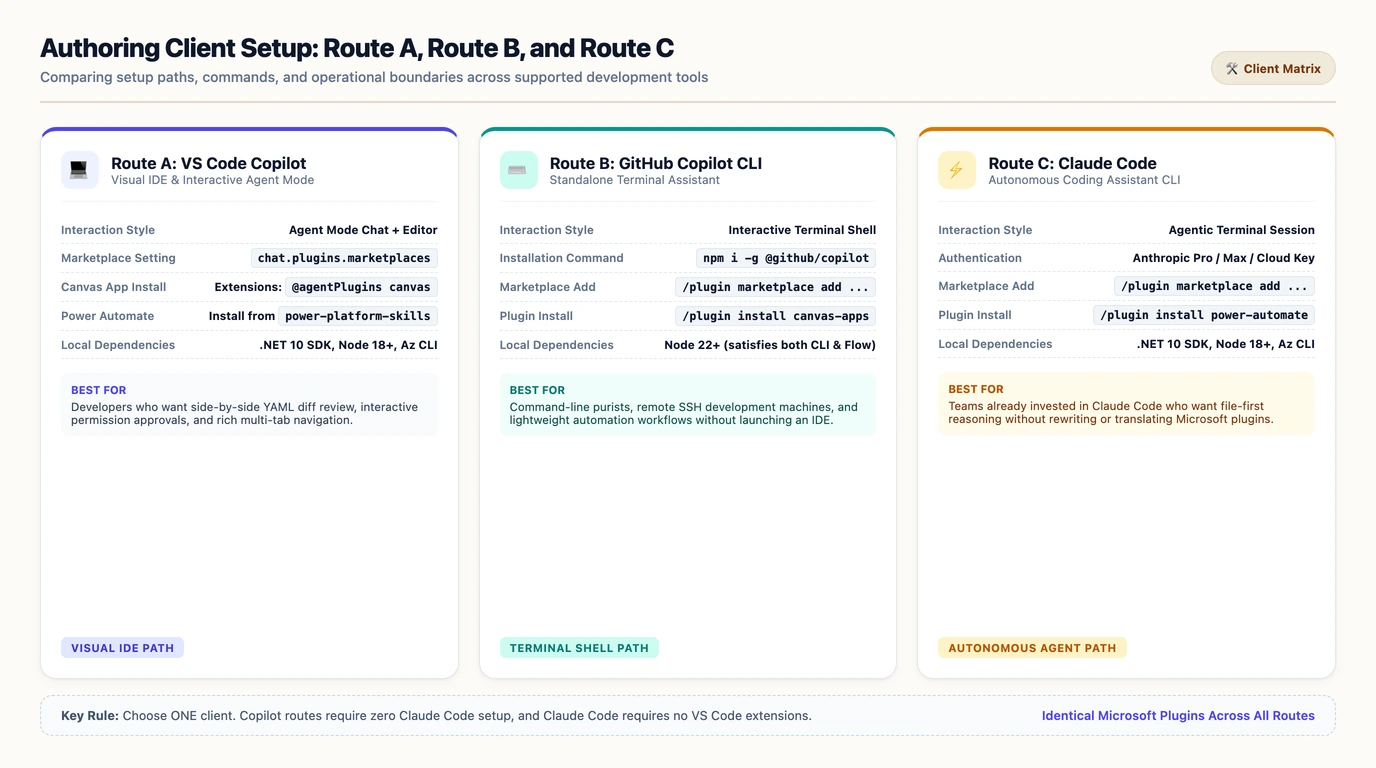
The setup differs by client. The app and flow exercises after this section are shared.
Route A: GitHub Copilot in VS Code
Install a current VS Code release, sign in to GitHub Copilot, and open the working folder. Use Agent mode, not an interaction limited to code suggestions. Agent plugins provide the skills and MCP integrations used here. Sources: VS Code plugin getting started and canvas installation in VS Code.
In Preferences: Open User Settings (JSON), enable plugin support. If the Microsoft marketplace is not already available, add it to the configured marketplaces. Merge these entries into existing settings rather than replacing the file or discarding other marketplace entries:
The marketplace setting is documented as experimental. Organizational policy can restrict plugin availability, so a blocked setting is an administrator issue, not a reason to install Claude Code instead. Source: VS Code marketplace configuration.
Next:
- Open Extensions and search for
@agentPlugins canvas apps. - Install Canvas Apps, published by Microsoft.
- Search the agent-plugin marketplace for Power Automate and install the
power-automateplugin frommicrosoft/power-platform-skills. - Open a new Agent-mode chat and inspect the available skills and MCP servers.
- Confirm that canvas authoring skills and the FlowAgent tools are loaded. Approve the trusted server startup when prompted.
Microsoft documents the Canvas Apps Extensions-view installation directly. The Power Automate route uses VS Code’s documented marketplace installation mechanism with Microsoft’s published plugin; it is not a claim that every Claude-specific component behaves identically in VS Code. Sources: native Canvas Apps installation, VS Code plugin installation, and Power Automate plugin.
If the plugin does not appear, reload VS Code and inspect Chat: Open Customizations → Plugins. Check the marketplace and policy settings before continuing. Installation alone is not the acceptance test: the MCP tools must be available and successfully return platform information. Sources: VS Code plugin management and FlowAgent setup checks.
No Copilot CLI or Claude Code installation is needed for this route.
Route B: GitHub Copilot CLI
Install the current standalone Copilot CLI using GitHub’s instructions. For the npm installation path, with Node.js 22 or later:
Complete the GitHub sign-in prompt; use /login if requested. Organization-provided access also depends on the organization allowing Copilot CLI. Source: Copilot CLI installation and authentication.
Inside the interactive Copilot session, install the two plugins:
These are interactive agent commands, not ordinary shell commands. Microsoft’s marketplace documents this installation sequence for Copilot CLI and Claude Code. Start a fresh session if the newly installed skills or MCP servers are not visible. Sources: Microsoft marketplace installation and Copilot CLI plugin reference.
No Claude subscription, Claude extension, or Claude marketplace conversion is needed.
Route C: Claude Code
Install Claude Code using Anthropic’s current quickstart, authenticate through an access method supported by your organization, and start it in the working folder:
A Pro subscription is one access option, not the only possible prerequisite: Anthropic documents other subscriptions, a Claude Console account, and supported cloud-provider access. The Claude Code VS Code extension is optional when using the terminal client. Source: Claude Code quickstart.
Inside the Claude Code session, install the same Microsoft plugins:
Restart the session if necessary and verify that both toolsets are available. These are Microsoft-maintained Power Platform plugins, not an Anthropic-only implementation of canvas authoring. Sources: Power Platform Skills marketplace and Power Automate plugin.
Same workflow, not guaranteed identical output
The three clients can use the same platform workflows, but model choices, permission prompts, command presentation, and generated results can differ. Use each client’s skill picker or command completion instead of assuming a plugin command is displayed identically everywhere. Natural-language requests that explicitly name the relevant skill are useful when slash-command naming differs. Sources: VS Code cross-tool plugin guidance and canvas natural-language workflow.
4. Build the training-registration canvas app
Step 1: Create a small, explicit data model
For this illustrative exercise, create a SharePoint list named Training Register with these columns:
| Column | Type | Purpose |
|---|---|---|
| Title | Single line of text | Attendee name |
| Single line of text | Notification recipient | |
| Phone | Single line of text | Contact number |
| Training | Choice | Training course |
| FeePaid | Single line of text | Stores Yes or No |
Populate the Training choices with a few sample courses. Use test records and email addresses you control.
The deliberately text-based FeePaid column illustrates an important distinction: a Yes/No dropdown in the app does not make the underlying SharePoint column Boolean. The generated app must preserve the actual schema. If you prefer a true Yes/No column, change the data model deliberately and ask the agent to use that type. Microsoft’s authoring workflow supports schema discovery, but the maker still needs to resolve business meaning and ambiguous requirements. Sources: canvas discovery and clarification and schema inspection capabilities.
Step 2: Create and prepare the app in Power Apps
In the intended environment:
- Create an unmanaged solution for the exercise if you plan to package the app and automation together.
- Create a blank canvas app, preferably within that solution.
- Save it.
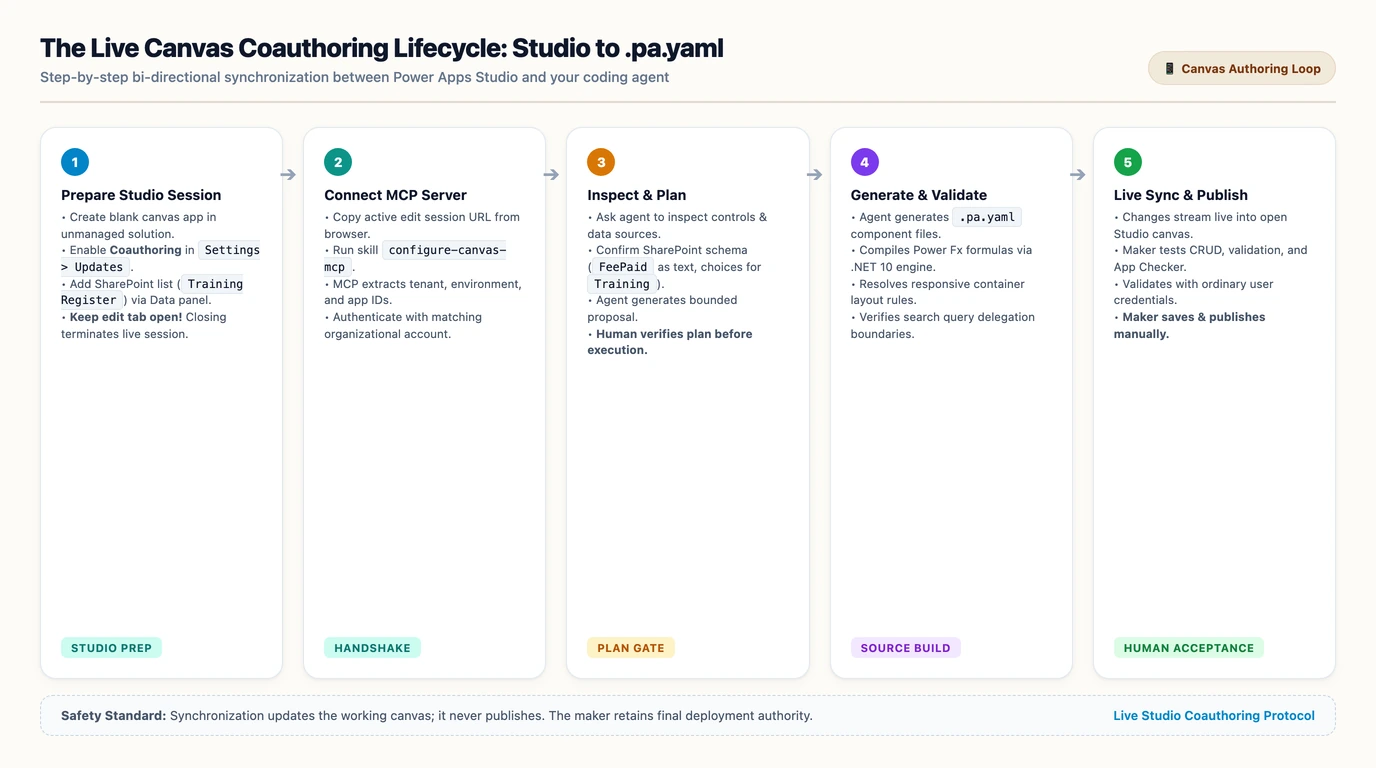
- Open Settings → Updates and enable Coauthoring. Allow Studio to reload if prompted.
- Use the Data panel to add the SharePoint connection and select Training Register.
- Save again and keep the Studio tab open.
The app must already exist before the agent connects. A blank saved app is sufficient; initial publication is not listed as a prerequisite in Microsoft’s canvas-authoring instructions. Adding the data source through Studio is the documented path, with the add-data-source skill available for guidance and verification. Source: canvas preparation and data-source setup.
Solutions provide the packaging foundation for application lifecycle management, but they do not automatically carry every external dependency into another environment. Connections and environment-specific configuration still need attention. Sources: solution-aware flow benefits and connection references.
Step 3: Connect your chosen agent
Copy the complete URL from the app’s Studio edit session, not its player link or the Power Apps home page.
- VS Code Copilot: In Agent chat, select the
configure-canvas-mcpskill or ask it to configure the Canvas Authoring MCP server. - Copilot CLI: Invoke the installed configuration skill through command completion, or make the same natural-language request.
- Claude Code: Run
/configure-canvas-mcp, or make the same request.
Supply the Studio URL and complete any authentication prompt. Then ask:
List the available Canvas App controls and data sources for this connected app. Confirm that Training Register is available, and describe its columns before making changes.
This verifies a working connection, not just an installed plugin. The configuration workflow extracts the app and environment information from the Studio URL. Keep the tab open throughout authoring; closing it ends the coauthoring session needed for compilation and synchronization. Sources: connection and verification and configuration skill.
Step 4: Give the agent a bounded requirement
Use this prompt in any of the three clients, after connecting:
Use the canvas-app skill to build a single-screen Training Register Canvas App using the connected SharePoint list.
Show registrations in a searchable gallery. On the same screen, provide a form to create a registration or edit the selected registration. Include New, Save, and Cancel actions. Do not add deletion.
Use the actual SharePoint schema. Title represents the attendee name. Training must use the list’s choice values. FeePaid is text: show a Yes/No dropdown and write the corresponding text value, without changing the list schema.
Use responsive containers and a clean blue-and-green theme. Include required-field validation and clear success and error feedback. Review the search formula for SharePoint delegation limitations.
Inspect the connected app first, propose a short plan, and ask about unresolved requirements before editing. Generate and validate the .pa.yaml files, resolve validation errors, and synchronize the result to the live Studio session. Do not publish the app. Report remaining warnings and anything I must test manually.
This is an example requirement, not a guarantee of a particular layout. The documented workflow supports discovery, clarification, source generation, validation, synchronization, and iteration; the prompt makes the desired boundaries explicit. Source: canvas build workflow.
Review the plan before approving changes. In particular, confirm field types, whether deletion is excluded, and what the agent intends to do when a save fails.
Step 5: Inspect, test, and publish deliberately
After synchronization, inspect the app in Studio. Refresh if necessary, but first confirm that the connection and synchronization succeeded rather than treating refresh as a universal fix. Source: canvas troubleshooting.
Use this acceptance checklist:
- Create a registration and verify the stored SharePoint values.
- Edit it and confirm that the existing item changes rather than a duplicate being created.
- Cancel an edit and check that unsaved values do not leak into the next operation.
- Test missing required fields and invalid email input.
- Verify Training choices and the text values stored by FeePaid.
- Check phone and desktop layouts, orientation changes, keyboard navigation, and accessible labels.
- Review App Checker findings and test with an ordinary intended user, not only the maker account.
A clean validation result is useful, but it does not prove that the business behavior, accessibility, or permissions are correct. Microsoft explicitly positions agent coauthoring as a complement to existing testing and development practices. Source: coauthoring, not autopilot.
Search deserves particular attention. Delegation means pushing a query to the data source rather than evaluating only a limited local subset. A gallery that works against a few sample rows can return incomplete results when a nondelegable query meets a larger list. Ask the agent to explain its formula, then check it against the connector’s supported operations. Source: delegation guidance.
Once the checks pass, save and publish through Studio. Synchronization and publication are separate decisions; the prompt intentionally leaves the latter with the maker. Sources: authoring workflow and maker control.
5. Extend an existing app without starting over
The same connection workflow works for an existing app. Open it in Studio, enable coauthoring, connect using its edit-session URL, and ask the agent to synchronize and inspect the current source before editing. Microsoft documents pulling existing screens and controls into local .pa.yaml files as part of this process. Source: editing existing canvas apps.
For VS Code Copilot, Copilot CLI, or Claude Code, use an inspection-first prompt:
Use the canvas-app skill to inspect this existing app without modifying it. Explain each screen, the main navigation paths, data sources, and important formulas. Identify dependencies and uncertainties. Then propose how to add a training-summary screen while preserving the existing screens and behavior. Wait for approval before applying changes.
After reviewing the proposal, ask for a narrow change, such as adding one screen or improving one form. Validate and regression-test the affected paths.
This is especially useful for inherited support work: the agent can help reconstruct the implementation from the app’s source. Treat that explanation as an analysis to verify, not proof that the agent has recovered undocumented business intent. The tool can inspect what exists; the team must still confirm why it exists. Source: existing-app inspection and editing workflow.
6. Build the notification flow
The second half of the example sends a registration email when a new SharePoint item is created. It uses the Power Automate plugin installed earlier, not the Canvas Authoring MCP server.
Step 1: Authenticate and select the environment
Check Azure CLI and sign in with the work account used for Power Automate:
In your chosen client:
- VS Code Copilot: Select the Power Automate
setupskill in Agent chat, or explicitly ask it to run that skill. - Copilot CLI: Select the installed Power Automate setup command through completion, or request it in natural language.
- Claude Code: Invoke the Power Automate setup skill, using command completion to distinguish it from another plugin’s setup command.
A shared setup prompt is:
Use the Power Automate plugin’s setup skill. Verify Node.js, Azure CLI authentication, and the FlowAgent MCP connection. List the environments I can access. Ask me to select the target environment, set it explicitly, and confirm the effective account and environment before creating anything.
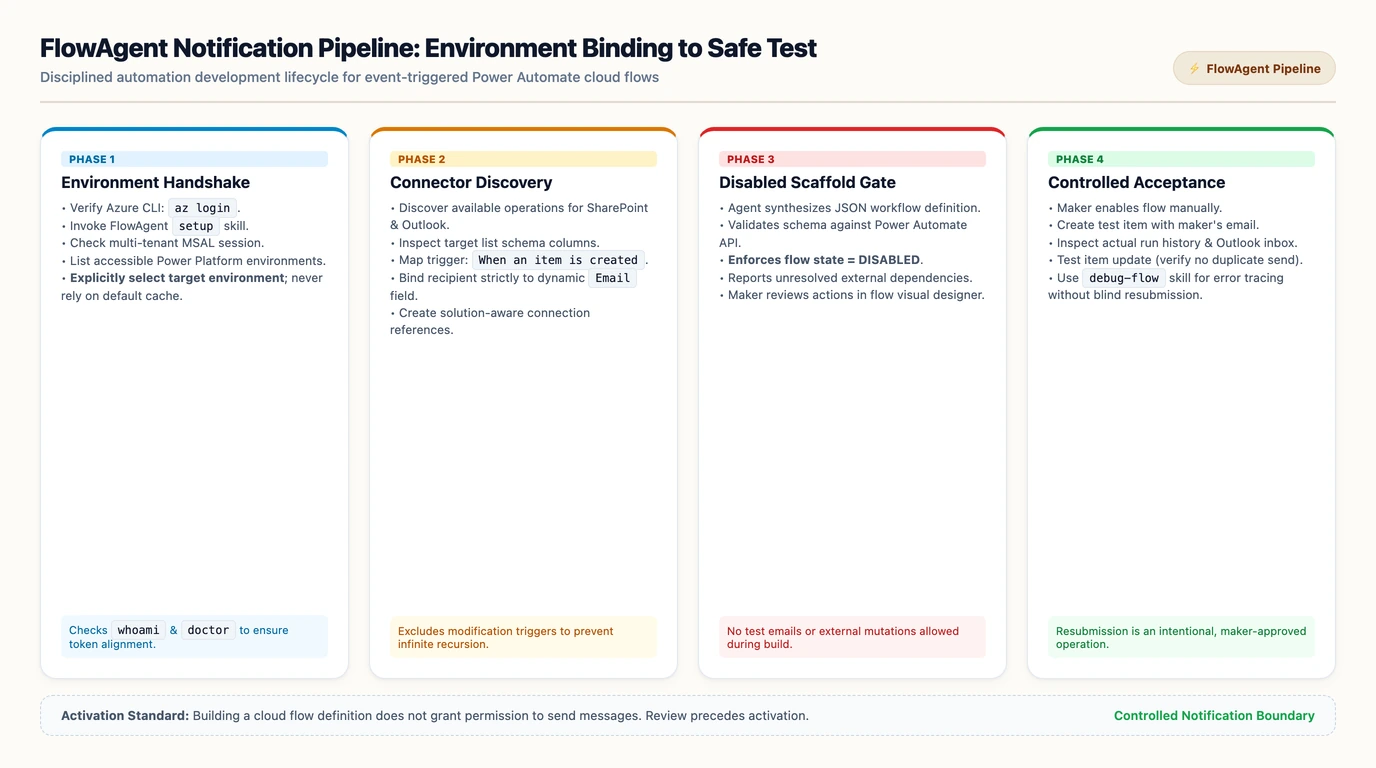
The setup skill checks dependencies, authentication, MCP wiring, and environment discovery. Select the same intended development environment used for the app; do not assume a cached default is correct. Source: Power Automate setup skill.
One subtlety matters in multi-account environments: FlowAgent’s connection-management authentication uses a separate Microsoft Authentication Library (MSAL) session. Changing the Azure CLI account alone does not necessarily switch that identity. If the environment appears missing or connection operations fail, ask the agent to inspect whoami, doctor, and account information before concluding that the environment does not exist. Source: FlowAgent identity troubleshooting.
Step 2: Describe the flow and its activation boundary
Provide the real SharePoint list URL in your chat, then use this prompt in any of the three clients:
Use the Power Automate create-flow skill to create a cloud flow named Training Register Notification in the selected environment.
Trigger only when a new item is created in the Training Register SharePoint list at the URL I supplied. Send an email to the new item’s Email column using my approved Office 365 Outlook connection. Use an HTML summary containing attendee name, training, phone, and fee-paid status, with a link to the SharePoint item.
Inspect the actual connector operations and list schema before building. Confirm the recipient mapping and sender connection with me. Reuse an existing authorized connection only after identifying it; if a connection is missing, guide me through authentication or explain what I must configure in the designer.
Validate the definition and report unresolved dependencies. Leave the flow disabled. Do not enable it or send test emails until I have reviewed it.
The plugin provides guided flow creation, connector discovery, connection management, and validation. Explicitly asking for a disabled flow makes the handoff clear: building the definition is not permission to start sending messages. Source: Power Automate plugin capabilities.
If solution packaging is required, also state the intended solution. Verify the result rather than assuming the plugin placed it there. If necessary, use Power Automate’s Solutions → Add existing → Automation → Cloud flow path to add an eligible existing flow. Microsoft documents both creating flows within a solution and adding existing flows. Source: solution-aware cloud flow creation.
Step 3: Review connections, not just actions
Open the generated flow in Power Automate and check:
- The environment, SharePoint site, and list are correct.
- The trigger is item creation, not creation-or-modification.
- The recipient is the item’s Email value, not a hard-coded demonstration address.
- The sender connection belongs to the intended account.
- The HTML fields and item link use the correct dynamic values.
- The flow is still disabled and has no unresolved connection errors.
A connection contains the authentication used by a connector. A connection reference is a solution component pointing to a connection. Solution-aware flows use references to make environment-to-environment binding manageable; those references are not portable credentials. Canvas apps have additional connector-specific differences, so do not assume their connection behavior is identical to flows. Sources: connection references and solution-aware flow connections.
If authentication was not completed during generation, finish it in the designer before activation. A generated definition with unresolved connections is a scaffold, not a working automation. Source: FlowAgent connection and validation capabilities.
Step 4: Enable and test with controlled data
After review:
- Save the flow and turn it on.
- Start a manual test in Power Automate if appropriate.
- Create a new registration with an email address you control.
- Inspect the run history, trigger payload, and email action.
- Confirm delivery, content, sender, and item-link behavior.
- Update the same registration and verify that an item-created-only trigger does not produce an unintended second notification.
Do not infer successful delivery from an agent’s completion message. Inspect the actual run and mailbox. The plugin’s run-history and diagnostic tools can assist, but they supplement the acceptance test rather than replace it. Source: Power Automate run inspection and diagnostics.
For all three clients, a follow-up diagnostic prompt can be:
Use the Power Automate debug-flow skill to inspect the latest run of Training Register Notification. Identify the failed action and explain the evidence. Propose the smallest correction. Do not resubmit a run or send another email without approval.
This also makes a useful boundary explicit: resubmitting a run can repeat external actions. FlowAgent supports run resubmission, so it should be an intentional operation. Source: Power Automate run-management capabilities.
7. Troubleshoot the layer that actually failed
| Symptom | First checks |
|---|---|
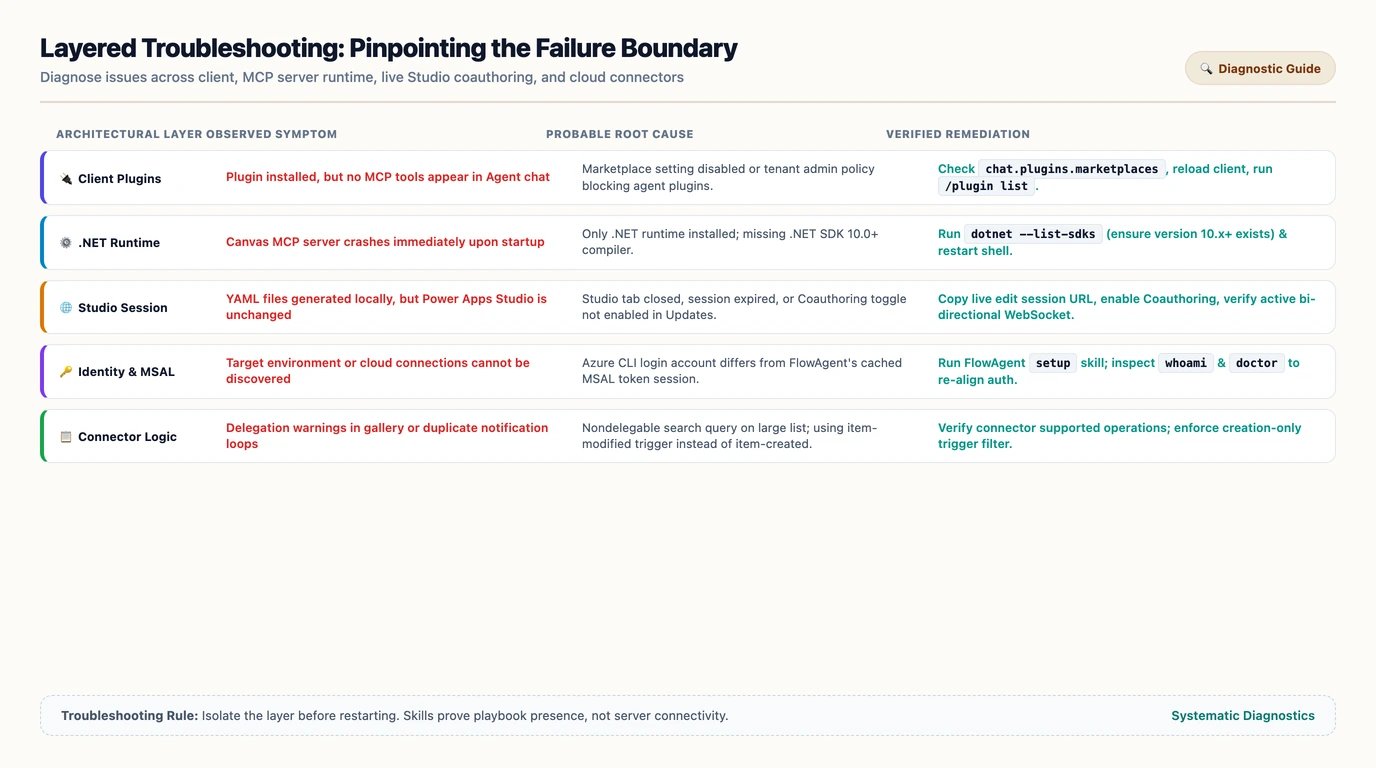
| Plugin installed, but no platform tools appear | Confirm the plugin is enabled, reload the client, and inspect MCP startup errors. Skills alone do not prove server connectivity. |
| Canvas server cannot start | Check the .NET 10+ SDK, executable paths, package-source access, and plugin version. |
| Canvas files exist, but Studio is unchanged | Check coauthoring, the active Studio tab, the edit-session URL, and validation/synchronization results. |
| SharePoint list is missing | Add it through Studio’s Data panel, confirm the environment and permissions, and inspect applicable data policies. |
| Flow environment or connections cannot be found | Verify the selected environment and both Azure CLI and FlowAgent connection-management identities. |
| Flow exists, but does not run | Check activation state, trigger configuration, connections, and run history. |
These checks follow Microsoft’s canvas troubleshooting guidance and the Power Automate setup skill. For canvas package-download errors, inspect approved NuGet sources rather than blindly bypassing enterprise restrictions. For sovereign-cloud deployments, follow FlowAgent’s cloud-specific authentication guidance rather than copying commercial endpoints. Sources: canvas troubleshooting and FlowAgent setup and cloud routing.
8. Spend agent effort where it helps
A live demonstration can show that a workflow is possible. It cannot establish a universal completion time, token budget, or quality ranking between coding agents.
Claims such as “one screen takes 15–20 minutes” or “one app consumes half a session” depend on the model, plan, context, app complexity, tool calls, and repair loops. They should not become planning guarantees. Anthropic itself documents shared usage limits for its subscription-based access, while Microsoft recommends switching between agent work and direct editing to conserve tokens. Sources: Claude Code usage limits and Microsoft’s token-budget guidance.
A practical division of work is:
- Delegate a complete screen, a repeated layout pattern, or a bounded formula refactor.
- Use the designer for a small label, color, or property adjustment when that is faster.
- Start with one screen or one flow, inspect the result, then expand.
- Separate inspection, editing, validation, and activation in your prompts.
- Evaluate clients against the same requirements and acceptance tests rather than adopting a presenter’s preference as a benchmark.
These are workflow recommendations, not measured performance claims. They keep the agent’s work reviewable without pretending that a smaller prompt guarantees a smaller bill.
Also keep the charging boundaries straight. This exercise uses a coding client to author Power Platform artifacts; it does not establish that every app edit or publication consumes Copilot Studio credits. Coding-agent access, Power Apps and Power Automate entitlements, and any separately deployed Copilot Studio agent belong to different product contexts. Check the applicable product terms rather than importing a credit model from an unrelated agent demonstration. Sources: canvas authoring prerequisites, Copilot CLI access, and Claude Code access.
Conclusion: change the authoring interface, not the engineering standard
The useful breakthrough is that a canvas app and its automation can be developed through a tool-connected coding agent without abandoning Power Platform’s existing designers.
Choose VS Code Copilot, Copilot CLI, or Claude Code. Install Microsoft’s plugins, prove the MCP connections work, give the agent a bounded requirement, and validate the result in the platform. For canvas apps, keep the live coauthoring session open. For flows, verify the environment and connections, then activate only after review.
The agent can take on much of the construction work. It does not inherit responsibility for deciding whether the application is correct. That remains the maker’s job, regardless of which client wrote the first draft.
Read next