Automate SharePoint to Teams with Azure Logic Apps

Writer
In modern workplace environments, maintaining real-time visibility over shared assets is critical for document approvals, engineering handoffs, and team collaboration. Manually notifying team members when documentation is updated introduces lag and room for human error.
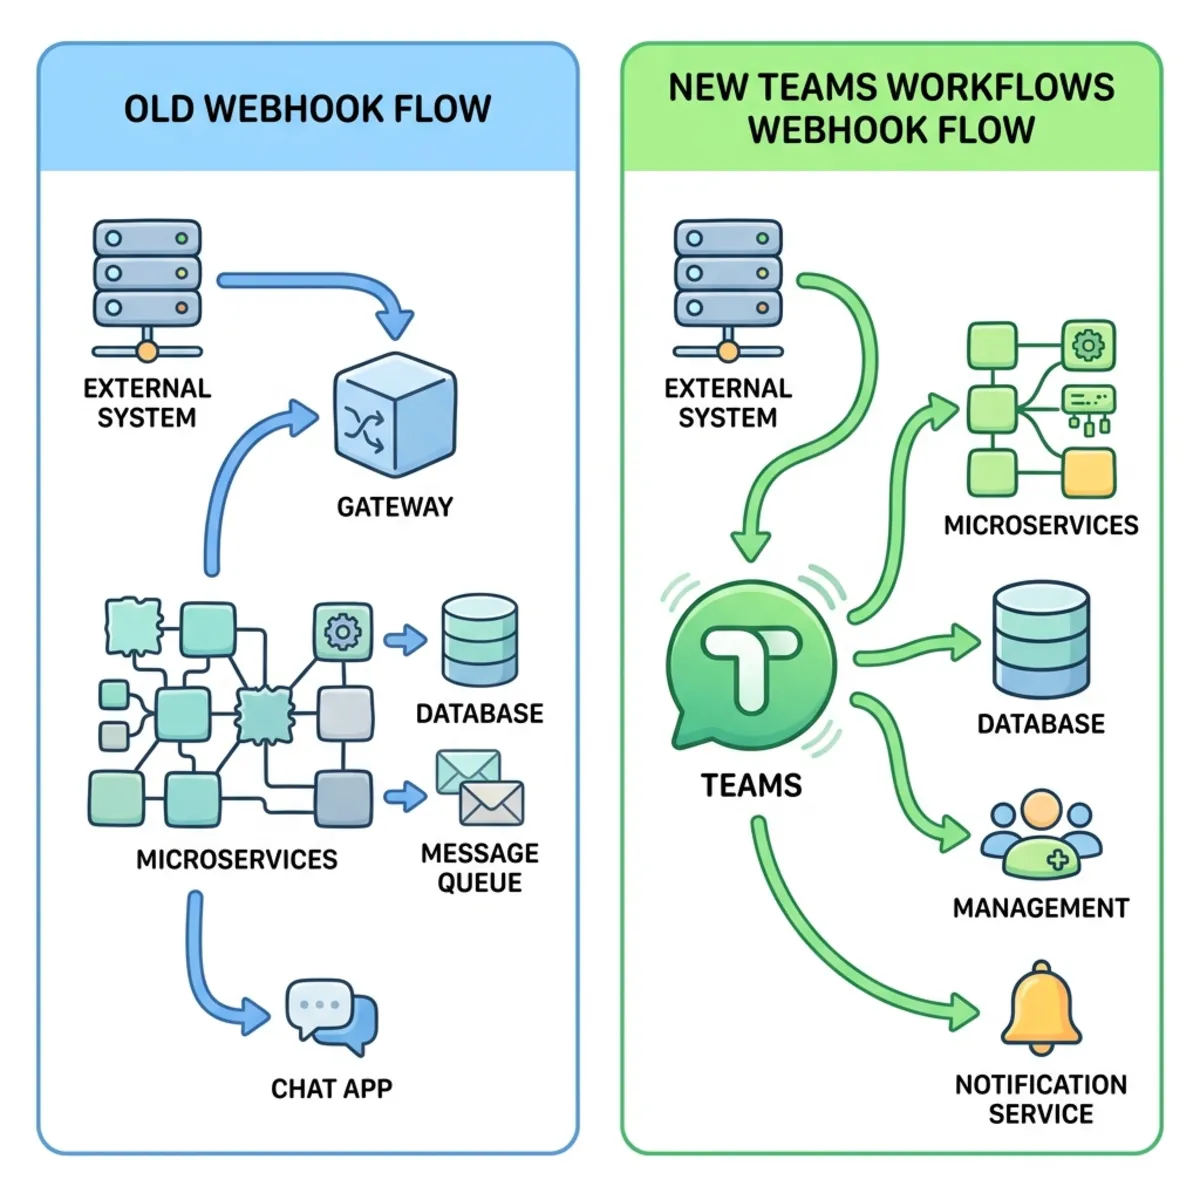
This guide demonstrates how to architect a low-code, serverless automation pipeline that broadcasts a near-real-time alert to a Microsoft Teams channel whenever a new file is uploaded to a target SharePoint Online document library. We’ll build it twice: first in the Azure portal designer so you understand every moving part, then fully automated from your terminal — no portal — using the Azure CLI, Bicep, and GitHub Copilot.
Read this first — the method has changed. Many older tutorials tell you to create a Teams Incoming Webhook via Manage channel → Connectors. That path no longer works: Microsoft permanently disabled Office 365 Connectors in Teams during the May 18–22, 2026 rollout. All connector-based webhooks must now use the Workflows (Power Automate) webhook instead. This guide uses the supported Workflows approach throughout. Reference: Retirement of Office 365 connectors within Microsoft Teams.
What You’ll Build (and What It Costs)
- Trigger: A polling SharePoint Online connector that checks a document library for new files on an interval you choose (e.g., every 1–3 minutes). This is the standard connector mechanism; for a true push alternative, see Why polling — and the event-driven alternative below.
- Action: An outbound HTTP POST to a Microsoft Teams Workflows webhook, delivering an Adaptive Card to your target channel.
- Time to build: ~20 minutes in the portal; ~5 minutes once you’ve scripted it.
- Cost: On the Consumption plan you pay per action execution and per trigger poll. Idle polling against an empty library is billed at a low per-check rate, and message delivery only runs when a file actually lands. For a single low-volume library this is typically pennies per month — but model your own poll frequency and upload volume before assuming.
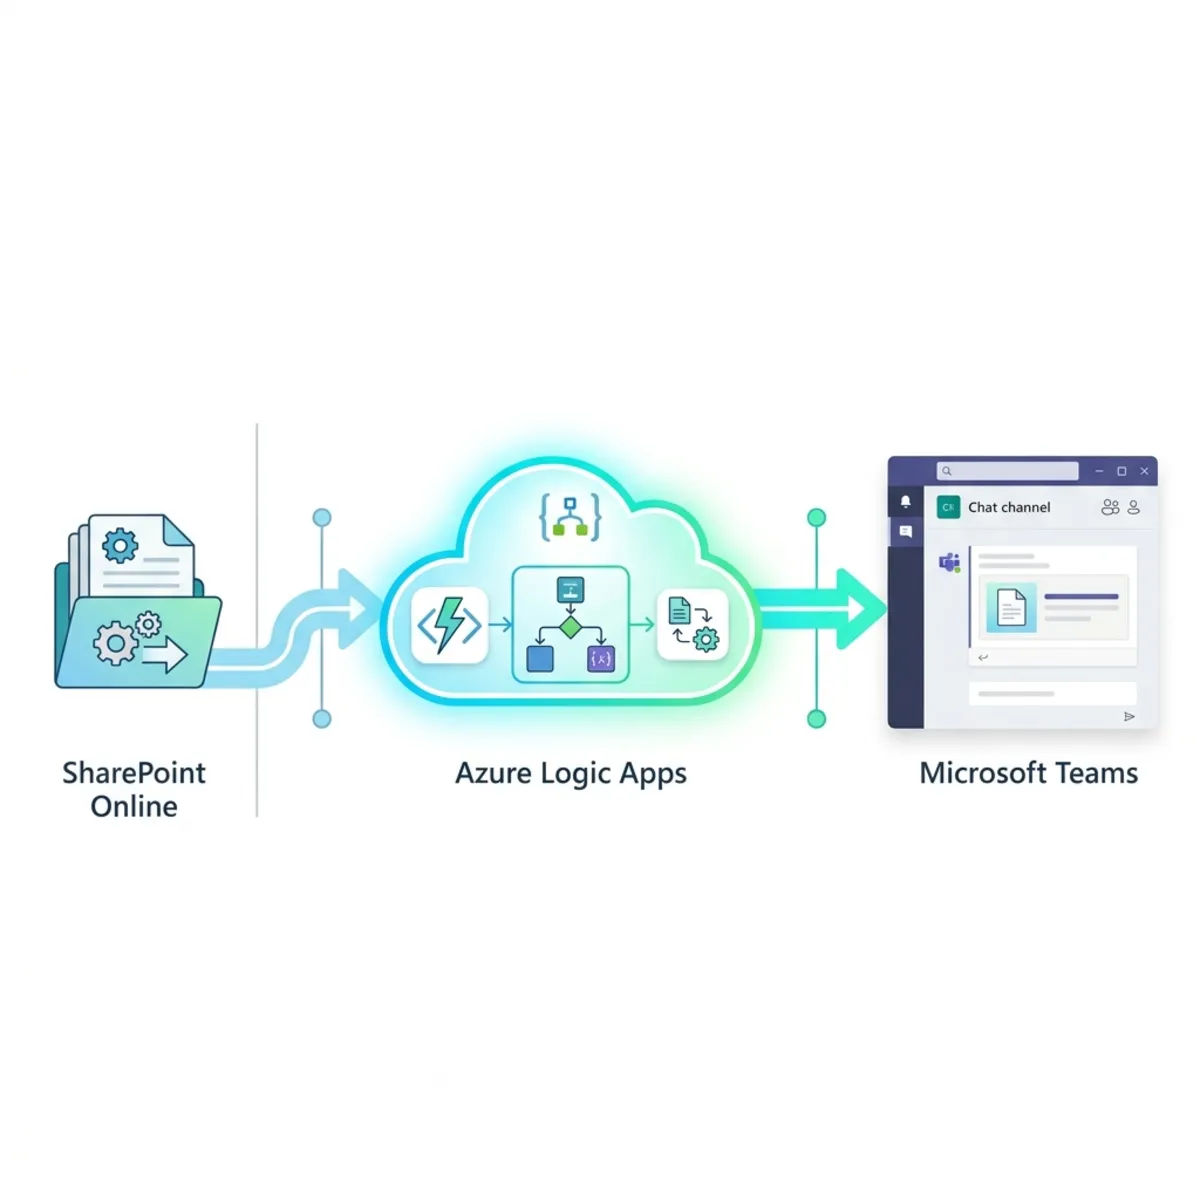
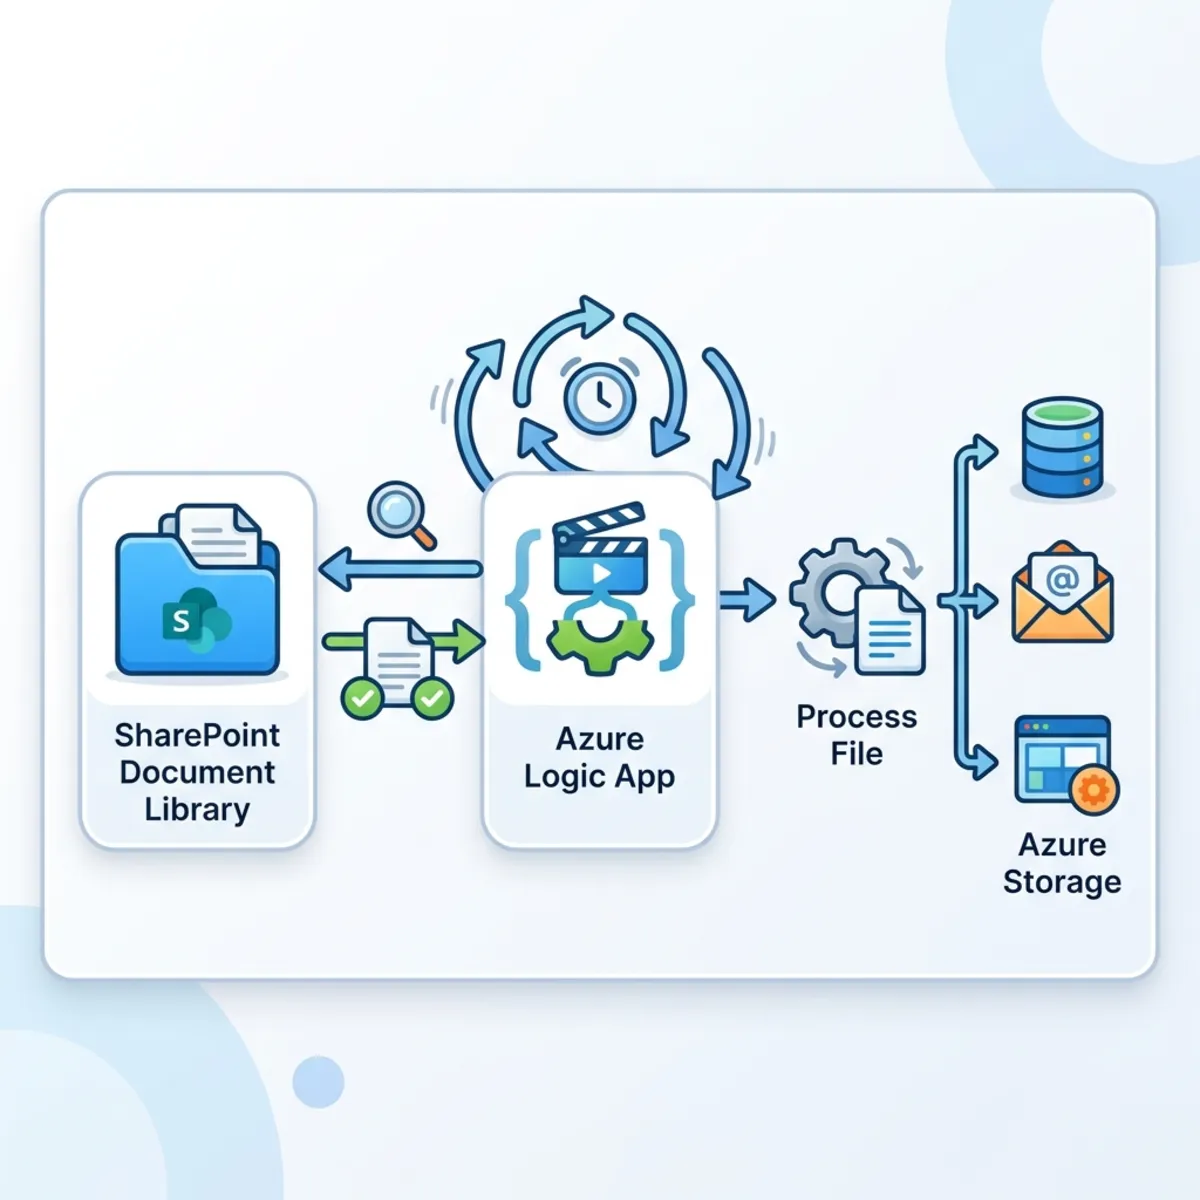
Azure Logic Apps and Microsoft Teams Architectural Flow
“Near-real-time,” not instant. The SharePoint trigger polls — it does not receive a push. A new upload is detected on the next poll, so end-to-end latency is roughly equal to your polling interval. Tightening the interval improves responsiveness but increases trigger executions (and cost). Pick the loosest interval your users will tolerate.
Why polling — and the event-driven alternative
A fair question: isn’t there a push trigger that fires the instant a file lands, instead of checking every few minutes? The short answer is that the SharePoint managed connector has no push trigger — and, importantly, Power Automate works exactly the same way. Its “When a file is created” trigger uses the same connector and also polls; Microsoft states it plainly: “SharePoint doesn’t send a notification to Power Automate when an item is created or modified. Power Automate polls the SharePoint directory to look for changes.” So switching to Power Automate would not buy you push — you’d inherit the same polling model.
True event-driven delivery is possible, but it lives outside the connector. You replace the polling trigger with a Logic App Request trigger (“When an HTTP request is received”), which gives you a public HTTPS endpoint, and then subscribe that endpoint to one of:
- Microsoft Graph change notifications on the document library’s
driveItemresource, or - Classic SharePoint webhooks registered on the list/library.
Either way, SharePoint/Graph then pushes a notification to your Logic App the moment something changes. The catch is the operational overhead that the managed connector hides from you:
| Polling connector (this guide) | Push (Graph notifications / SharePoint webhooks) | |
|---|---|---|
| Latency | ≈ your poll interval | Near-instant |
| Setup | Pick a trigger, done | Request trigger + subscription registration |
| Validation handshake | None | Required (echo a validation token on setup) |
| Subscription lifetime | N/A | Expires — you must renew on a schedule before it lapses |
| What the event tells you | The new file’s properties | Only “something changed” — you then call a delta / Get changes query to find the actual file |
| Best for | Most workflows; low/medium volume | Low-latency or high-volume scenarios where polling cost/lag hurts |
For this tutorial, polling is the right default: it’s simpler, it’s idiomatic, and it’s the very same mechanism Power Automate uses. Reach for Graph change notifications only when sub-minute latency or poll volume genuinely matters — and budget for the subscription-renewal and delta-query plumbing that comes with it.
Infrastructure Requirements
To implement this solution, ensure you possess the following access rights and environments:
- Azure Subscription: An active subscription with permission to create resources in a resource group.
- SharePoint Online Site: A site (e.g., IT support team) containing a document library, and an account that can read that library (the connector signs in as you).
- Microsoft Teams: Membership of the target team/channel (e.g., the evening team channel) and permission to create Workflows in your tenant. The “Post to a channel when a webhook request is received” template uses the standard request trigger — it is not a premium flow.
Step 1: Deploying the Azure Logic App Resource
- Sign in to the Azure portal.
- In the global search bar, type Logic Apps, select it under Services, and click Add.
- Hosting plan: Select Consumption (Multi-Tenant). This plan has the fastest setup and a pure pay-per-execution model, which is ideal for lightweight, event-driven tasks. Click Select.
Consumption vs. Standard. Consumption (multi-tenant) bills per action and is perfect for a single low-traffic workflow like this one. The Standard plan (single-tenant) runs on App Service infrastructure, supports local VS Code development and stateless workflows, and bills on a hosting plan — choose it when you need predictable pricing at scale, VNet integration, or many workflows packaged together. For this tutorial, Consumption is the right call.
- Resource details:
| Parameter | Configuration Value | Technical Best Practice |
|---|---|---|
| Subscription | Select your active Azure subscription | Ensure this matches your billing target. |
| Resource Group | Select an existing group or create one: rg-demo-automation | Use consistent naming conventions to track ownership and lifecycle. |
| Logic App Name | la-sharepoint-teams-notify | Choose unique, descriptive names that convey source, destination, and intent. |
| Region | The region geographically closest to your users | Minimizes network latency during API hops. |
| Log Analytics | No for this tutorial | Keeps the footprint minimal; enable it in production for diagnostics. |
Production tip: Use structured naming (e.g., rg-prod-automation-01) and enable Log Analytics in production so you get run history, failure diagnostics, and alerting on the workflow.
- Click Review + create, verify your parameters, then Create.
Step 2: Initializing the SharePoint Online Trigger
When deployment finishes, click Go to resource, then under Development Tools open the Logic App Designer.
- Click Add a trigger.
- Search for SharePoint and select the native managed SharePoint connector.
- Choose When a file is created (properties only). (Avoid “created or modified” unless you also want edits to fire a notification, and use “created in a folder” only if you must scope to a single subfolder.)
- Authenticate the connection. The first time you use the connector, Logic Apps prompts you to Sign in. This creates an API connection resource that stores the OAuth authorization the workflow uses to read SharePoint. Sign in with an account that can see the target library.
- Configure the trigger parameters:
- Site Address: Select your target site (e.g., IT support team).
- Library Name: Select your target library (e.g., the default Documents library).
- Folder (optional): Leave blank to watch the whole library, or pick a subfolder to scope it.
Polling interval lives here. In the trigger card, expand the recurrence settings to set how often Logic Apps checks the library (e.g., every 1 minute or every 3 minutes). This is your single biggest lever on the responsiveness ↔ cost trade-off.
Step 3: Provisioning the Microsoft Teams Workflows Webhook
This is the step that replaces the retired Incoming Webhook connector. You’ll create a Teams Workflow that exposes an HTTP endpoint and posts whatever it receives into your channel.
- In Microsoft Teams, click the ellipsis (
...) next to your target channel (e.g., evening team) and choose Workflows. (Alternatively, open the Workflows app from the left rail and click + New flow.) - Select the template Post to a channel when a webhook request is received. If it isn’t in the featured list, search for it.
- Give the flow a name (e.g., SharePoint upload notifier), confirm you’re signed in, and click Next.
- Select the Team and Channel that should receive the messages, then click Add workflow / Create flow.
- Copy the generated POST URL and store it somewhere safe. This URL is a secret — anyone who has it can post to your channel.
Treat the URL like a password. It carries its own authorization. Don’t commit it to source control or paste it into screenshots. In the automated build below we pass it as a secure parameter and (optionally) keep it in Azure Key Vault.
Payload format matters now. The Workflows webhook expects a Teams message envelope — an Adaptive Card (or a MessageCard) wrapped in attachments — not the bare { "text": "..." } body that the old Incoming Webhook accepted. The action in Step 4 uses the correct envelope.
Step 4: Configuring the Outbound HTTP Action
Return to the Logic App Designer to connect the trigger to the Teams endpoint.
- Under the SharePoint trigger, click + → Add an action.
- Search the Built-in tab for HTTP and select the plain HTTP action.
Do not pick “HTTP Webhook.” That action implements an asynchronous subscribe/unsubscribe pattern: it registers a callback URL and then waits for the remote service to call back before completing. A Teams webhook never calls back, so the action would stall until it times out. For a fire-and-forget POST, the plain HTTP action is the correct choice.
- Configure the HTTP action:
- Method: POST
- URI: Paste the Workflows webhook URL from Step 3.
- Headers: Content-Type → application/json
- Body: Use the Adaptive Card envelope below. Insert the File name with extension dynamic-content token where shown — selecting it from the picker produces the
@{triggerBody()?['{FilenameWithExtension}']}expression automatically.
- Click Save in the designer toolbar to commit the workflow.
Prefer zero JSON? As an alternative to the Workflows webhook + HTTP action, you can add the native Microsoft Teams action “Post message in a chat or channel,” pick the team and channel from dropdowns, and type the message with the file-name token inline. It’s the simplest path in the designer, but it requires a second OAuth connection (Teams) and is harder to provision headlessly — which is why the automated build later sticks with the connection-free webhook approach.
Step 5: Validation and Runtime Verification
Run an end-to-end test:
- Open your SharePoint document library (and the specific subfolder, if you scoped the trigger to one).
- Upload a file (e.g.,
test-document.docx) via Upload → Files or drag-and-drop. - Open the target Teams channel (evening team).
- Because the trigger polls, wait up to one polling interval for the run to fire.
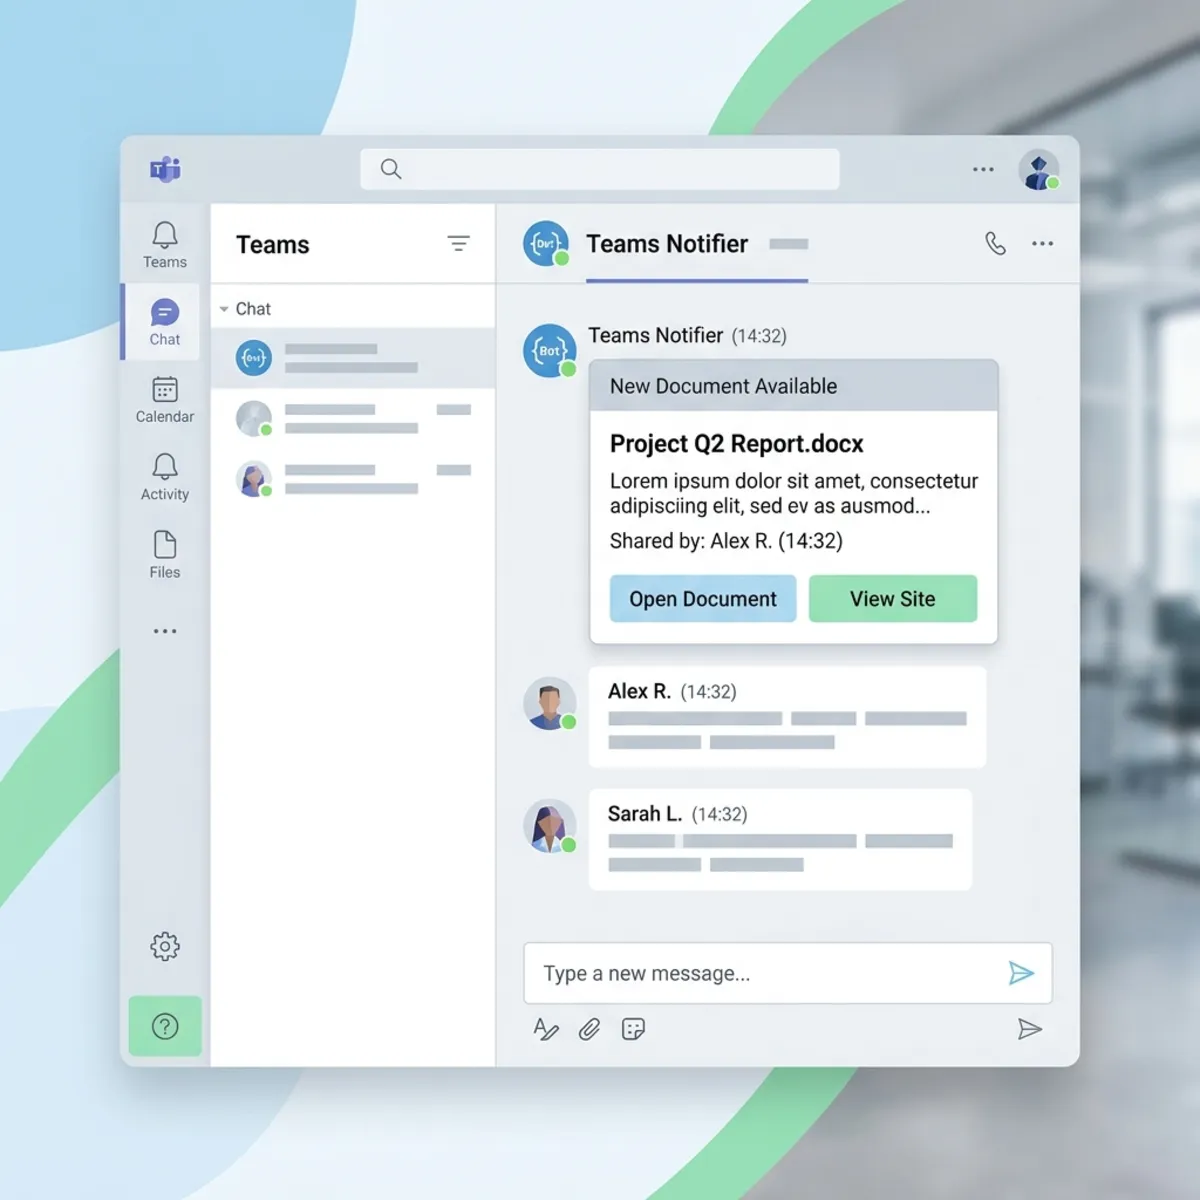
Once the Adaptive Card appears in your channel with the correct file name, your pipeline is live.
Troubleshooting
| Symptom | Likely cause | Fix |
|---|---|---|
| Nothing posts at all | Trigger hasn’t polled yet, or the file landed outside the watched folder | Wait one interval; confirm the library/folder scope; check Overview → Run history to see if the trigger fired |
| Run fires but Teams shows nothing | Wrong payload shape (e.g., bare { "text": ... }) | Use the Adaptive Card envelope from Step 4; a malformed body returns 400 from the Workflows endpoint |
| Run fails with 401/403 on the SharePoint trigger | API connection authorization expired or account lost library access | Reauthorize the SharePoint connection under API connections |
| Posts stop working after a while | Webhook URL rotated or flow deleted in Teams | Recreate the Workflow and update the URI |
| The HTTP action hangs/times out | You picked HTTP Webhook instead of HTTP | Replace it with the plain HTTP action |
Starting From a Different Trigger: A Microsoft 365 Cheat-Sheet
The pattern in this guide is trigger → post to Teams. The action half rarely changes — you can reuse the exact HTTP-to-Teams step from Step 4 no matter what starts the workflow. What changes is the trigger, and the single most important thing to know before you pick one is whether it pushes (fires the instant something happens) or polls (checks on a schedule, so there’s built-in latency).
Here’s how the common Microsoft 365 starting points actually behave in Logic Apps (the same connectors, and the same push/poll behavior, that Power Automate uses):
| Starting point | Connector / trigger | Push or poll? | What to know |
|---|---|---|---|
| New email to your own mailbox | Office 365 Outlook — When a new email arrives (V3) | Near-instant (push) | Webhook-backed, but only for the connection owner’s mailbox; it won’t reliably fire for an arbitrary other address |
| New email to a shared mailbox | Office 365 Outlook — When a new email arrives in a shared mailbox (V2) | Polling | ⚠️ No real-time option — expect a few minutes’ delay (see below) |
| New Teams channel message | Microsoft Teams — When a new channel message is added | Polling (~3 min default) | Fires for root messages only, not replies |
| New Teams chat message | Microsoft Teams — When a new chat message is added | Polling | Supports only one user per flow |
| New SharePoint file | SharePoint — When a file is created (properties only) | Polling | This guide’s trigger |
| New OneDrive file | OneDrive for Business — When a file is created | Polling | Same model as SharePoint |
| Calendar event soon/changed | Office 365 Outlook — When an upcoming event is starting soon | Polling | Microsoft’s docs label it a polling trigger |
| Anything, truly instant | Built-in — When an HTTP request is received (Request trigger) | Push (you are the endpoint) | Pair with Microsoft Graph change notifications or SharePoint webhooks for real-time on mail, chat, files, events, etc. |
The shared-mailbox gotcha (directly answering a common question). No, there is no push trigger for a shared mailbox — the connector polls, and Microsoft confirms there’s “no built-in trigger… that supports real-time monitoring of unread emails from a shared mailbox as soon as they arrive.” If a few minutes of delay is fine, use When a new email arrives in a shared mailbox (V2) and move on. If you genuinely need instant processing, drop the connector and use a Graph change-notification subscription on /users/{shared-mailbox}/mailFolders('Inbox')/messages delivered to a Logic App Request trigger — the same push pattern described in Why polling — and the event-driven alternative above.
A Logic Apps advantage over Power Automate. For polling triggers, Logic Apps Consumption lets you set the recurrence interval directly on the trigger (every 1 minute, 3 minutes, etc.). In Power Automate the polling frequency is tied to your license tier — you can’t simply dial it down. Same connector, more control.
Adapting the workflow to a new starting point
Whichever trigger you choose, only two things change versus this guide:
- The trigger block — swap the SharePoint trigger for your chosen one and sign into its connection.
- The dynamic-content tokens in the Adaptive Card — e.g., for an email trigger show the Subject and From; for a Teams message show the message body and sender. The HTTP-to-Teams action itself is unchanged.
For example, a shared mailbox → Teams alert would keep Step 4 exactly as-is and only change the card text to something like New email from @{triggerBody()?['from']} — @{triggerBody()?['subject']}. Let Copilot do the rewrite:
Copilot Chat prompt — repoint the trigger
“Take my workflow.json and replace the SharePoint trigger with the Office 365 Outlook ‘When a new email arrives in a shared mailbox (V2)’ trigger for the mailbox support@contoso.com, polling every 3 minutes. Keep the HTTP-to-Teams action identical, but change the Adaptive Card text to show the email’s subject and from. Note in a comment that this trigger polls and has no push option.”
Fully Automated Build — No Portal Required
Everything above can be provisioned without a single Azure portal click. There are two parallel ways to do it, and they produce the exact same result:
- The terminal path (this section) — Azure CLI + GitHub Copilot, scripted and repeatable. Best when you want Infrastructure-as-Code and CI/CD.
- The VS Code path (its own section below: Or Build It Visually in VS Code) — the Azure Logic Apps extension with a visual designer. Best when you’d rather click than write JSON.
Both share the same Teams webhook URL, the same SharePoint connection consent, and the same Copilot prompt library — so the VS Code section only covers what’s different, and points back here for the rest. This guide assumes you already have an Azure subscription and GitHub Copilot available both in VS Code and as the Copilot CLI.
The one click you can’t avoid
The Teams Workflows webhook URL is created inside Teams/Power Automate and is interactive to provision. Create it once (Step 3 above), copy the URL, and treat it as an input to the automation. Likewise, the SharePoint API connection needs a one-time OAuth consent. Everything else — resource group, connection resource, workflow definition, and deployment — is fully scriptable and repeatable. I’ll flag those two human-in-the-loop moments honestly as we go.
Your toolbelt
In VS Code, install:
- Azure Logic Apps (Consumption) (
ms-azuretools.vscode-logicapps) — browse, create, edit, and deploy Consumption logic apps without the portal. - Azure Tools / Azure CLI Tools — for az IntelliSense and
.azcliscratch files. - GitHub Copilot + Copilot Chat — to generate and refine the artifacts below.
About az logic. The Logic Apps CLI extension targets Consumption workflows only; its az logic workflow commands are now generally available, though the broader tooling has historically carried an experimental label. It’s great for demos and personal automation; for production CI/CD prefer the Bicep/ARM path shown later, which is fully supported. Docs: Create and manage workflows with Azure CLI.
Set up your project folder first
Before running any commands, make a folder to hold your files. This folder is your project — keeping everything in one place (and under version control) is what makes the automation reproducible.
You’ll create just a handful of plain-text files here:
Add a .gitignore so the secret webhook URL and local cruft never get committed:
Mental model for newcomers: the files in this folder are your source of truth; Azure runs a copy of them. You push changes up by deploying, and pull the live version back down by exporting (both shown below). Keep the Teams webhook URL in an environment variable or Key Vault — not in these files.
Step A — Sign in and create the resource group
Step B — Author the workflow definition (let Copilot write it)
A Consumption logic app is just a JSON workflow definition plus a parameters block. Rather than hand-writing it, open VS Code and ask Copilot Chat to scaffold it.
Copilot Chat prompt — generate the workflow definition
“Create an Azure Logic Apps Consumption workflow definition JSON file named workflow.json. The trigger is the SharePoint ‘When a file is created (properties only)’ managed connector, polling every 3 minutes, referencing a connection named sharepointonline via
@parameters('$connections'). Add one HTTP action (not HTTP Webhook) that POSTs to a teamsWebhookUrl workflow parameter with Content-Type: application/json and a Teams Adaptive Card message envelope whose TextBlock shows@{triggerBody()?['{FilenameWithExtension}']}. Include the$connectionsand teamsWebhookUrl parameters. Wrap it as{ "definition": { ... }, "parameters": { ... } }so it’s compatible withaz logic workflow create --definition.”
The result should look close to this (your exact SharePoint trigger path/dataset encoding is connector-generated — verify it against the designer’s Code view or let the VS Code Logic Apps extension produce it):
Step C — Create and authorize the SharePoint connection
The workflow references a Microsoft.Web/connections resource named sharepointonline. You can create it from the CLI, but the SharePoint connector needs an interactive OAuth consent before it will return data — this is the second (and last) human-in-the-loop moment.
Copilot CLI prompt — scaffold the connection command
After the connection resource exists, open it once to grant consent (the consent link appears in the connection’s Edit API connection blade, or VS Code’s Logic Apps extension will prompt you on first run). This is a one-time action per connection.
Step D — Deploy without the portal (two supported paths)
Path 1 — az logic (fastest):
Path 2 — Bicep + az deployment (repeatable, production-grade): ask Copilot to convert the same resources into IaC.
Copilot Chat prompt — generate Bicep
“Write a main.bicep that deploys: (1) a Microsoft.Web/connections resource for the sharepointonline managed API, and (2) a Microsoft.Logic/workflows Consumption resource whose definition is the workflow above, wiring
parameters.$connections.sharepointonlineto the connection’s resource ID and exposingteamsWebhookUrlas a@secure()parameter. Add a main.bicepparam file. Then give me theaz deployment group createcommand that passesteamsWebhookUrlfrom an environment variable so the secret never lands in source control.”
Step E — Verify and manage from the CLI
Keeping local and Azure in sync
This is the part that most often confuses new starters, because it behaves differently depending on your plan — and this guide uses Consumption.
Consumption (this guide): one source of truth, no local runtime. A Consumption logic app cannot run on your laptop — there is no local engine to execute it. So “sync” simply means your workflow.json/Bicep is the source of truth, and you move it one direction at a time:
- Push (local → Azure): deploy with
az logic workflow create/updateoraz deployment group create(Step D). This overwrites the cloud copy with your file. - Pull (Azure → local): export the live definition back into your file so the two match — useful if someone edited the workflow in the portal:
Watch out for drift. If you edit in the portal designer and in your local file, whoever deploys last silently overwrites the other. Pick one habit: either always edit locally and deploy, or always edit in the cloud and export. Commit after every change so git is your history.
The VS Code Azure Logic Apps (Consumption) extension blurs this slightly: when you open a logic app from the Azure view and edit it in the designer, you’re editing the cloud resource directly and saving back to Azure — convenient, but it isn’t a local project you can run offline.
Standard (if you want true local development). If “build and debug on my machine, then sync to Azure” is what you’re really after, that’s a Standard logic app capability, not Consumption. Standard stores each workflow as a workflow.json inside a local project folder, runs locally via the Azure Functions Core Tools (func start), and deploys through the Azure Logic Apps (Standard) VS Code extension or zip deploy. Microsoft even ships an Export from Consumption to Standard path in that extension if you start here and outgrow the multi-tenant model. The trade-off is a hosting-plan bill instead of pure pay-per-execution.
| Capability | Consumption (this guide) | Standard |
|---|---|---|
| Run/debug locally | ❌ No local runtime | ✅ func start in VS Code |
| Files as a local project | A source-of-truth file you deploy | ✅ Native project folder |
| Sync model | Push (deploy) / Pull (export) | Live local dev ↔ deploy |
| Deploy command | az logic workflow … | az logicapp … / zip deploy |
| Billing | Per action execution | Hosting plan |
A starter prompt library for GitHub Copilot
Copy-paste these to reproduce (or extend) the whole solution:
- Scaffold: “Generate a complete Azure Logic Apps Consumption workflow.json that posts a Teams Adaptive Card via an HTTP action whenever a file is created in a SharePoint library; parameterize the Teams webhook URL and the SharePoint connection.”
- IaC: “Convert workflow.json into main.bicep + main.bicepparam with a
@secure()Teams webhook parameter and a Microsoft.Web/connections resource for SharePoint.” - Deploy: “Give me the exact az commands to log in, create resource group rg-demo-automation in westeurope, and deploy this Bicep, reading the webhook URL from
$TEAMS_WEBHOOK_URL.” - Harden: “Refactor the Bicep to store the Teams webhook URL in Azure Key Vault and reference it via a Key Vault getSecret instead of a plain parameter.”
- Extend: “Add a Condition so the notification only fires for files whose extension is .docx or .pdf, and include the uploader’s display name in the Adaptive Card.”
- Debug (Copilot CLI):
gh copilot suggest "az command to show the last 5 runs and failures for a Consumption logic app"
What’s automated vs. manual, summarized. Scriptable: resource group, connection resource, workflow definition, deployment, enable/disable, run inspection. Manual (once each): creating the Teams Workflows webhook URL, and granting OAuth consent to the SharePoint connection. After that first consent, every redeploy is hands-off.
Once az logic workflow show reports state: Enabled and a test upload produces an Adaptive Card in your channel, you have a fully reproducible, portal-free SharePoint-to-Teams notification pipeline — authored, deployed, and managed entirely from the command line.
Or Build It Visually in VS Code (No Portal)
If you’d rather use a designer than hand-edit JSON, the Azure Logic Apps (Consumption) VS Code extension builds the same pipeline — trigger, action, and all — without the portal. This section covers only what’s different from the terminal path; for anything not mentioned here (the Teams webhook URL, the SharePoint OAuth consent, the Copilot prompt library, and the sync model), use the terminal section above.
What you’ll need: the Azure Logic Apps (Consumption) extension (ms-azuretools.vscode-logicapps) and GitHub Copilot — both already in your toolbelt. You won’t need to write workflow.json or Bicep by hand.
- Sign in to Azure inside VS Code. In the Azure view, sign in — this replaces
az loginfrom Step A. No separate terminal session required. - Create the logic app from the extension. Right-click your subscription → Create Logic App, then pick the resource group, name, and region in the command palette. This replaces
az group create+ the deploy in Steps A and D. - Build the trigger and action in the designer. Add the SharePoint “When a file is created (properties only)” trigger and the HTTP POST action exactly as in the portal walkthrough (Steps 2 and 4 of the main guide). The key VS Code advantage: the extension handles the SharePoint connection sign-in inline, so the one-time OAuth consent from terminal Step C just happens when you first authenticate — there’s no separate connection resource to create.
- Reuse the Teams webhook URL. Paste the same Workflows webhook URL from Step 3 of the main guide into the HTTP action’s URI, with the same Adaptive Card body from Step 4. Creating that URL in Teams is still the one unavoidable manual step.
- Deploy and debug without the portal. Right-click the logic app → Deploy / Upload, then watch Run history in the same Azure view to confirm runs and inspect failures.
Copilot still helps here. Use the same prompt library from the terminal section. Inline, open the JSON behind the designer and ask Copilot Chat things like “explain what this SharePoint trigger path is doing” or “change the polling interval to 1 minute and add a timestamp to the Adaptive Card.”
How this path differs from the terminal path:
| Terminal path | VS Code path | |
|---|---|---|
| You author | workflow.json / Bicep by hand (Copilot-assisted) | Visual designer; JSON generated for you |
| SharePoint consent | Separate connection resource + consent (Step C) | Handled inline at first sign-in |
| Deploy | az logic workflow create / az deployment group create | Right-click → Deploy |
| Repeatable IaC / CI-CD | ✅ Yes (files in git) | ⚠️ Not by default — export the definition (see the sync section) to version it |
| Best for | Automation, pipelines, reviewers | Quick visual builds, learning |
Either way it’s still a Consumption logic app — so there’s no local runtime, and the same push/pull rules from Keeping local and Azure in sync apply. When a test upload lands an Adaptive Card in your channel, you’ve built the entire pipeline without ever opening the Azure portal.
Read next