Microsoft 365 Backup: Step-by-Step Setup Guide

Writer

Set up billing, protect SharePoint, OneDrive and Exchange, then verify that backups and restores work. Follow the sections in order.
Prerequisites
Prepare the following:
- Admin account: Use Global Administrator for setup and management of all three workloads. For ongoing administration, use Microsoft 365 Backup Administrator where possible.
- Azure subscription: Must be in the same tenant as Microsoft 365. Your account needs Owner or Contributor permissions on the subscription and resource group. Global Administrator does not replace these Azure permissions.
- Resource group: Use an existing resource group or create one during setup.
- License: The tenant needs at least one SharePoint license, or a license that includes SharePoint.
- Backup scope: Decide whether to protect all sites, accounts and mailboxes, or selected items.
- Exclusions: Prepare any items to exclude from full-workload backup.
- Recovery window: Choose the required retention period:
| Service | Available recovery windows | Maximum |
|---|---|---|
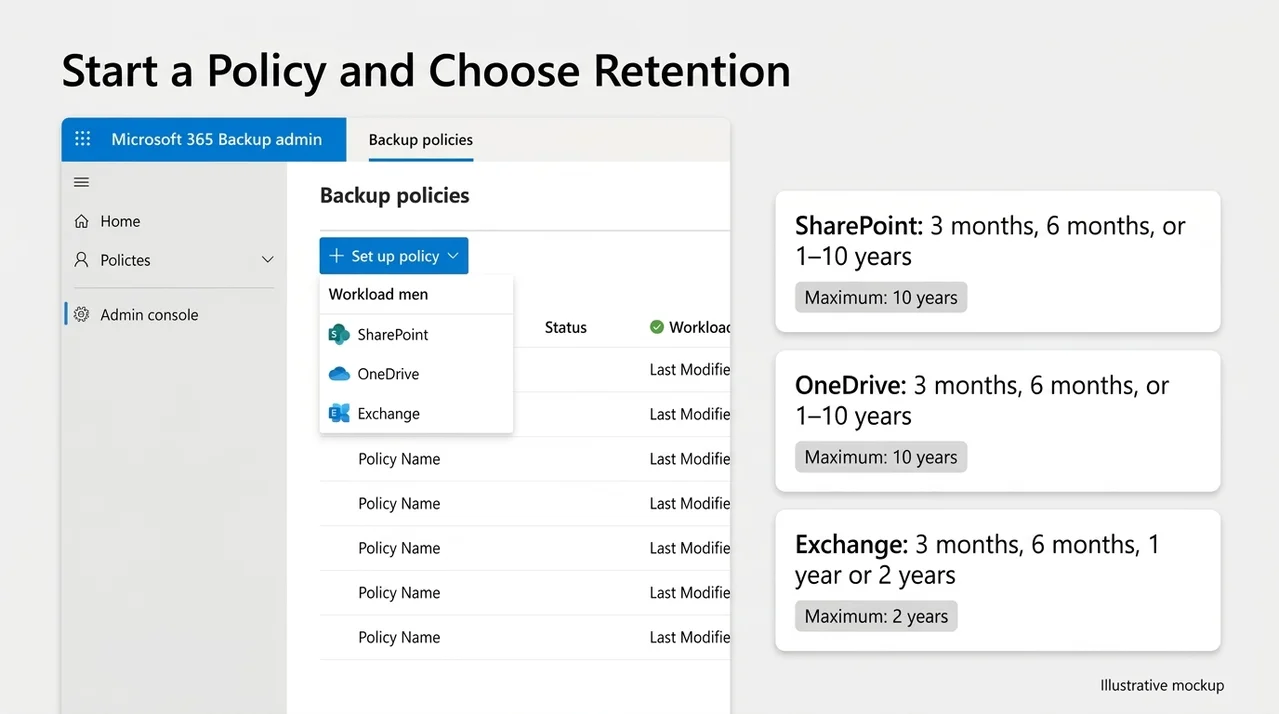
| SharePoint | 3 months, 6 months, or any whole year from 1–10 years | 10 years |
| OneDrive | 3 months, 6 months, or any whole year from 1–10 years | 10 years |
| Exchange | 3 months, 6 months, 1 year or 2 years | 2 years |
- Notification recipients: Prepare email addresses or email-enabled groups for backup alerts.
- Restore-test item: Prepare a non-production site, account or mailbox for testing recovery.
Important: The Back up all options below are labeled Preview. Review the scope and potential costs before enabling them.
1. Create the Billing Policy
In the Microsoft 365 admin center:
- Click Billing → Pay-as-you-go.
- Open Billing policies → Add a billing policy.
- Enter
M365-Backup-Billingas the name. - Select your Subscription.
- Select your Resource group, or click Create a new resource group.
- Select your Region.
- Tick I accept the pay-as-you-go billing terms of service.
- Click Next.
- On Choose users, leave All users applied → click Next.
- On Budget, optionally tick Set a budget for this policy.
- If setting a budget, configure the amount, reset period and alert recipient groups.
- Click Next.
- Review the details → click Create policy.
Important considerations:
- Region determines where tenant ID and usage data for billing are stored. The setup documentation does not state that this region must match the Microsoft 365 tenant region.
- All users does not select what gets backed up. Backup scope is configured separately.
- A budget sends alerts. It does not stop the service or charges when reached.
2. Connect the Billing Policy
Continue from New billing policy created:
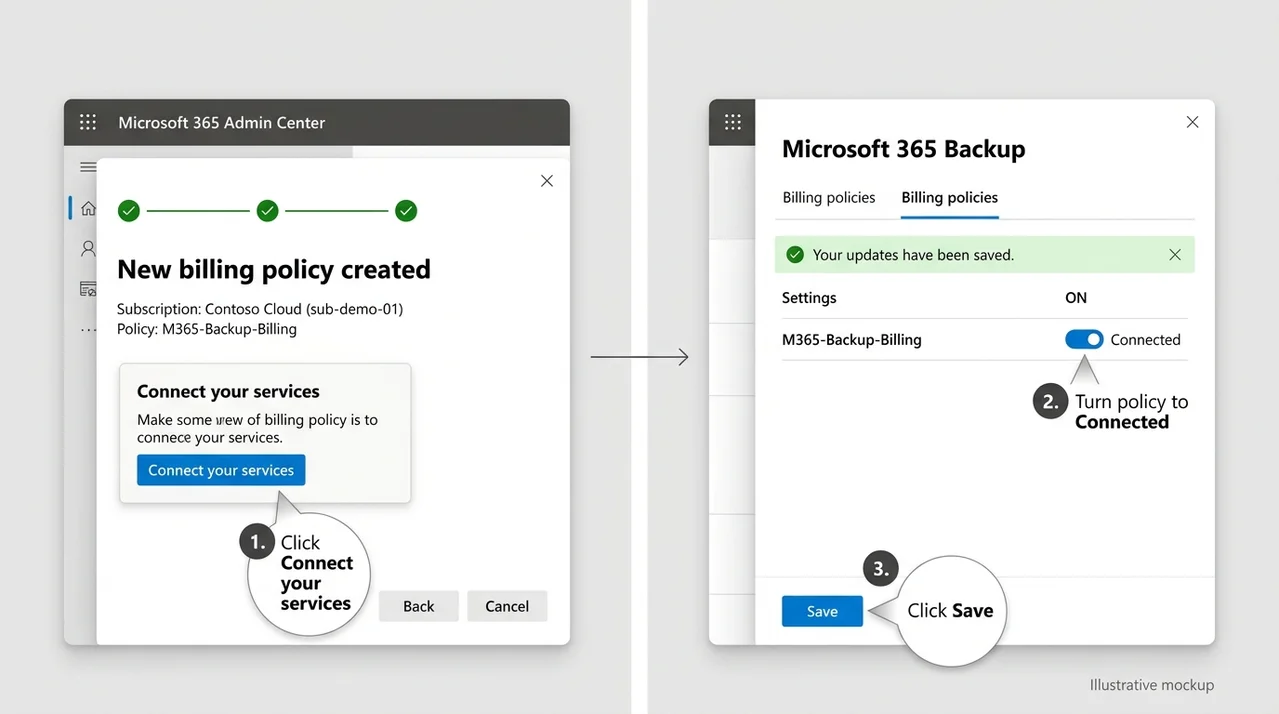
- Click Connect your services.
- On the Services tab, find Microsoft 365 Backup.
- Click Connect a policy.
- In the side panel, open Billing policies.
- Find
M365-Backup-Billing. - Turn Connection status to Connected.
- Click Save.
- Confirm Your updates have been saved.
- Close the panel using X.
3. Create the SharePoint Backup Policy
Open the Wizard
- Click Settings → Microsoft 365 Backup.
- Open the Backup policies tab.
- Click Set up policy → SharePoint.
- On Overview, click Next.
Choose the Backup Scope
Follow Option A or Option B.
Option A: Back Up Specific Sites
- Select Select sites individually → click Next.
- Search for and select the sites to protect.
- Click Next to continue to Backup settings.
Option B: Back Up All SharePoint Sites
- Select Back up all SharePoint sites (Preview) → click Next.
- On Full SharePoint backup, read the coverage and cost information.
- Tick I understand the changes and potential cost implications of turning on Full SharePoint backup.
- Click Next.
- On Exclude sites, choose:
- No, back up all sites that match the scope, or
- Yes, exclude specific sites, then select the exclusions.
- Click Next.
Configure Backup Settings
- Check the Policy name:
- For selected sites, enter a name such as
SharePoint-Backup. - For full backup, the displayed name is
Full SharePoint backup.
- For selected sites, enter a name such as
- Open Recovery window.
- Choose 3 months, 6 months, or 1–10 years.
- Click Next.
Review and Create
On Review and finish, check:
- Scope
- Policy name
- Recovery window
- Frequency
- Billing
Complete policy creation using the wizard’s final action.
4. Create the OneDrive Backup Policy
Open the Wizard
- Click Settings → Microsoft 365 Backup.
- Open the Backup policies tab.
- Click Set up policy → OneDrive.
- On Overview, click Next.
Choose the Backup Scope
Follow Option A or Option B.
Option A: Back Up Specific Accounts
- Select Select accounts individually → click Next.
- Search for and select the accounts to protect.
- Click Next to continue to Backup settings.
Multi-Geo note: Individual-account selection does not support adding accounts across multiple geographies.
Option B: Back Up All OneDrive Accounts
- Select Back up all OneDrive accounts (Preview) → click Next.
- On Full OneDrive backup, read the coverage and cost information.
- Tick I understand the changes and potential cost implications of turning on Full OneDrive backup.
- Click Next.
- On Exclude accounts, choose:
- No, back up all accounts that match the scope, or
- Yes, exclude specific accounts, then select the exclusions.
- Click Next.
Configure Backup Settings
- Check the Policy name:
- For selected accounts, enter a name such as
OneDrive-Backup. - For full backup, the displayed name is
Full OneDrive backup.
- For selected accounts, enter a name such as
- Open Recovery window.
- Choose 3 months, 6 months, or 1–10 years.
- Click Next.
Review and Create
On Review and finish, check the Scope, Policy name, Recovery window, Frequency and Billing.
Complete policy creation using the wizard’s final action.
5. Create the Exchange Backup Policy
Open the Wizard
- Click Settings → Microsoft 365 Backup.
- Open the Backup policies tab.
- Click Set up policy → Exchange.
- On Overview, click Next.
Choose the Backup Scope
Follow Option A or Option B.
Option A: Back Up Specific Mailboxes
- Select Select mailboxes individually → click Next.
- Search for and select the mailboxes to protect.
- Click Next to continue to Backup settings.
Multi-Geo note: Individual-mailbox selection does not support adding mailboxes across multiple geographies.
Option B: Back Up All Exchange Mailboxes
- Select Back up all Exchange mailboxes (Preview) → click Next.
- On Full Exchange backup, read the coverage and cost information.
- Tick I understand the changes and potential cost implications of turning on Full Exchange backup.
- Click Next.
- On Exclude mailboxes, choose:
- No, back up all mailboxes that match the scope, or
- Yes, exclude specific mailboxes, then select the exclusions.
- Click Next.
Configure Backup Settings
- Check the Policy name:
- For selected mailboxes, enter a name such as
Exchange-Backup. - For full backup, the displayed name is
Full Exchange backup.
- For selected mailboxes, enter a name such as
- Open Recovery window.
- Choose 3 months, 6 months, 1 year or 2 years.
- Click Next.
Important: Exchange has a maximum recovery window of 2 years, not 10 years.
Review and Create
On Review and finish, check the Scope, Policy name, Recovery window, Frequency and Billing.
Complete policy creation using the wizard’s final action.
6. Understand Full-Workload Backup Coverage
For Full SharePoint, Full OneDrive and Full Exchange backup:
- Eligible existing items are included.
- New sites, accounts or mailboxes are checked every 24 hours.
- If a new item matches another policy’s scope, that policy handles the backup. Otherwise, the full-workload policy includes it.
Items are not included when they are:
- Already part of another active or paused backup policy.
- On the full-workload policy’s exclusion list.
- Being permanently deleted from Microsoft 365 Backup.
Excluded items can still be protected by another backup policy.
Retention caution: A scope change that reduces an item’s recovery window starts a 30-day grace period. After that period, recovery points older than the new window are permanently deleted.
7. Enable Backup Email Notifications
- Open Settings → Microsoft 365 Backup.
- Open Email notifications.
- Turn notifications On.
- Add recipients to the Backup Notification List.
- Optionally enable routine event notifications.
- Click Save.
8. Check Initial Backup Progress
- Open Settings → Microsoft 365 Backup.
- Open the Backup policies tab.
- Click Refresh.
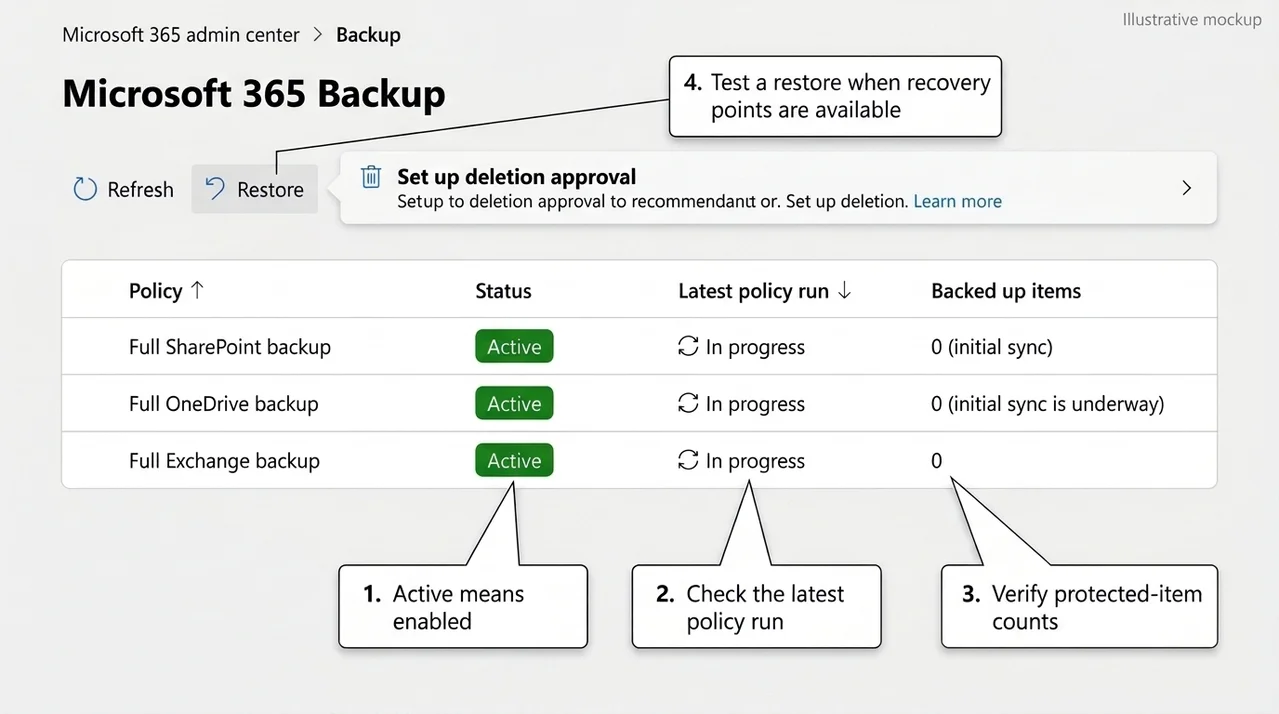
- Check Status and Latest policy run for each policy.
- Select each policy → open its details.
- Confirm the expected items and recovery window.
- Check whether Backed up items increases.
Understand the Status
- Active: The policy is enabled.
- Latest policy run: In progress: The policy run has not finished.
- 0 backed-up items: The dashboard is not yet showing protected items. Check again and review policy details before considering setup complete.
Active does not, by itself, confirm that the initial backup has finished.
If counts remain zero, review the scope, exclusions and any Action required information. Full-workload backup protects eligible items that are not already included in another policy.
Do not create duplicate policies simply because the initial run is still in progress.
Understand the Recovery Window
The recovery window is the configured retention period, not existing backup history.
For example, a newly created 10-year policy does not provide recovery points from before backup started. Initial recovery points take time to become available.
9. Configure Deletion Approval
At the top of the dashboard:
- Find Set up deletion approval.
- Click Set up now.
- Follow the configuration prompts to assign the required approvers.
- Save the configuration.
Purpose: Require additional approval before a backup deletion grace period can be shortened. This protects against accelerated accidental or malicious deletion. It does not mean every backup or restore requires approval. Additional approval is required for faster permanent deletion.
10. Perform a Small Restore Test
Once recovery points are available:
- Choose a non-production test site, account or mailbox.
- Click Restore on the relevant workload card.
- Select the test item.
- Choose an available recovery point.
- Review the restore scope and destination.
- Where supported, choose a new location rather than replacing production content.
- Submit the restore.
- Open Restorations to monitor progress.
- Verify the recovered content.
Important: Restoring to the original location can replace existing content. Review the destination carefully before submitting. See Restore data in Microsoft 365 Backup for the available restore options.
11. Use the Dashboard for Ongoing Monitoring
| Dashboard area | What to check |
|---|---|
| Backup policies | Policy status, scope, latest runs and recovery windows |
| Restorations | Submitted restore operations |
| Reports | Available backup reporting |
| Approvals pending | Requests awaiting approval |
| Backed up items | Protected-item counts |
| Removed items | Items removed from protection |
| Items being permanently deleted | Pending permanent deletions |
During the applicable deletion grace period, an Undo Deletion option can cancel an item’s pending offboarding.
Optional Recommendations
The Recommendations cards are optional improvements, not unfinished setup tasks:
- CSV-based bulk restore: Consider for recovery involving many items.
- Dynamic rules for policy automation: Consider for rule-based protection scopes.
12. Final Setup Checklist
- Billing policy is connected.
- All intended backup policies are active.
- Initial policy runs have completed successfully.
- Expected items appear as protected.
- Recovery windows match organizational requirements.
- Email notifications are configured.
- Deletion approval is configured.
- A small restore test has succeeded.
- An administrator is assigned to monitor backups and restore requests.
References
Read next