Copilot Studio ALM: Deploy the Whole Solution, Not Just the Agent

Writer

An agent works in development. Its topics respond correctly, its tools connect, and its knowledge sources return useful answers. Then the solution reaches production, and something breaks.
The mistake is often in the release model: treating the agent as a single object instead of a collection of components, dependencies, and environment-specific configuration.
Application lifecycle management (ALM) in Copilot Studio is about making that collection repeatable. Power Platform solutions provide the deployment package. Pipelines control how a version moves through environments. Target configuration and agent publishing complete the release.
This guide explains that model and walks through a custom-host pipeline for development, user acceptance testing (UAT), and production. It focuses on agents powered by the standard harness, the scope of Microsoft’s Copilot Studio solution-management documentation. Product requirements and time-sensitive details reflect documentation checked on October 26, 2026.
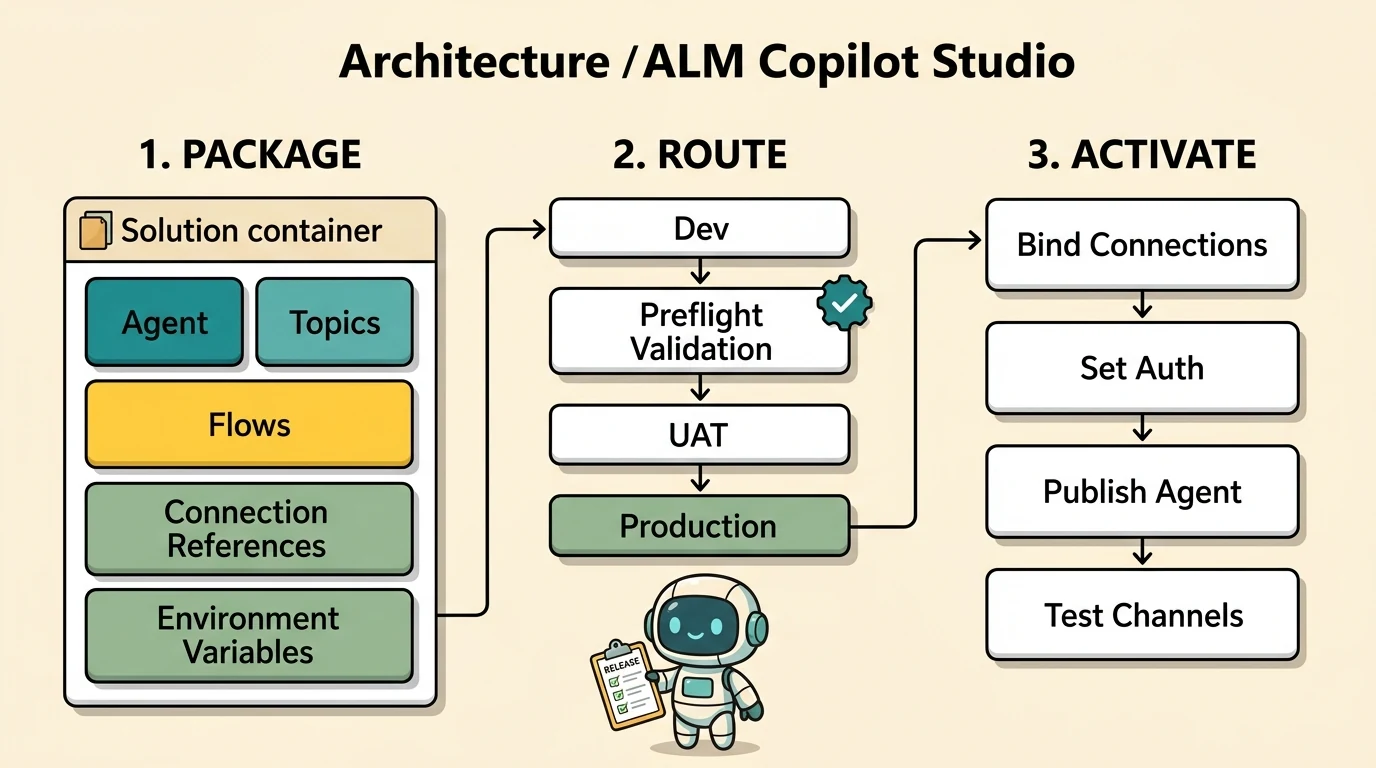
The mental model: package, route, activate
Think of a release as three separate concerns:
- Package: What components must travel together?
- Route: Which environments and approval gates must the release pass through?
- Activate: What must be configured and published before the imported agent is usable?
A solution answers the first question. A pipeline answers the second. Neither eliminates the third.
Microsoft describes solutions as carriers for agents. Agents are created within solutions, and custom solutions support export, import, and pipeline-based ALM. This is the same solution framework used for other supported Power Platform components, including apps and flows. See Copilot Studio solutions and Power Platform solution concepts.
The carrier analogy has a boundary: a solution is not a clone of the source environment. Pipelines do not transport ordinary business records stored in Dataverse tables. Some agent properties and separately stored resources also do not transfer automatically. Microsoft’s pipeline overview and agent import/export guidance explicitly document these limits.
A successful solution import proves that a package was installed. It does not prove that the agent is ready for users.
Choose environments for a purpose, not for a diagram
A practical starting recommendation is three workload environments:
- Development: Author and change the solution.
- UAT: Validate the release with representative scenarios and users.
- Production: Run the approved release.
Add integration testing, staging, or preproduction when each provides a distinct validation boundary. More environments can improve isolation, but they also create more configuration and maintenance work. An extra stage should answer a question that the existing stages cannot.
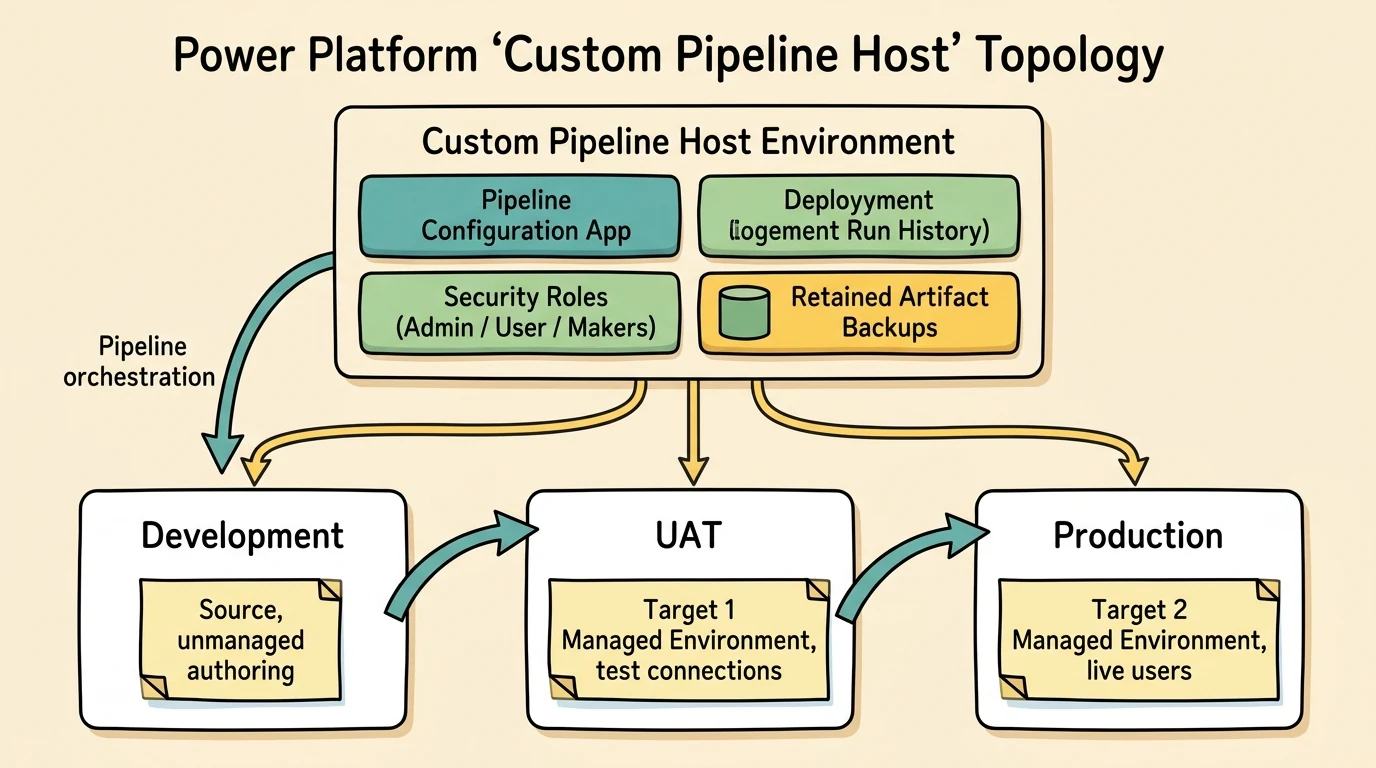
For a custom-host pipeline, account for a separate pipeline host as well. Microsoft recommends a dedicated production environment for the host, separate from development and deployment targets. It stores pipeline configuration, security, run history, and artifacts; it is not another agent-testing stage. The custom-host setup guide recommends four environments, while allowing configurations with as few as three.
Pipeline roles are not environment provisioning types
The pipeline configuration app classifies participating environments as Development Environment or Target Environment. These describe their roles in the pipeline, not their underlying Power Platform provisioning types.
Register the authoring source as Development Environment. Register UAT and production as Target Environment. A UAT environment remains a target even though the release subsequently advances to production. Microsoft documents these classifications in custom-host configuration.
This distinction matters because pipelines are initiated from the linked development environment. You do not open the managed solution in UAT and export it again to create the production release.
Understand the prerequisites before building the pipeline
For the custom-host approach, Microsoft’s setup documentation requires Dataverse databases in participating environments and Power Platform administrator or Dataverse System Administrator privileges to install the pipelines application.
Managed Environments requirements need careful wording:
- The pipeline host does not have to be a Managed Environment.
- Developer environments have a documented exception and can be used for development and testing with the developer plan.
- Plan ordinary UAT and production targets as Managed Environments.
- Premium-use licensing requirements apply to Managed Environments.
The pipeline overview describes these exceptions, while the custom-host guide states the target requirement more broadly. Do not interpret “development” in a pipeline record as automatically granting the exception for the Developer environment type.
The October 2026 enforcement change
Microsoft states that, starting in October 2026, administrators are notified when pipelines deploy to unmanaged targets. They have 30 days from notification to approve enabling Managed Environments, with one additional 30-day extension available per environment. After the allowed period, further pipeline deployments to that unmanaged target are blocked.
These checks do not disable solutions already deployed. Automatic conversion can be configured per host, but turning it off does not remove the target requirement. See Managed Environments enforcement for pipelines.
Confirm applicable licensing before enabling Managed Environments or automatic conversion for deployment targets.
Start with a custom solution and a deliberate publisher
Create the release container early rather than assembling it only when production is imminent.
A recommended setup sequence is:
- Select the intended development environment.
- Open the solution explorer in Copilot Studio or Power Apps.
- Create a custom unmanaged solution.
- Select an organizational publisher with a deliberate customization prefix.
- Set the custom solution as the preferred solution where appropriate.
- Create the agent and verify its solution association.
Microsoft documents custom-solution creation and preferred-solution selection in Copilot Studio solution management. Publisher fields and prefixes are covered in Create a solution.
The publisher is more than a display label. Its prefix helps avoid naming collisions, and component ownership affects managed-solution behavior. Choose it before creating metadata rather than expecting a later publisher change to rename existing components. See solution publisher concepts.
Creating the solution first is good discipline, not an absolute requirement. An existing agent can be added using Add existing > Agent > Agent. Microsoft’s agent export/import procedure explicitly supports this path.
If the creation interface shows an unexpected solution, verify the saved association through View solution or the agent settings. Refreshing a stale page may help inspection, but repeated refreshes are not a deployment mechanism or a documented requirement.
Include the dependency graph, not just the agent record
Seeing the agent in the solution explorer is not sufficient evidence that the release package is complete.
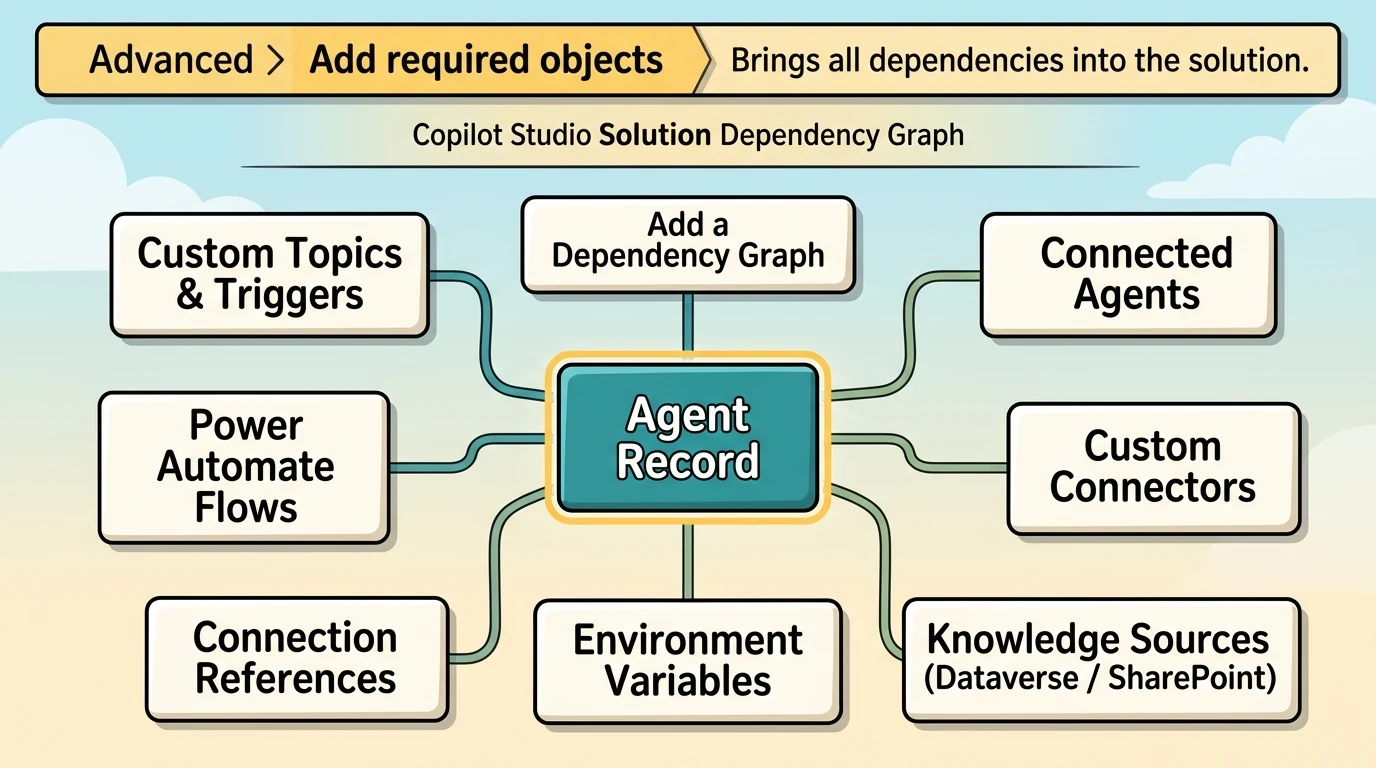
An agent can depend on topics, flows, tools, connection references, environment variables, knowledge configuration, and other agents. Which objects appear separately depends on how the agent and its resources were created or linked. Microsoft warns that not all components and properties are included automatically, including some custom topics and knowledge sources stored as separate resources or Dataverse tables. See agent solution limitations.
Use Add required objects, then inspect the result
Microsoft’s documented dependency-inclusion procedure is:
- Open the custom unmanaged solution.
- Locate the agent under Agents in the Objects pane.
- Select its three-dot menu.
- Select Advanced > Add required objects.
- Review the resulting component list.
Repeat dependency inclusion for flows and environment variables where needed. Add missing environment variables explicitly if they are not already present. These steps are documented in Add components to an agent in a custom solution.
Publishing the agent is not a substitute for this step. If only one object appears after authoring changes, do not assume another publish will collect everything. Check the solution membership and dependencies directly.
As a release-review recommendation, compare the package against the agent’s actual design:
- Are the required topics and flows represented?
- Are connector dependencies included or already installed in the target?
- Are the necessary environment-variable definitions present?
- Are linked agents available and correctly referenced after import?
- Do knowledge sources remain accessible under target permissions?
- Are file-backed resources present and usable after deployment?
Treat this as a validation checklist, not a promise that every resource category is automatically portable.
Respect connector ordering and authoring boundaries
Microsoft specifically instructs teams to import custom connectors first, then the connection references with the agent solution. This may require a prerequisite deployment before the main agent release. See custom connectors in agent solutions.
Also avoid deleting or editing unmanaged agent topics directly in the solution explorer while retaining the agent. Microsoft warns that this can cause export and import failures. Make topic changes through the normal Copilot Studio authoring experience. Removing an agent from a solution does not automatically remove its remaining components. See agent solution cautions.
Keep optional features out of the portability assumption
A demonstration might add public websites, an uploaded file, a SharePoint tool, a connected agent, memory, a skill, and Work IQ simply to show how the component list grows. That demonstrates packaging complexity, not an end-to-end functional implementation.
“Skill” also needs precision. Microsoft’s standard-harness ALM documentation distinguishes Azure Bot Service skills from agentic skills in the GitHub Copilot harness. Do not treat their configuration or portability as interchangeable. See the scope note in the export/import guide.
For Work IQ integration through the Model Context Protocol (MCP), the Copilot Studio-specific documentation still labels the integration preview and documents its own prerequisites. It does not establish a universal ALM guarantee that enabling Work IQ always creates exactly two portable components named “Work IQ Copilot MCP” and “Work IQ User MCP.” Treat such names as observations from a particular interface, not a release contract.
The broader Work IQ overview describes usage-based API access independently of Microsoft 365 Copilot licensing, while the Copilot Studio preview page describes a Microsoft 365 Copilot license prerequisite. Those are different integration contexts. Verify the specific feature path rather than transferring assumptions between them.
Develop unmanaged; deploy managed
Unmanaged solutions are the authoring source. Managed solutions are deployment artifacts for downstream environments.
An unmanaged solution can be exported as managed. That does not mean converting the development workspace into a managed solution and continuing to author there. An installed managed solution cannot itself be exported. Microsoft explains this distinction in managed and unmanaged solutions.
Power Platform pipelines deploy managed solutions and retain both managed and unmanaged exports in the host. They do not offer unmanaged deployment to targets. See pipeline deployment behavior.
My recommendation is to make release changes in development and send a new version through the pipeline. Editing downstream environments introduces a second source of behavior and makes it harder to explain what was actually tested.
Configure a custom host and the deployment stages
Power Platform supports both a tenant-wide platform host and administrator-configured custom hosts. A dedicated custom host is not mandatory for every pipeline, but it fits centrally governed deployment scenarios. See pipeline setup options.
1. Create or prepare the host
In the Power Platform admin center, use Deployments > New custom host. Alternatively, select an existing Dataverse environment and install Power Platform Pipelines through Resources > Dynamics 365 apps > Install app.
Install the application in the host only, not separately in development, UAT, and production. Then open the Deployment Pipeline Configuration model-driven app. Microsoft documents both installation paths in custom-host setup.
Keep the custom-host package updated. The setup FAQ explains how to check for updates under the host’s Dynamics 365 apps.
2. Register the environments
In the configuration app:
- Open Environments and select New.
- Enter a recognizable name.
- Select Development Environment for the source, or Target Environment for UAT and production.
- Enter the actual environment ID.
- Save and refresh the record.
- Confirm Validation Status = Success.
Repeat for each participating environment. These are the documented environment-registration steps.
An environment can be associated with only one host, although it can participate in multiple pipelines within that host. If it is already linked elsewhere, investigate that association before using Force Link: changing the host can remove makers’ access to pipelines in the previous host. See host association behavior.
3. Create the pipeline and order its stages
Create a pipeline record, link the development environment, and add the UAT and production deployment stages.
For UAT, leave Previous Deployment Stage blank. For production, select UAT as the previous stage. This is how the sequence is expressed; development is the linked source, not a previous deployment-stage record.
Microsoft currently documents a maximum of seven deployment stages per pipeline. Administrators can create multiple pipelines, but “any number of environments” should not be interpreted as unlimited stages in one pipeline. See stage configuration.
Separate pipeline access from deployment authority
Pipeline permissions live in the host, but they do not replace permissions in participating environments.
| Pipeline access | Purpose |
|---|---|
| Deployment Pipeline Administrator | Manage pipeline configuration and run pipelines within the host without requiring host System Administrator membership. |
| Deployment Pipeline User | Run pipelines shared with the user; not create, edit, or delete them. |
| Deployment Pipeline Makers team | Create and consume personal pipelines managed in the custom host. Shared-pipeline access may also require the user role. |
These distinctions and the Security Teams assignment interface are documented in pipeline access configuration.
For a standard deployment, makers also need source export and target import privileges. Share the pipeline record with the intended users or groups; assigning a role alone is not the complete sharing procedure.
Delegation is a separate configuration
Delegated deployment runs a stage as a service principal or pipeline stage owner rather than the requesting maker. The deploying identity owns the deployed solution objects. See delegated deployment setup.
Do not assume checking a delegation or predeployment box creates a working approval process. Additional approval automation is required, and delegated requests remain pending until approved. Stage-owner delegation cannot deploy solutions containing connection references for OAuth connections, a common token-based authorization mechanism. Choose the delegation model against the actual connector requirements, not just the convenience of its setup.
Run the release: validate configuration before deployment
From the linked development environment, open the custom unmanaged solution and select its pipeline.
Microsoft’s run-pipeline procedure follows this sequence:
- Select the first target stage, such as UAT.
- Choose to deploy now or schedule for later.
- Allow preflight validation to check dependencies and common import problems.
- Supply connection-reference mappings and environment-variable values when prompted.
- Review the summary and add deployment notes if useful.
- Select Deploy and monitor the run.
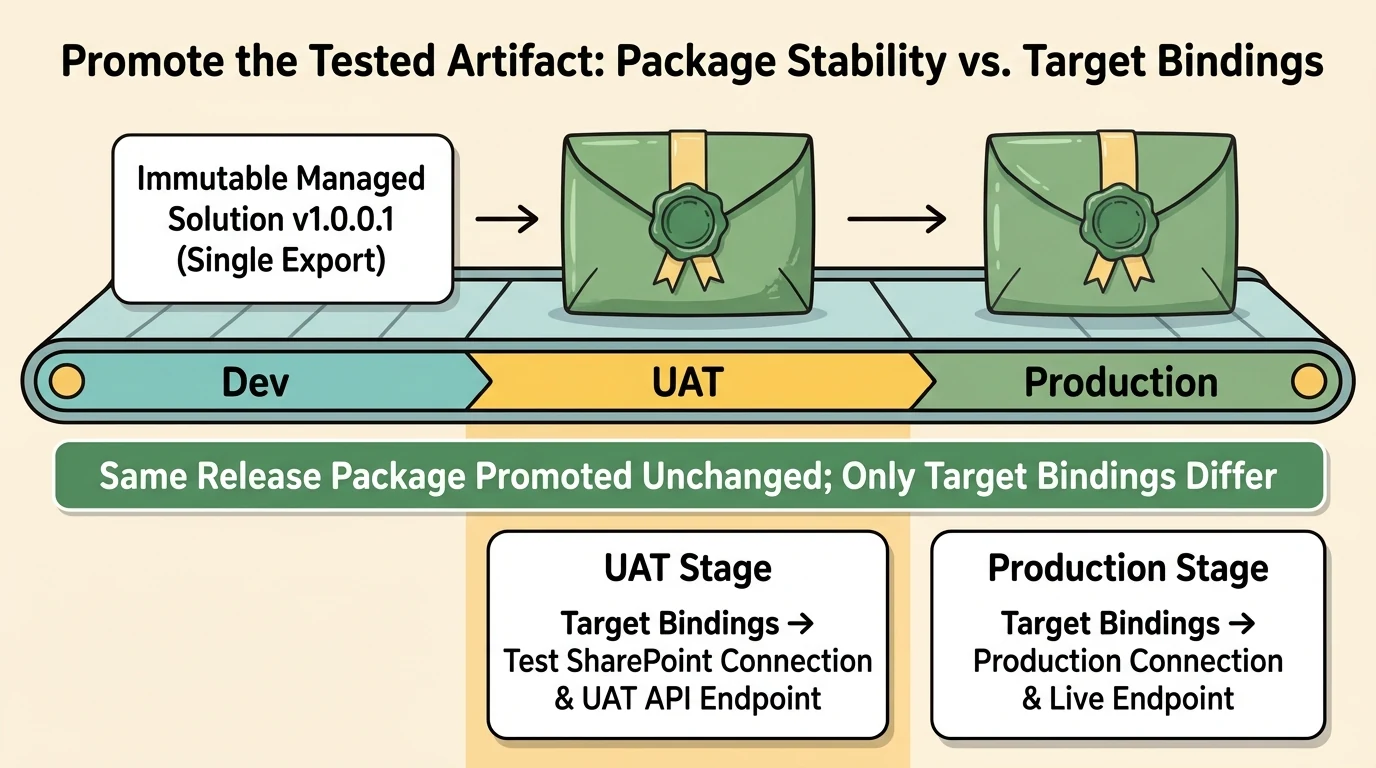
Keep the package stable; change the target bindings
A connection reference points solution components to an appropriate connection. An environment variable carries configuration that may differ between environments. Pipelines prompt for these settings before deployment and validate them. See pipeline configuration behavior.
For an illustrative support agent, the same release might use a UAT SharePoint connection and test endpoint in UAT, then a production connection and production endpoint in production. The logic stays the same; its bindings change.
A green connection indicator is useful, but my recommendation is to verify the selected identity and resource as well. An authenticated connection is not automatically the connection you intended to use.
Promote the tested artifact, not a fresh export
This is the most important pipeline behavior to understand.
Microsoft states that the solution is exported when the deployment request is submitted. Subsequent stages use that same artifact. The system does not re-export the development solution for production, and stages must be completed in order. See artifact preservation and stage sequencing.
Suppose an illustrative version 1.0.0.1 reaches UAT. A maker then edits development without changing the version. Promoting the existing release to production still deploys the artifact tested in UAT, not those later edits. Microsoft’s run-pipeline documentation explicitly describes this behavior.
“Move from UAT to production” is therefore shorthand for promoting the same release artifact to the next target. It is not a new export from UAT.
Target connections, environment variables, and deployment notes can differ by stage without changing that artifact. If UAT identifies a defect, fix it in development and start a new release through the required stages.
Complete the release in the target environment
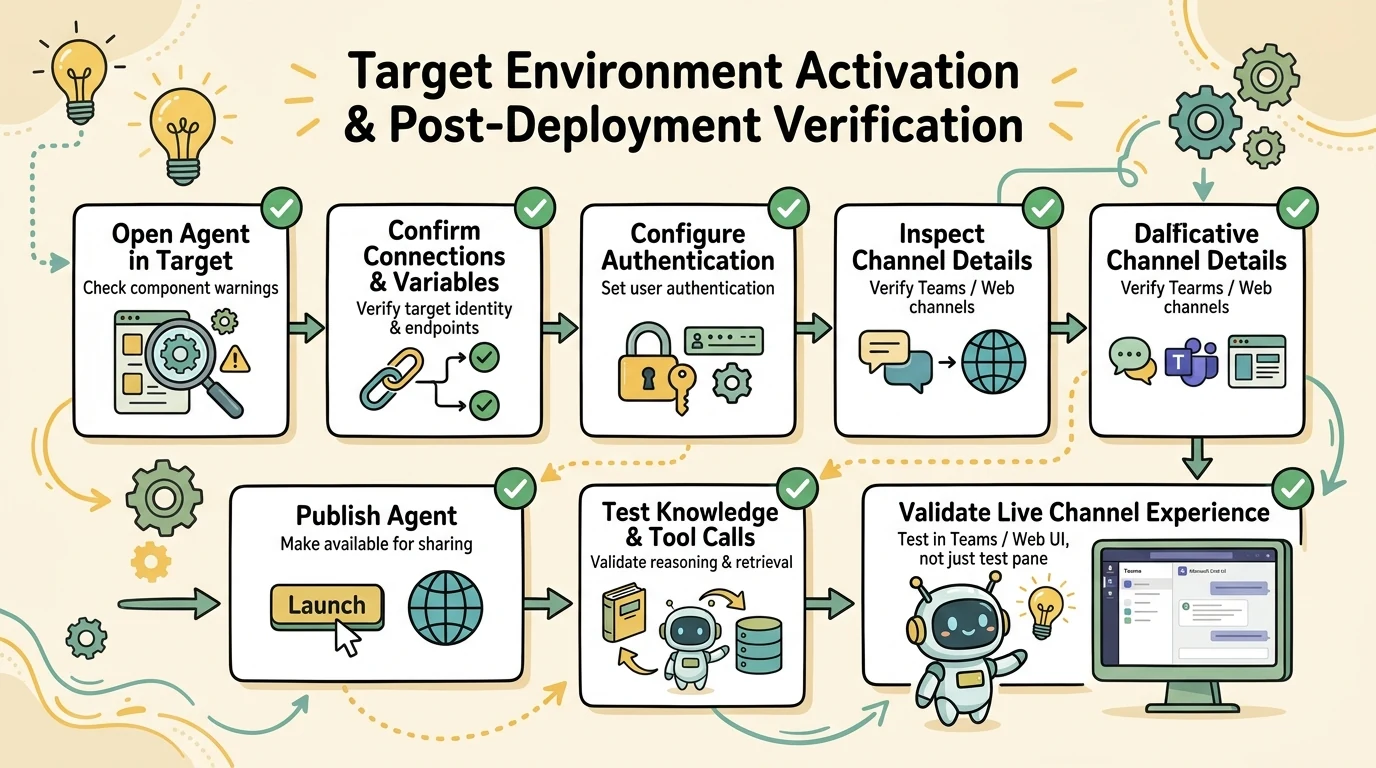
After import, Microsoft’s agent import procedure requires configuring user authentication again and publishing the imported agent before sharing it. It also warns that channel details and other properties may not transfer.
There are distinct operations here:
- Save: Persist authoring changes.
- Publish solution customizations: Activate changes for component types that require publication.
- Deploy the solution: Install the release package in a target.
- Publish the imported agent: Make the target agent available for sharing.
Pipelines do not automatically publish unmanaged customizations before export. Microsoft’s pipeline FAQ recommends publishing relevant objects as they are saved; Power Apps publishing guidance explains the component-level behavior.
As a recommended postdeployment check:
- Open the imported agent in the target.
- Review component availability and warnings.
- Confirm target connections and environment-variable values.
- Configure authentication and inspect channel configuration.
- Publish the agent.
- Test representative knowledge queries, tool calls, and linked-agent interactions.
- Validate the intended channel experience, not only the authoring test pane.
Automate these checks where supported, but keep their outcomes separate from the pipeline’s import status.
Use run history as release evidence
The solution’s Pipelines page shows activity for the selected solution and pipeline. The host’s configuration app provides a broader view across pipelines and solutions managed by that host.
Microsoft documents visibility into solution versions, initiators, validation results, errors, deployment settings, and artifact backups in custom-host monitoring. The admin deployment page also exposes start and end times, source, target, status, solution, and version. Its data is selected per host, not aggregated across all hosts.
When a release fails, inspect the stage run rather than repeatedly refreshing the agent page. When import succeeds but behavior fails, shift the investigation to target configuration, publishing, and functional validation.
Do not turn a demonstration’s five-minute deployment into a performance promise. Use the recorded timestamps for the actual run and keep installation duration separate from the time needed to approve, configure, publish, and test the release.
Retained artifacts help recovery, but are not source control
Pipelines retain managed and unmanaged solution exports. Administrators can download retained artifacts, and a host setting can allow makers to import shared solution deployments. See pipeline backups and shared deployment imports.
Previous-version redeployment is available when its pipeline setting is enabled. Treat it as solution-version recovery, not an environment-wide undo: ordinary Dataverse business data is outside the solution package.
Keep source control as a separate ALM concern. Microsoft recommends retaining unmanaged source in source control and supports extending pipelines to integrate with other continuous integration and continuous delivery tools. Artifact history answers “what was deployed?” Source control helps answer “what changed, and why?” See solution concepts and pipeline extensibility.
Protect the host itself. Deleting a custom host deletes its pipelines and run data, as the custom-host guide warns.
Handle geography explicitly
Cross-region deployment is supported only when Cross-Geo Solution Deployments is enabled in the host. Without it, the host and associated environments must share the same geographic location. Pipelines do not support cross-tenant deployment; Microsoft recommends Azure DevOps or GitHub for that scenario. See pipeline geographic and tenant limits.
The admin deployment guidance also warns that enabling cross-region deployment allows data to be shared across geographic regions within the tenant. Review that setting as an architectural decision, not merely a switch that makes a validation error disappear.
Conclusion: release readiness is more than transport
The useful unit of Copilot Studio ALM is not the visible agent record. It is a versioned solution with understood dependencies, explicit target bindings, and a verified runtime state.
Build in a custom unmanaged solution. Include and inspect the dependencies. Configure stages that serve real validation purposes. Promote the same managed artifact through those stages. Then complete authentication, publishing, and functional checks in each target.
The goal is not simply to make deployment succeed. It is to know exactly what reached production, why that version was approved, and whether the agent works where its users actually encounter it.
Read next