Mastering Copilot Studio's New Workflow Variables

Writer
Microsoft Copilot Studio has introduced a dedicated, modern Workflow interface that sits alongside the classic Agent Flow experience. This redesigned canvas transforms how you manage logic, state, and data — and the single biggest quality-of-life change is how it handles variables.
In legacy cloud flows, every variable meant another block on the canvas. The new interface collapses all of that into one unified Variable Container, replacing a cluttered multi-block architecture with a clean, low-code node.
This guide does two things. First, it tours the interface so you know what each control does. Then — because the best way to understand the Variable Container is to build one — we finish with a step-by-step walkthrough you can reproduce in your own tenant in about ten minutes.
Before you start. The new Workflow interface is a preview feature (rolled out in the 2026 release wave). Make sure you have a Copilot Studio environment with preview features enabled, and note that Workflows run on Copilot Studio’s credit-based consumption — they are not the same as standard Power Automate cloud flow licensing. If you don’t see “Workflows” yet, check with your admin that preview capabilities are turned on for your environment.
Where to find it: Sign in at copilotstudio.microsoft.com, open (or create) an agent, then go to the Flows / Workflows area in the left navigation and choose + New workflow. You’ll land on the rich visual canvas described below.
1. The Canvas: Modern UI & Navigation Controls
Enterprise automation flows get big, fast — and a flow you can’t read is a flow you can’t maintain. The canvas ships with a set of navigation utilities to keep things legible:
- Zoom In / Zoom Out: Scale the canvas to inspect a single logic branch or pull back to see the whole architecture.
- Fit to View: Re-centers and rescales the entire graph to your viewport in one click — your reflex whenever you feel lost.
- Tidy Up: Auto-aligns nodes and straightens connectors to clean up a messy canvas.
- Layout Swapping (Vertical ↔ Horizontal): Prefer the classic top-down Power Automate feel? Switch to a vertical layout. Like seeing branches spread left-to-right? Use horizontal. It’s purely a viewing preference and doesn’t change your logic.
One other change you’ll notice immediately: clicking a node opens its settings in a right-hand configuration panel instead of a pop-up that hides the rest of your flow. Your overall logic stays visible while you edit a single step.
Try it first: Drop two or three nodes anywhere, drag them out of alignment on purpose, then hit Tidy Up and Fit to View back-to-back. Building the muscle memory for these two buttons early will save you a lot of scrolling later.
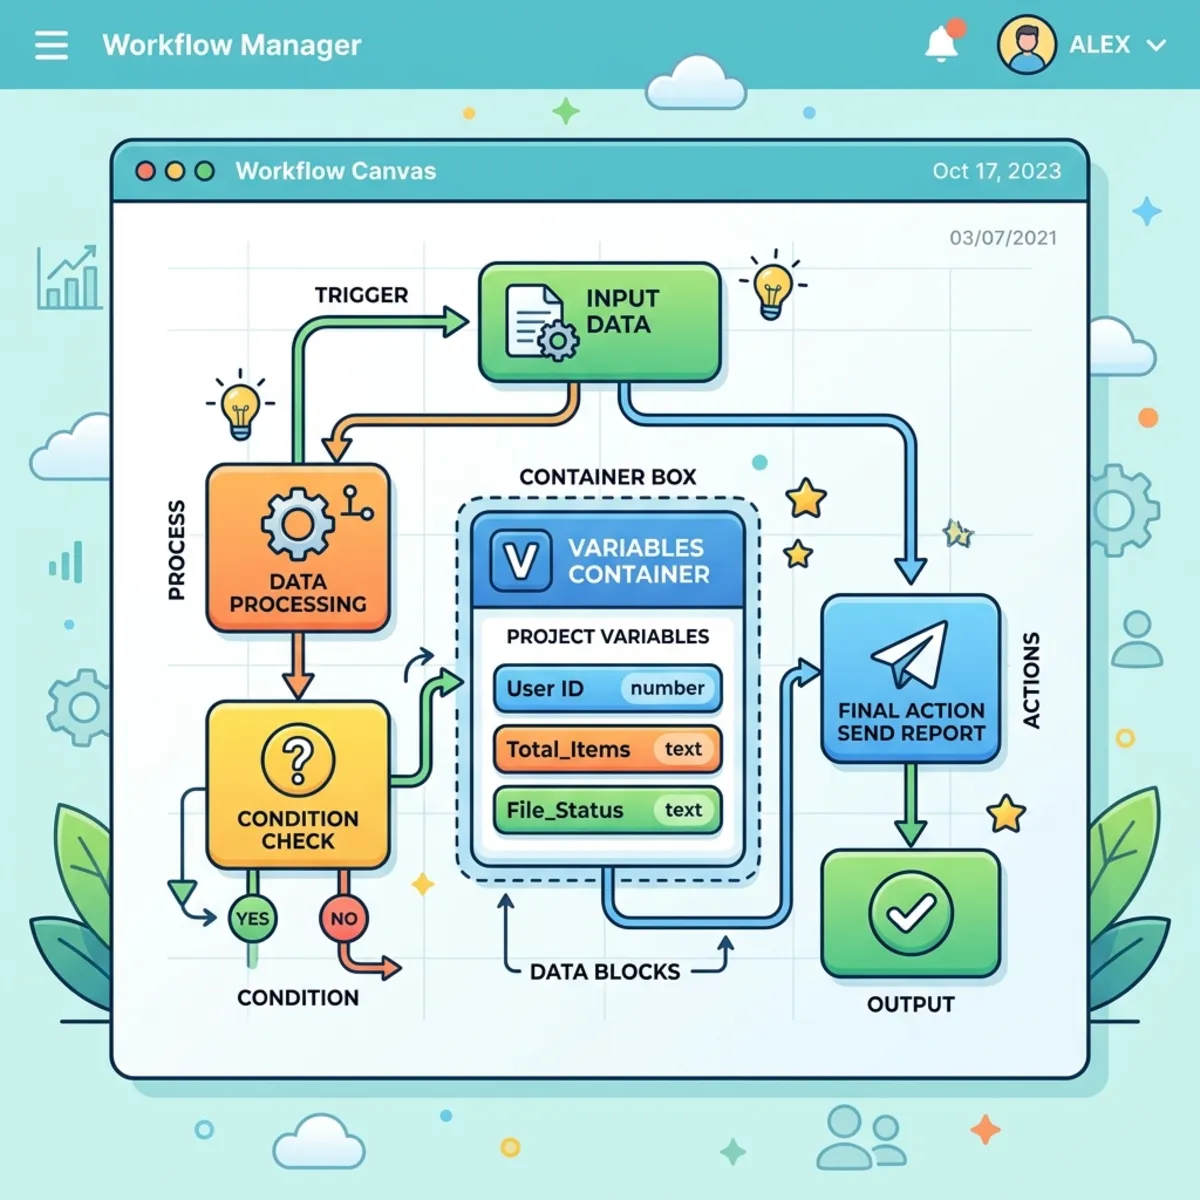
2. De-cluttering the Canvas: The Variable Container Block
In traditional Power Automate cloud flows, declaring and manipulating variables is notorious for creating layout clutter. A flow that needs 15 variables means 15 separate Initialize Variable blocks. Update those values later and you add 15 more Set Variable blocks — a tangled canvas that makes debugging painful.
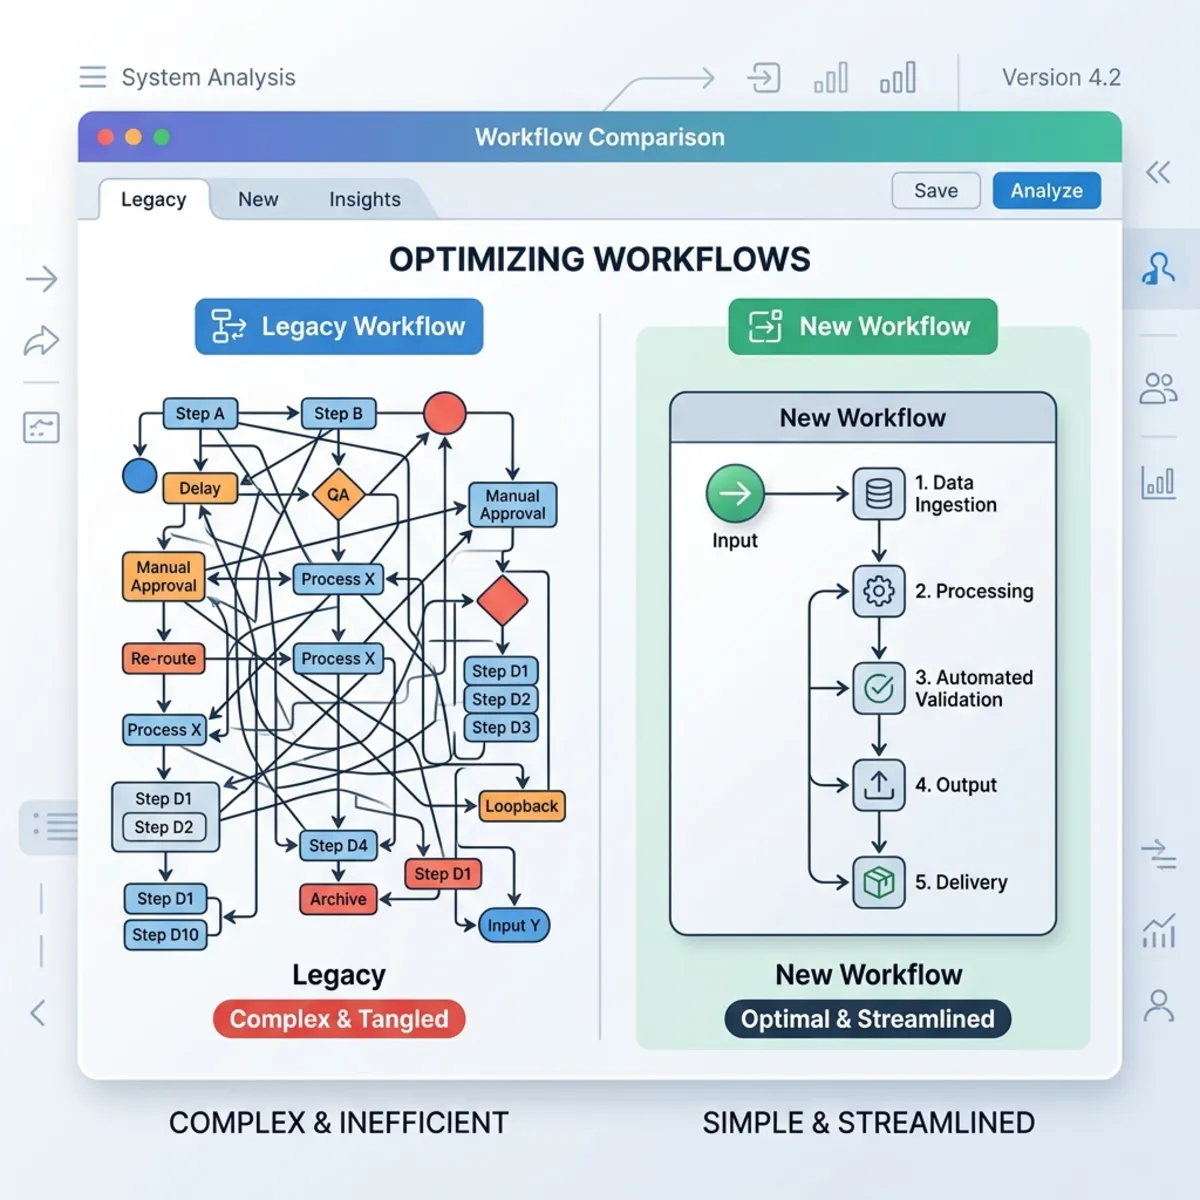
The new interface resolves this by turning the variable block into a Variable Container. Inside a single visual node you can handle initialization, value assignments, and complex operations across dozens of variables at once. Even with 50 assignments running complex operations, the canvas still shows just one clean block.
How the container is structured: a container holds an ordered list of operations. Each row is one action — initialize a variable, set it, increment it, append to it — and they run top-to-bottom. Because order matters, you can initialize X on row 1 and immediately increment it on row 2 within the same node.
3. Supported Data Types and Operator Syntaxes
The container supports a comprehensive set of data types. Picking a type dynamically exposes the operations that make sense for it, right inside the block:
| Data Type | Description & Example Input | Native Operations |
|---|---|---|
| Integer | Whole numbers (e.g., 55, 100) | Set, Increment, Decrement |
| Float | Decimal values (e.g., 1.2, 19.99) | Set, arithmetic (add / subtract / multiply / divide via expressions) |
| String | Text (e.g., "Hello") | Set, Append to string |
| Boolean | Logical flags (true / false) | Set, toggle |
| Array | Ordered lists (e.g., [1, 2, 3, 4]) | Set, append / insert items |
| Object | JSON key-value maps | Set, set individual property/field |
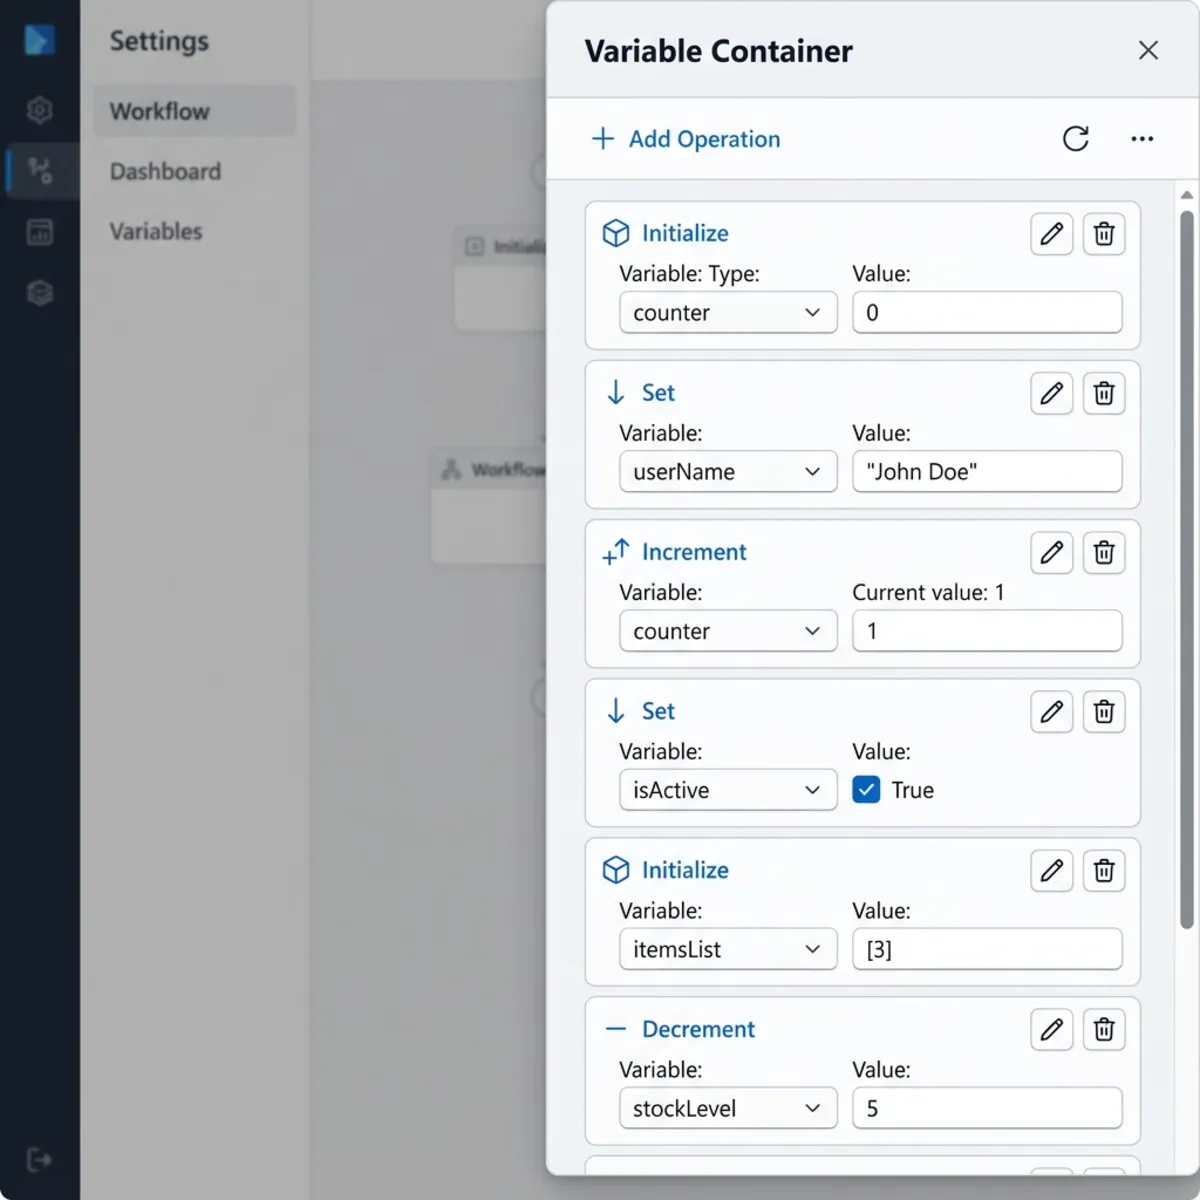
Adding an operation, step by step
- Open the Variable Container node so its configuration panel appears.
- Click + Add (or Add an operation) to create a new row.
- Choose the operation — for a brand-new variable, pick Initialize.
- Give the variable a name, select its data type, and provide an initial value.
- Add another row to act on it (e.g., Increment the integer you just created). The variable you defined above is now selectable in the dropdown.
Array & Object formatting tips
When you type arrays or objects directly into a value field, you must use valid JSON or you’ll hit a validation error:
- Arrays must be wrapped in square brackets. Typing
apple, mangotriggers an error because the platform evaluates it as a single string. Use proper notation instead:["apple", "mango"]. - Objects must follow JSON — curly braces, quoted keys, and value mappings:
Quick validation trick: If you’re unsure whether your JSON is well-formed, paste it into the Code View (Section 4) — malformed JSON shows up immediately, and the Health Center will flag it before you can save.
4. Advanced Block Management, Code View, and Scope Reuse
Maximize for real-estate optimization. When a container grows large, the configuration panel can feel cramped. Click Expand on the node to maximize it to full screen, giving you room to chain operations without constant scrolling.
Backend JSON inspection via Code View. Prefer to read or edit configurations as text? Click Code View to expose the clean JSON behind your variables and actions. While you’re in there:
- Turn on Word Wrap to stop long expressions from clipping off-screen.
- Copy the whole block to a text editor for diffing or documentation.
- Hold
Ctrl+ mouse scroll to zoom into the syntax for precise debugging.
Node duplication and scope conflicts. Right-click any node for the context menu (Cut, Copy, Delete, Duplicate). Duplication is great for reuse — for example, copy a fully configured Sales Block Variable container and rename the copy to IT Block Variable. But there’s a catch worth understanding before you do it.
Critical developer warning — variables share one scope. Variables in a workflow live in a single shared scope, so you cannot initialize the same variable name twice. If you duplicate a container that initializes X and Y, the platform instantly flags an error because X and Y already exist.
How to fix it: in the duplicated block, rename the initialized variables (e.g., X → X1, Y → Y1). When you change a name at the Initialize step, the reference dropdown lets you remap every chained operation in that container to the new name in one pass — so you don’t have to hand-edit each row.
5. Built-in Error Resolution: The Health Center
The Workflow interface includes a real-time validation engine — the Health Center — in a collapsible tray at the bottom of the canvas.
Instead of letting problems surface at runtime, it lists compile-time issues as you build: dangling connections from deleted nodes, references to variables that no longer exist in the backend JSON, orphaned branches, and similar structural errors. Click any item and it jumps you straight to the offending node and parameter, so you can fix issues before saving and deploying.
Practical habit: treat the Health Center like a build console. Keep it open while you work and aim to get it to zero entries before you ever hit Test — most “why won’t my flow run” questions are already answered there.
6. Dynamic Content, Triggers, and Copilot AI Expressions
Trigger customization. Every workflow begins with a customizable Start trigger. The interface supports several entry-point types, including:
- Manual — a button or direct user input (great for testing).
- Recurrence — scheduled runs (daily, hourly, etc.).
- Connector-based — events in external apps (a SharePoint file upload, a new Outlook email).
- HTTP Request — a webhook receiver for custom REST integrations.
- Agent call — lets a Copilot agent invoke the workflow dynamically.
Inserting dynamic content with /. To pass data out of a trigger or an upstream action into your Variable Container, type a forward slash (/) in any value field. This opens the Insert dynamic content menu, where you select an upstream output — for example, the User Email pulled from the triggering request headers. (Despite the slash gesture, this isn’t a “trigger” — it’s how you wire outputs from one step into the next.)
AI-assisted expression generation. Need to extract a value from a nested payload but unsure of the exact syntax? Let Copilot write it:
- Click Ask Copilot to generate an expression inside the variable input.
- Describe what you want in plain language, e.g. “Get the user email from trigger”.
- Copilot returns the backend query syntax, such as:
Code
- Click Insert to drop it cleanly into your action. Toggle Expression Mode any time you want to refine it by hand.
When to reach for / vs. Ask Copilot: Use / (dynamic content) when the
value you want already appears as a named output in the menu — it’s faster and
less error-prone. Reach for Ask Copilot only when you need to dig into a
nested or non-obvious path the picker doesn’t surface directly.
7. Runtime Testing and Monitoring Dashboards
Once your canvas is saved and the Health Center is clean, run a live execution with the Test button.
The platform keeps a run history dashboard that tracks every execution. Open any run to drill into:
- Run metadata — execution duration, the unique Run ID, and the global Workflow ID.
- Granular variable inspection — open an executed container to see its exact Input, Output, and Body. This is where you confirm what value actually entered a block, how each expression resolved, and the final state of every string, integer, array, and object at runtime.
How to debug a failed run: start at the run history, open the failed execution, and look for the node marked with the error. Expand its Input/Output to compare what you expected to pass in against what actually arrived — nine times out of ten the mismatch (an empty dynamic-content value, a string where you expected a number) is visible right there.
8. Putting It All Together: Build Your First Variable Container
Theory is fine, but the container clicks once you’ve built one. Here’s a self-contained example that uses no external connectors — you can run it entirely with a manual trigger. We’ll calculate a discounted order total.
Goal: take a customer name, quantity, and unit price as inputs; compute a subtotal and a discounted total; and return a friendly confirmation string.
- Create the workflow. New workflow → set the trigger to Manual. Add three inputs:
CustomerName(Text),Quantity(Number), andUnitPrice(Number). - Add a Variable Container and rename it
Order Math. - Initialize the inputs into variables (one row each):
- Init
Subtotal(Float). For the value, click Ask Copilot to generate an expression and prompt “multiply Quantity by UnitPrice from the trigger”. Insert the generated expression (it will look likemul(...Quantity, ...UnitPrice)). - Init
Discount(Float) =0.1(a flat 10%). - Init
Total(Float). Set it with an expression that subtracts the discount, e.g. “Subtotal minus Subtotal times Discount” via Ask Copilot.
- Init
- Build the confirmation message:
- Init
Message(String) ="Order confirmed for ". - Add an Append to string row and type
/to insert theCustomerNamedynamic content, then append". Total due: "and theTotalvalue.
- Init
- Check the Health Center. Resolve anything it flags until the tray is empty.
- Test. Click Test, enter sample values (e.g.,
Acme,3,19.99), and run. - Verify in monitoring. Open the run, expand the
Order Mathcontainer, and confirmSubtotal = 59.97,Total = 53.97, and thatMessagereads as expected.
That single node just did the work that would have taken six or seven separate blocks in a classic cloud flow — and everything you needed to verify it was one click away in the run history.
Key Takeaways
- The Variable Container replaces stacks of Initialize/Set Variable blocks with one ordered, readable node — your canvas stays clean no matter how many variables you manage.
- Order matters inside a container: rows execute top-to-bottom, so you can initialize and operate on a variable in the same block.
- Variables share one scope — never initialize the same name twice; rename on duplication.
- Use the Health Center as a build console and get it to zero before testing.
- Let Ask Copilot write nested expressions for you, and lean on Insert dynamic content (
/) for everything the picker already exposes. - The run history is your debugger — Input/Output/Body inspection answers most “why did this happen” questions.
Read next